Hello everyone! As I said in my previous post about the toad in ink, I wanted to try and do some ink drawings in the month of October for what’s called “Inktober”. It’s a challenge that artists do to try and create ink artworks maybe everyday, but I knew I would never be able to do that!
So I did get this little drawing of the “Mossy Fairy House” done using inks and I did a bunch of fun cat cartoons. I’ll share them next time I think, there’s not many but it was a lot of fun! This Fairy House was a good practice for me as I did it entirely with brushes, no ink pen. I’ll show you from start to finish the stages it went through, it’s more interesting and educational in my opinion.
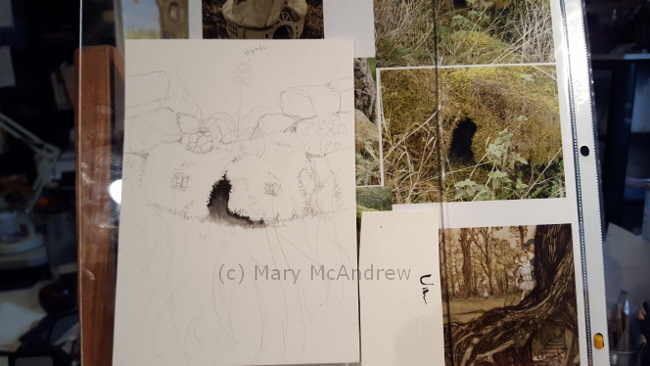
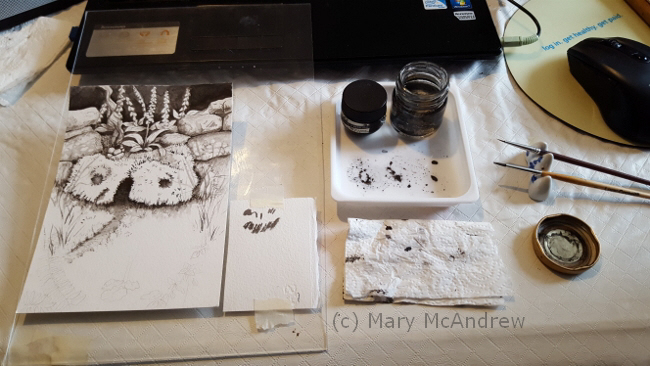
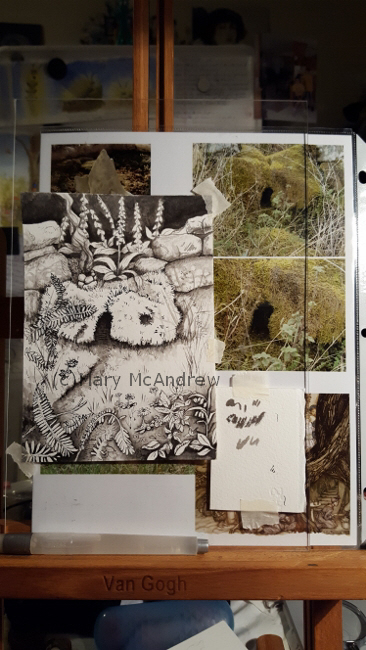
This shows the very beginning next to the reference photo.
I sketched my drawing out on a 5×7″ piece of bristol board that I taped to a piece of clear plexiglas. I like using this a lot in the studio, I use it like this and it’s easy to lay on top of reference materials or you can put a lamp behind when you need to trace from your sketch. I also put a piece in front of current illustrations that are leaning behind my easel on the table, don’t want any paint splashes on them now do we?
Anyways, the reference photo is one I shot years ago while hiking in the woods near our village, there is NO shortage of luscious moss growing here in England! It was growing on some rocks that had fallen down ages ago and to me, well it just looked like a Fairy house! What would you think if you saw it?
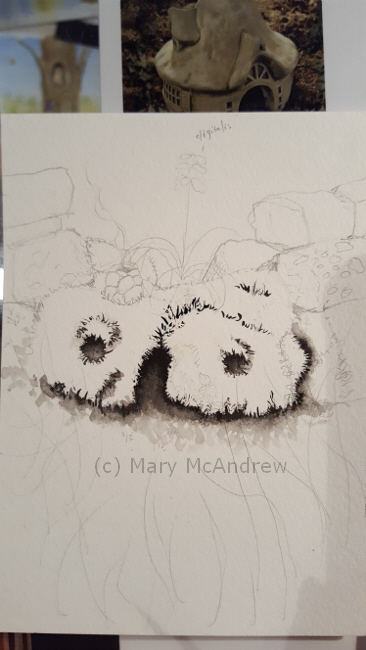
Starting to brush ink in, deciding how to make it look more ‘house’ like.
Then I started to brush ink in, trying to decide where to go with this, because the whole thing has got to come from my imagination. I added two ‘windows’ but never felt right about them. You can see I sketched rocks behind and added a chimney.
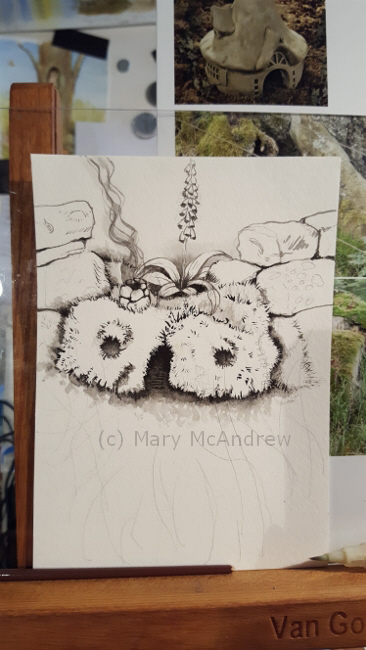
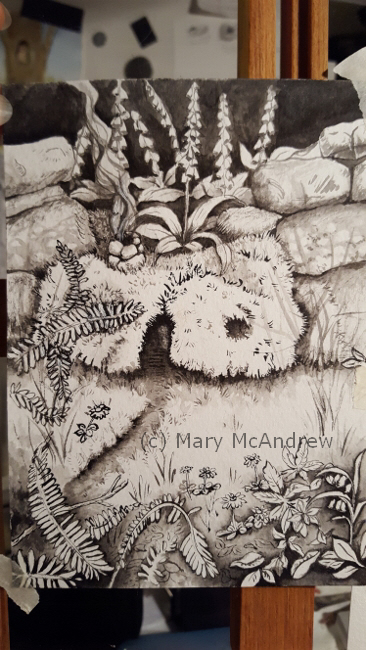
More ink as I pick out the rocks of the wall and put some smoke from the chimney.
More ink goes on as I pick out the rocks of the wall and put some smoke from the chimney. I also add one Digitalis or Foxglove flower behind. This grows commonly here and I love it, so do the bees!
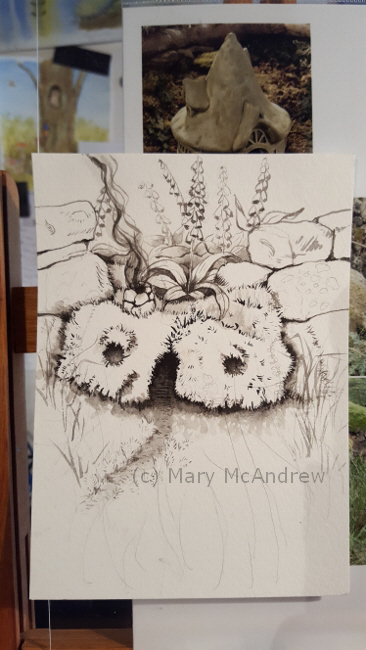
I add more flowers and the path to the Fairy House.
Now I’m adding more flowers behind to fill it out (or fill it in however you want to look at it!), and I start to make a path lightly in grey wash. I also flick in some simple grass to start to set a scene, thinking all the time, “what will I put in the foreground?”. I would like to make it a nice illustration and add a fairy but nothing was hitting me.
I next do a bit on the stones on my mossy fairy house.
Then I start to add washes to the stones of the wall. This was fun because I got to look back through my reference photos of stone walls, which inevitably takes me MUCH longer than it should because I end up thinking about all the different walks it took to get all those photos! Actually more than that, it’s seeing so many photos of things I’d love to paint and this distracts me like crazy! Haha…oh well back to little mossy fairy house!
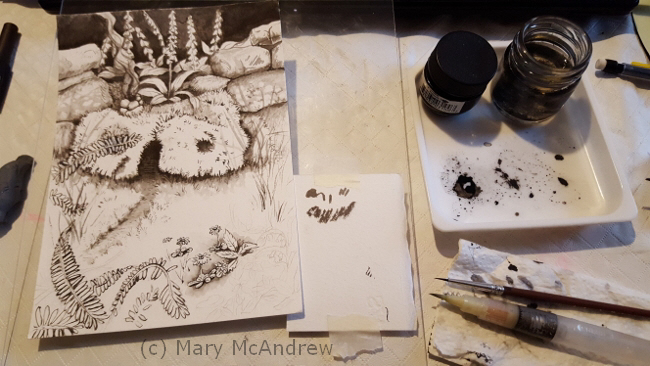
Now I’ve set up in front of my laptop so I could look for reference photos I’ve saved.
This photo shows I’ve moved off the easel, I’m done with that little reference photo and am looking up reference photos on my laptop to get inspired for the greenery in front. You can see how I’ve put my ink out, this is a little jar of Speedball Acrylic Ink, next to it is a small jar of water and they are sitting in a plastic paint mixing tray. The ink is permanent so I know I was taking a chance on permanently staining the tray, but it’s ok, I’ll use it for ink now. My brushes are resting on a tiny paintbrush stand I got years ago with a set of chinese brushes and ink. I have a small scrap of paper between the art and the ink, this is for testing marks etc. It kind of looks like I made a Jack O’Lantern face doesn’t it?
Now I add more ferns and flowers to the fairy house.
Ok, so the way the windows looked like two stark dots was bugging me, enter my husband. I like asking him his opinion as he has a sharp eye and doesn’t hold back on opinions! (though sometimes not what I want to hear!). He right away pointed out he didn’t like the windows, they looked too symmetrical, yes, that’s it, they had to be changed! It was nearly impossible to rub out or lift the black ink so I resort to illustrative techniques….out comes the white gel pen! I drew in pencil first how I wanted the fern to go and as you can see I added more in the foreground too. I drew on each leaf with the white pen to make it show, perhaps gouache would have worked well but it’s so tiny I opted for the pen.
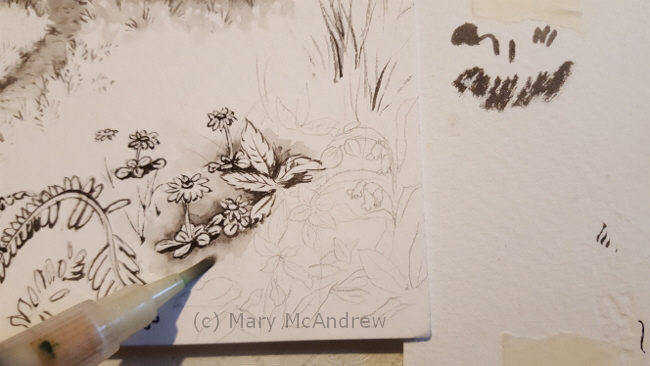
Here’s a close up showing my waterbrush used to create a wash of ink around things.
You can see I have my waterbrush out now, this is great for making the soft shadows around the plants. I shot a video clip with my cell phone showing a bit of this. Next time I’ll try and set it up on a holder – tripod or something. I first paint the outline of the plant, then you can either let it dry and go back to it or try to quickly brush along the edge to draw the ink out. I usually like to get the drawing done first so I can think about where I want the ink wash shadows to go all together.
I was able to upload the clip to my YouTube channel, click here if you want to check it out! If anyone knows of some free program that compresses your videos please let me know in the comments, I have an awful time uploading videos.
Now we’re back on the easel, working on those plants!
Now we’re back at the easel and I’m working on adding more ferns, flowers and details in the foreground.
Almost finished!
Well we’re almost finished now, I lift a light patch inside the doorway, I really wanted to add something but felt the pressure of wanting to be done too. I’ve left a ‘free’ area on the grass in front of the Fairy House in case I come back to it later with a little fairy or creature. Something that bothered me about the drawing too is how I added so much dark under the house and it looked disconnected from the ground too much, do you know what I mean? So I tied it down a bit by adding grass blades with the help of the white pen and drawing grass with my ink.
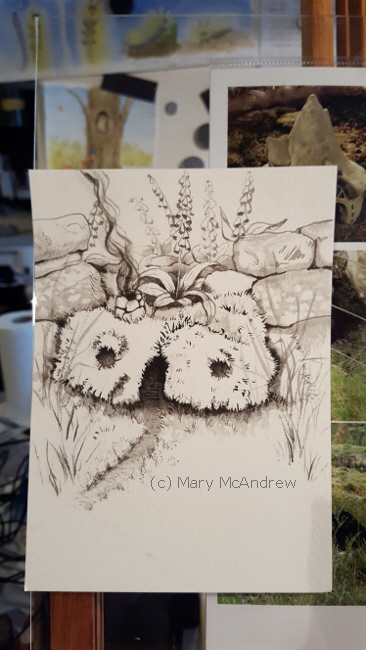
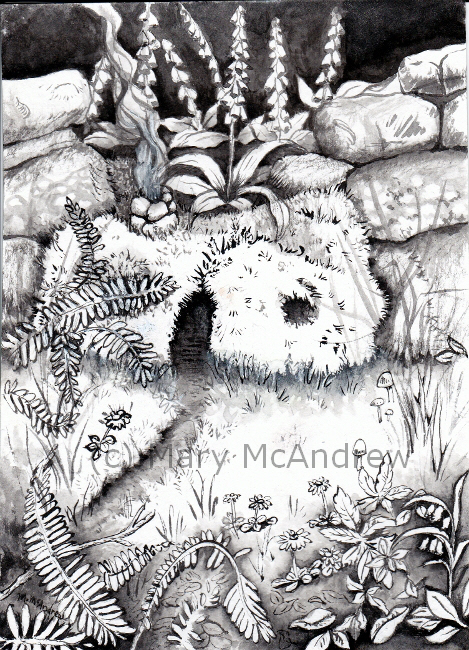
And it’s finished!
Here’s the final drawing finished. It came out nicely I think, mostly I’m pleased with doing something that looks a bit different for my style. Adding the black background and darkness in the foreground I find to be exciting looking and graphic. I’m not happy about the smoke from the chimney and could have gone back with a wash of white gouache, but I really was trying to push myself to just use ink. Someday maybe a fairy will find it’s way in here, but that will probably be if I do another version of it. I was ready to say it’s done and get onto the next thing! I’ll share that next, some fun little cat cartoon drawings inspired by illustrator Edward Gorey!
I hope you enjoyed seeing the steps to this little ink drawing, please leave me a comment or any questions below. Cheers!
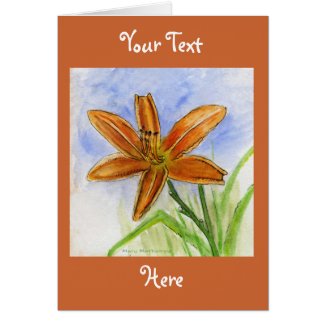
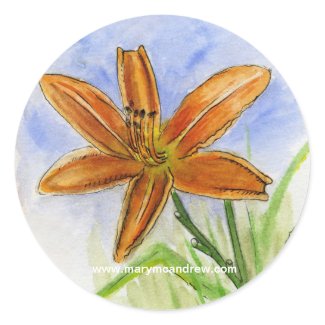
This will be one of the shortest blog posts I’ve done in ages! I just did this little sketch the other day to test out some paper and new kit supplies. I stood to paint in front of the row of Day Lilies and it wasn’t easy. The ‘no see’ums and the ‘see um’s’ were all biting me and started to make me miserable! Oh the joys of painting outdoors! Anyhow, the paper proved to be too thin and cheap so that won’t be going into my sketch journal.
After I got as much done as I could, I retreated to the shade and just outlined with a permanent ink pen to tidy it up. It looked a LOT better after doing this! Then later that night I saw my little kit of metallic watercolor paints and thought, ‘what the heck?’ so I brushed some on and it looked nice. The border is just the permanent ink pen then I loosely brushed on some metallic paint.
Well folks that’s it! Told you it was a short post, haha. More bug sketches and paintings coming real soon! Enjoy the links below to my shop!
(if you are viewing this from your email subscription, please visit my blog on the actual website to see the video and links properly)
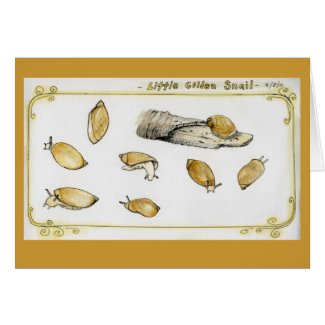
Today I went for a walk with Ginger. We ventured forth out into the wet lanes and fields, the mud sucking at our feet, water swirling as we waded. Not all my land is wet mind you, but this time of year it certainly is in some areas. I start my post off today with my drawings of the little snail I met while out walking, because I knew you’d be curious to see him.
Little Golden Snail Sketches
I did these studies actually back at my studio while looking at him under a magnifying glass. I did some while in the field (you’ll see below) but it was so small it was hard to really get a good look at him while I sat on a log! So he came home for a visit. I first lightly sketched him with pencil then drew with a permanent ink pen and then watercolor on that. After I drew the swirly curly border I drew over it with one watercolor pencil then just dragged a wet waterbrush over all of it to soften it and make the color bleed out a bit.
Now back to our walk.
Secret Circle Lane
This is “Secret Circle Lane”, as wet as it always is in springtime; (click it for high res. view in my shop) how pretty reflecting the sky like that! Ginger and I crept quietly along through this water because I heard an interesting call from some kind of frog along with the zillions of peepers that were singing.
Here’s a short video clip I shot while standing in the water, just to let you hear the sound of the Peepers calling.
my boots
Ah yes, the trusty boots! Can’t go anywhere without these mud boots or “Wellies”. Well these boots weren’t made for “walkin” they were made for “sloshin”!! I did see some interesting little critters in the water before our feet disturbed it, some snails and a few water beetles.
me
Oh, and there’s me…had to show you my favorite hat of all time and my Dad’s hunting coat! The hat I bought in England at a farm supply shop, where they sell the expensive horsey equipment and clothes. Well it WAS expensive too, BUT well worth ever penny! It’s waterproof, lined for warmth, has a flap that drops down over your ears and makes it fit your head like a helmet and has an elastic cord that goes under your chin for high winds. When the wind blew hard on the high hills of Northumberland, my wonderful hat stayed put!! The other nifty thing is it has a little button on the brim you click and you get two settings of led lights! High power beams!! I’m telling you we’ve used it to find our way on paths past dusk and it’s great for visiting old castle ruins because you can point your beam into dark places that you wouldn’t have seen before. I should get paid money to promote this hat!
And the wonderful old Woolrich hunting coat my dad gave me so I love it. He used to put it on when going out hunting, I still remember seeing him in the kitchen with the pants on with bright red suspenders and laughing playing like he was Santa! It is covered with pockets and has a special pocket at the back for carrying your ‘game’ home in. I have been known to carry sketchbooks there and always keep a spare kitchen size garbage bag for sitting on wet ground.
Crocuses in Aspen Hall
I told you before that we planted flowers in “Aspen Hall”, here’s two little crocuses I wanted to sketch. Click to see a note card of it where you can zoom in and see it bigger.
golden snail
I love the close up pictures of this pretty little golden snail. I spotted him on the ground amongst the leaf litter, but in the sun he glistened like gold. I took my tiny Olympus camera on the macro setting and shot this picture through a close up part of my magnifying glass! It really works at getting a little closer. Click on the pictures to view note cards that you can view close up.
golde snail pointy end up!
Here’s another shot of him, I love the form of the shell twisting up like that.
Studying the snail closely for sketches
Now this picture is important because it shows you how tiny he was and when you need reading glasses to see things better, it doesn’t help. The other thing that made it difficult to draw him in the field was sitting on one little log made my back hurt terribly so I was not comfortable. I wrote my notes and did some little sketches anyways.
golden snail peeking at me
Another great shot, I love the patterns in the shell that the sunlight catches. And notice the subtle color that runs up through those eye stalks? I notice how well it matches the dead stick he was crawling on.
My Journal page
Here’s my actual journal page from my time sitting in “Aspen Hall”, go ahead and click it to read it.
Tiny Golden Snail with metallic gold watercolor paint added.
Now I had a little more fun with the snail studies I did by using some metallic watercolor paint on them. I took some pictures of the snail paintings tipped at an angle to catch the sun and really show the metallic watercolor paint I added on top. It was a lot of fun using it and really made it look like the snail did, it sparkled in the sun!
Golden Snails in watercolor with gold metallic watercolor over.
And one more shot showing the glitter in the full sun.
I hope you enjoyed our walk today and you didn’t even have to get your feet wet! 😉 Don’t forget to visit my SHOP by clicking the pictures above to see note cards of the little golden snail or the landscape photos in this post.
Here’s a note card using the watercolor studies:
Speaking of snails I’m honored to say there’s a wonderful blog written by two talented women one of which was inspired by my posts about the snail I found and did studies of while I was in England! Have a look here: “The Dao of Doing”
Though I went for this walk a month ago, I need to catch up on posting my sketches from all my walks so you can see where I’ve been. This walk started at the Edlingham Church from the 11thC and Edlingham Castle.
Edlingham church and castle quick sketch
As I noted on my page, it was a gorgeous, sunny day. I started by walking past the old church and as I stood in the parking lot near it, I sketched using my Derwent Inktense “Ink Black” watercolor pencil. I then used my waterbrush to make washes using the pencil lines. You can add more color or value by touching the tip of your pencil with the waterbrush and adding it to the already damp paper. If you re-draw on the damp paper the pencil will make a very strong line and be harder to blend. Since I don’t have use of a scanner here, I photographed my pages and then brightened them, the picture here looks a bit more contrasty than the real one.
The sketch of the castle at the bottom of the page (shown above) is started with the same Inktense pencil then later colored with watercolors and watercolor pencils. I was way up in a sheep field looking back when I did this, just a quick impression.
Edlingham Church and Castle
After my walk I added color to the top sketch of the church, with watercolor pencils. I’m going through a phase with them right now, as I so often do…then I switch back to my loved watercolors. I’m having fun layering colors to find nice greens and browns. I don’t like a drawing or painting to look ‘mushy’, that is be too soft, and I’m tempted to go back and draw with my ink pens into these little studies. But they are studies and sometimes the soft look of them is nice.
Lapwing
As I walked up through another farmers field I saw Lapwings on the ground. They are such a neat bird with two long feathers on their crest that looks like a fancy plumed hat! When they fly their wings are wide, rounded and a sharp looking black and white. They have a very nice call too. This picture is a bit blurry as I shot it from far away, but you get the idea of what they look like.
Dog Rose + Lapwing
I’ll type out the notes from this page down below.
I had fun and created a old fashioned looking greeting card with this Dog Rose watercolor I did. Click to see it in the shop, it has pink inside and you can add your own text. Click your back button to return.
On the way to the top
This photo shows just how gorgeous the views were; I wanted to stop and paint all the time! But if you don’t keep walking you’ll never see as much, so on I went. (click it to see it in my shop larger)
Yup, that's me!
Yes, well, that’s me! I was happy to be out walking alone, stopping as I pleased and discovering interesting things, like the butterflies below.
Painted Lady Butterfly
This is a tattered looking Painted Lady, it looks similar to the Tortoiseshell below, but see how that one is dark in the center around the body?
Small Tortoiseshell Butterfly
This small little Tortoiseshell butterfly looks like it’s been through some weather, maybe even escaped a birds beak? I saw quite a few butterflies along the little dirt lane I walked on, I think they enjoyed the windbreak of the stone wall that followed it.
At the Roman Fort site, wow, buttercups!
(Click to see this picture as a glossy note card) This picture is at the top of the hill where the Roman Fort used to be. There are piles of stones around in a big rectangle shape, all that is left of it now. The Buttercups were so pretty, I crouched down low to get this shot, I liked the angle of it.
Here are the notes I wrote on my page: ” Headed to the Old Roman Fort. Sitting here now- it’s so beautiful the scene. Skylark is singing to my right + sheep are calling down the valley behind me. I don’t have time to paint the landscape, I have too much to do at home. 🙁 oh…I couldn’t resist! Quick watercolor sketch!” (See below!)
Small watercolor view from top of Edlingham
I’m so glad I took some time to do this little watercolor, now I look at it in my field journal and can remember the scene so well. I sat on a huge rock of the fort, with my feet up and set a little container of water besides me. I used regular watercolor brushes for this one. I first laid on washes of blue and quickly lifted areas with a tissue for clouds. Then overlapping (on purpose) the blue near the horizon, I put pale green hills. The blue showed through and it made very nice distant hills, keep it soft and pale for this. Then I put various patches of greens for the fields in front.
View from Top, "Ah, this is the life!"
I used this picture to create a glossy note card for those who love hiking, click on the picture to see my “people in landscapes” but I also created one that says on it: “Ah, this is the life!” I guess that says it all, you’ll find that one in my shop here.
More posts coming as I catch up! Please sign your email in the box at the right if you’d like to be notified. Exciting news coming soon about Creative Journaling and Sketching tours!
Come with me on a sunny, breezy stroll along the Northumberland coast of England, south of Cullernose Point and Dunstanburgh Castle.
South of Cullernose Point, Northumberland
This sketch is done looking northwards while I sat on the grass. I used one water soluble “Inktense” pencil (Ink Black) by Derwent, ; after doing a light sketch I wet it with my waterbrush to create tonal values. It’s like doing an ink wash sketch, great for quick sketches and you can go back over it later with color. The inktense pencils are relatively permanent once dry, so I’m experimenting with using the black then coloring later from photos. These colors of Inktense are very intense, so you need to practice and go lightly with your pressure. You can also achieve very black areas which I like.
Drawing near Cullernose Point
Here I am with my field sketchbook, what a view! (click on the picture to see it as a note card with a quote by Pablo Picasso)
Enjoy the many photographs I took below, they show the things we discovered as we walked and some I used later to do sketches from at home.
Brown Lipped Snails on Cowslip Leaves
It’s funny, once you learn about something you start noticing it more and more, as is the case with snails for me. Now when we walk I see them everywhere!
Brown Lipped Snails
These are Brown Lipped Snails; notice the brown line at the edge of their shell. I just love the striped patterns they have.
Pool with Grey Heron
This is looking down from the coastal path we walked on, there is a Grey Heron in that pool down there.
Grey Heron
Well spotted! He’s a beauty; we watched him fish in the pool as I took pictures from afar.
View of the coastal rocks we explored
Here’s another view of the coast where we walked. You can see two figures walking on the path ahead, that’s where we’ll be going.
Common Limpets and a Sea Slater bug
When we ‘clambered’ down to the shore, (hey it’s an old word but it fits here!), we found lots of Limpets, snails and Periwinkles. It wasn’t until I looked at my pictures on the computer later that I noticed the bug, a “Sea Slater”, how interesting! The Limpets are living creatures that cling very tightly to the rocks, you’ll see a watercolor sketch below of one I did.
Yellow Scales
This is called Yellow Scales, a type of lichen that grows near the coast on rocks. It’s very beautiful along with the whitish lichens and grey rocks.
Southern Marsh Orchid
When we returned to the top of the cliffs, we found these small unusual orchids growing here and there. I was surprised at how tiny they were and may have passed them by if Gary didn’t point them out. As near as I can tell they are Southern Marsh Orchids, if anyone knows better, please let me know!
Me Drawing near Cullernose Point
This photo will show you how tiny they were, the orchid is just in front of my sketchbook. I just lay in the grass and did a tiny light, sketch with a pencil. (click to see this and other photos like this, in my shop)
Shell and Flower studies
When I got home I downloaded my photos and did these studies from the laptop. I used watercolors for these, but using Titanium White this time for the white highlights and ‘wet’ look. I don’t usually use white paint, I rub or scrape off to create lights, but I quite liked using the paint for the glaze look. You can read my list of things we saw while there that day on my page.
Studies of Grey Heron
The little studies at the top of the page show my experiment with “Inktense” and just a black watercolor pencil, using watercolor pencil to color it. I wanted to see how much the blacks would lift or blend, hoping they wouldn’t. As I thought the Inktense didn’t lift as well and that’s exactly what I wanted.
The heron studies are also done from the laptop, just painted without sketching him out first. The little one in the left corner was an experiment of painting solid blue water then lifting color and using white paint to add the heron after. I’m not thrilled with how it came out but you should always experiment!
I hope you enjoyed coming along on this walk by the sea. Get outside and bring a small sketchpad with you, you’ll be surprised at how much you’ll see when you sit and start to draw things around you; a whole new world opens up before your eyes.
Here’s a little video clip of the waves washing over the rocks where we were, enjoy!
NOTE: Many of the photographs in this post have been made into beautiful glossy note cards and gifts and are in my shop (home page link). There are many more besides the links in this post, I hope you have a look and please pass it on to friends!
A Valentines Day bouquet from your sweetie is very nice…smells so sweet, warms your heart..but doesn’t last forever no matter what you do. Unless you get out your paints and do some studies! After a week of enjoying the blooms…then watching some slowly fade, I picked out the freshest ones and moved them into another vase up to my studio. As I did the tulips dropped their petals in a flourish, woosh…all over the table. I picked some up and looked at them, thinking how beautiful their individual forms and colors were.
I decided to do studies of the petals and laid them on my paper with a strong little lamp above me. I should have titled this post “How to Paint Through Pain”…that is, how to cope with painting while in pain. I painted these on the floor, my lower back has been hurting and sitting in a chair was too much to bear. So, I put it on the floor and kept moving around…kneeling, laying on my stomach…what ever I could. I got a bit messy with some areas of these studies, but then it was hard to concentrate! I started each with a basic gesture of the shape very lightly drawn with pencil. The shadows were the most fun to paint, studying the colors coming through the petals. A tip here, to keep the petals fresh until you’re ready to work, put them in a ziplock sandwich bag with a sprinkle of water, then put them in the refrigerator. Tell everyone NOT to eat them!!
Oh yes, the other thing is I did them with just my waterbrush…see above picture. You can see the petals laying on my paper and waterbrush in my hand. (PS. this was really late at night…actually I think it was 1am!)
So now I can look at the little study and always remember my Valentines surprise bouquet! I wish I had time to do more studies..I had planned to, but you know how that goes!
Well where to begin? This is a very late entry about my weekend at the Allegany Nature Pilgrimage, May 30, 31, June 1, 2008. I wanted to make sure I share it with you because it was such a fantastically wonderful weekend filled with great people and plenty of new things to learn about nature. I’ve decided to break it up into several posts so it’s not too long. This one will be about the wildflowers I saw. Below is just one of the fabulous views in Allegany State Park.
I feel giulty for not having more drawings, but let me explain what it was like. From Friday until Sunday you could show up for hikes or classes lead by experts in their field, all day long! There was one after the other, some at the same time, it was so hard to pick and choose which I wanted to go on. I filled 13 pages in my sketchbook with notes about birds, flowers and plants! We were constantly walking as a group so it was very hard to draw, the small amount of sketching I did was while I was walking! Seriously…you have to watch the ground so you don’t trip! haha…
This page of my sketchbook shows a drawing I did while on a guided birdwatching hike. It was lead by Tim Baird of Salamanca, he’s a retired science teacher who knows more about birds and plants than anyone I know! He has such a wonderful casual manner when you ask questions about everything you see….well um…that was me! I asked him about everything I saw! He was so patient!! haha…must be the teacher in him. Most of the flowers, plants and birds I learned about this weekend were from his walks. Thanks Tim!!
Dwarf Ginseng, shown in the little sketch above, a pretty little woodland flower.
I learned about this flower on a wildflower hike led by Mary Alice Tock, down by the lakeside. It’s Cinquefoil, cinque (5) as in five leaves, five petals slightly heart shaped. Mary told us some things to look for when identifying wildflowers: 1. color 2. shape of leaves 3. # of petals 4. arrangement of leaves on stem, and how they’re connected to the stem.
This is Clintonia, a woodland lily, also called Yellow Corn-lily or Blue Bead for the fruits it bears. I took this picture up at Thunderocks on my last day…more about that amazing place in another post!
This is Golden Alexander, shown in the sketch I did above while walking. It has a complicated flower head like Queen Anne’s Lace, I forget the technical term…I’m sure someone can remind me in the comments.
This very pretty flower is Golden Ragwort, looks just like something that’d be growing in your garden.
This is Star Flower, found in the woods also, like a hidden gem just waiting to be noticed.
And this is a very well known wildflower, Trillium. I was lucky to catch sight of it in bloom here and in the Adirondack mtns.
This is about the morning I spent at Reinstein Woods Nature Preserve in Cheektowaga, NY. It’s from back in May, but I wanted to put it up to keep my posts in order. The very first thing I saw, well heard, was a House Wren…busy little thing! I kept watching it flit around until it showed me where it’s nesting hole in a dead tree was. (Don’t forget to click on my sketchbook pages to see the enlarged views.) I did a really quick sketch of a fern leaf and flowers on mint. I looked in my wildflowers book and still haven’t found a ‘blue’ flower, they say it should be pink. I need to find some more books!
May really is the month to see and hear birds when you’re out walking! Some of the birds I heard or saw: Catbird, Yellow Warbler, House Wren, Canada Geese, Baltimore Oriole, Mallard ducks, Turkey Vulture, Red Winged Black Bird, Nuthatch, Wood Ducks, Great Blue Heron, Belted Kingfisher.
I also took a few pictures of the gorgeous wildflowers including the pink ones with the bee on it, those are Honey Suckle, the pale lavender ones are Dames Rocket if I’m not mistaken. You look for the four petals it has, not five.
I came upon a Baltimore Oriole that had just had a bath in the shallow area of the pond. He was up in the branches at my eye level, just preening and shaking off. I took some pictures with my tiny camera but he was really too far away; but what in inspiring sight, I can’t wait to do a painting of one.
Then down by the wooden bridge on the Lily Pond Loop, I shot a short video clip just to show how gorgeous the day was. It was sunny but cool, the lily pads were out, no flowers yet, and birds flying everywhere. Check it out because I have another video clip taken on July 5th to show you soon…lilie flowers in full bloom!
Today I’ve uploading my sketchbook pages that I did the other day (4-23-08). It was my first day going outside to draw since my car accident…what a great day to be out there! I got to observe the bluebirds trying to nest in one of the bluebird boxes I put up. A Red Spider Mite came and visited, then crawled all over my paint box. I tried to note the bugs I saw, one I need help identifying, the little brown one with tan spots. The thing I wanted to draw most were the little yellow flowers, I still have to figure out what kind they are.
Check out the pictures I added, the Red Spider Mite was crawling over my white watercolor block, I photographed it through my magnifying glass! The other picture shows my field bag and it’s contents…also my palette. I kept the little binoculars handing so I could keep checking out the bluebirds.
Me painting with sketchbook and watercolor palette in one hand.
I decided to put that little travel watercolor palette to test. I picked up a gorgeous iris and lily yesterday, sketched it out and started the first stages of painting. My objective here was really to test out the palette, watercup arrangement and holding the light board all in one hand. I want to see if I can use it like this in the field without an easel for little studies. You can click on any picture to see enlarged views.
My travel watercolor palette with watercups attached
I show a close up of the arrangement so you can see the watercups; they are actually for holding mediums for oil painting, designed to hold the liquid even when tipped slightly on a hand held palette. They worked fantastic! I had to get over the habit of looking for my watercup on the table! You can see the ‘sticky tack’ or ‘blue tack’ in my palette. Yesterdays blog explained that better, so they get tested today and it worked wonderfully! Yay..two experiments that worked.My hand got a bit tired from holding the board and palette but this set up is supposed to be for quick studies, I worked on it longer than I would in the field.
The pictures are to show the stages of my painting, start to finish.
Iris pencil sketch
starting to lay in some colors
Putting on the blues, make sure yellow is dry first
The most up to date information about my artwork, nature sketching adventures, or step by step demonstrations. Search using Categories or Tags, or use the search box in the left column.
Please sign up below to get notified when I post new articles.
Day Lily 7-15-11")
golden snails final ed")


")
")
")
")


Church and Castle")


S of Cullernose Point")


wc iris 4 cro resz")