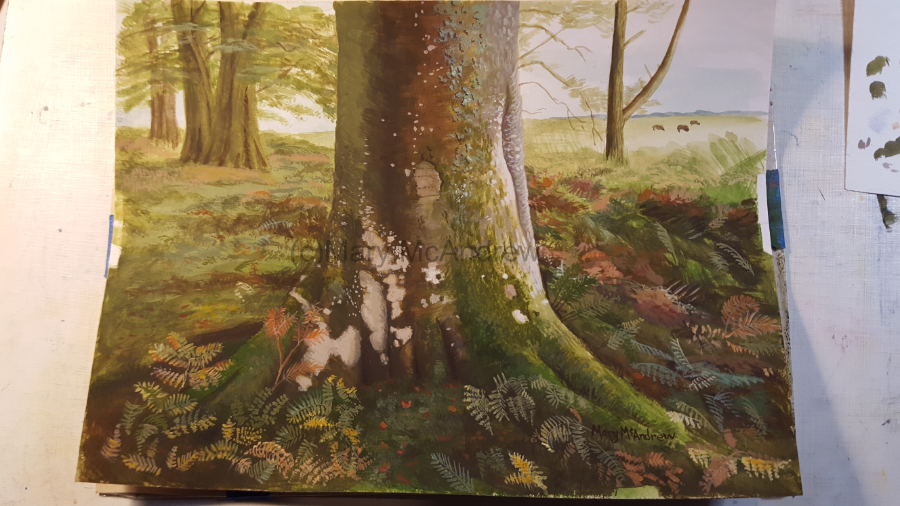
This post has a lot of photos showing as many stages of painting as I could. I’m taking the pictures using my cell phone, sorry they are not perfect! I’m using a photo I took a few years ago in Northumberland, on a walk with Gary at Beanly Moor. Some of the most beautiful old Beech trees are there, the tall stately ‘ladies of the wood’ these trees can be known as. Many times we find a long row of very mature trees and know that once they were part of a farmers hedge and left to grow because they were forgotten and went wild. I love that.
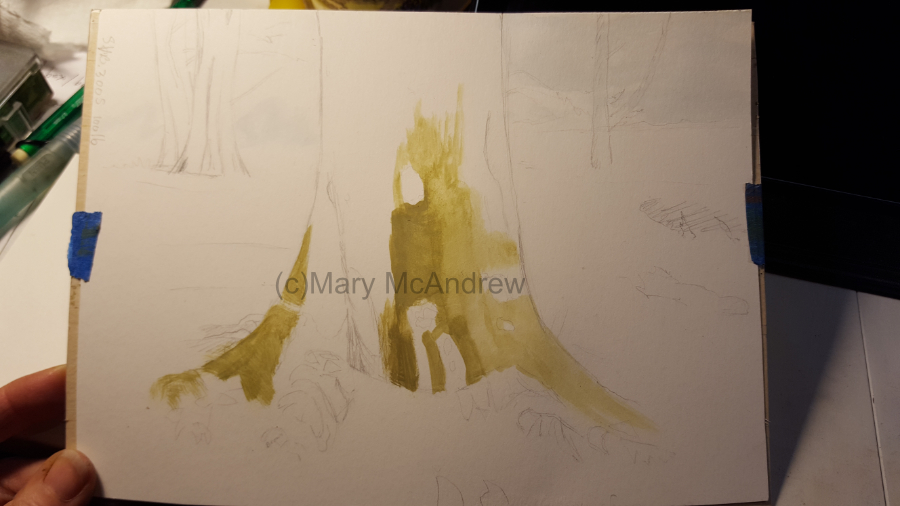
Above, first I did a light pencil drawing but didn’t add too many details. Then I started to add some color that I see on the tree, I’m using gouache paint.
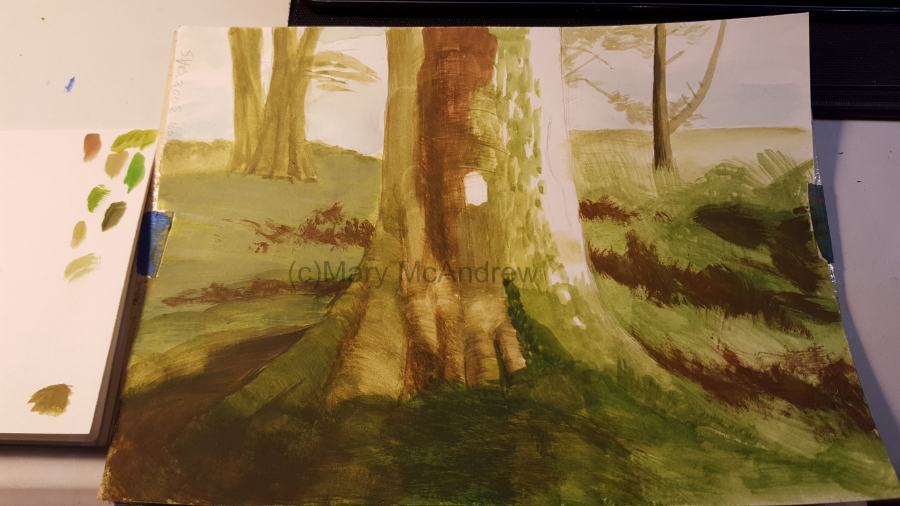
Here I start to put the greens of the ground down and a bit of burnt sienna mixed with burnt umber on the tree. I used a big filbert to brush the tree and used strokes that followed the rounded contour of the trunk. This left ‘streaks’ in the paint that I liked and I used the same brush later to add more tree color. The strokes it made I left and they really look great even at the end with other textures layered on top.
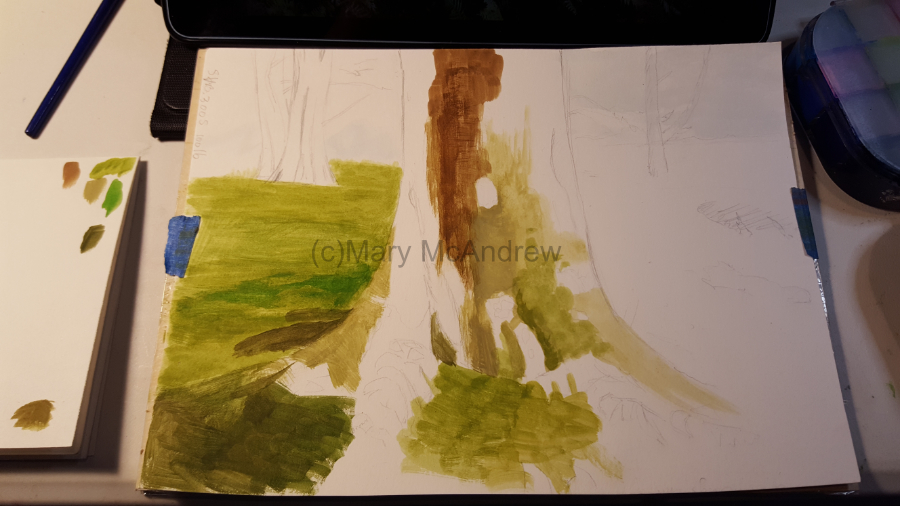
Here I did quite a few things, I toned down the green in the background on the left by putting a more opaque light green on top. I scumbled in more of the foreground greens and values then I added the dark browns you see using the big filbert brush. These are important dark areas because I’ll be putting light grasses and bracken on top and this will make them look more three dimensional.
I also made some brush strokes on the tree for the lichens and moss that I rather liked the texture of. When you see lichens on trees like this, it almost looks like fur. So as I continue I try to keep that texture on the tree.
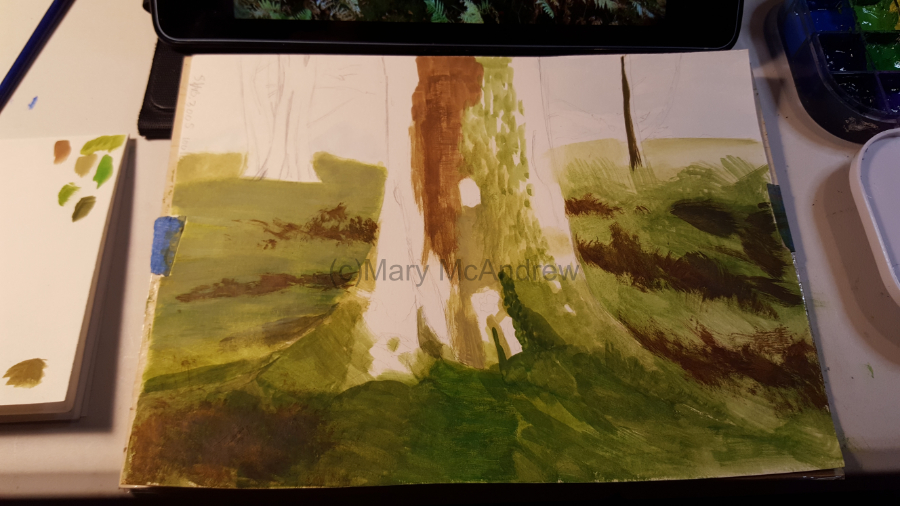
I used a very light wash of color brushed on the left side of the tree, I’m trying to get rid of areas that are not as light in value as the right side of the tree and the background. I used the big filbert brush again to stroke with the round trunk.
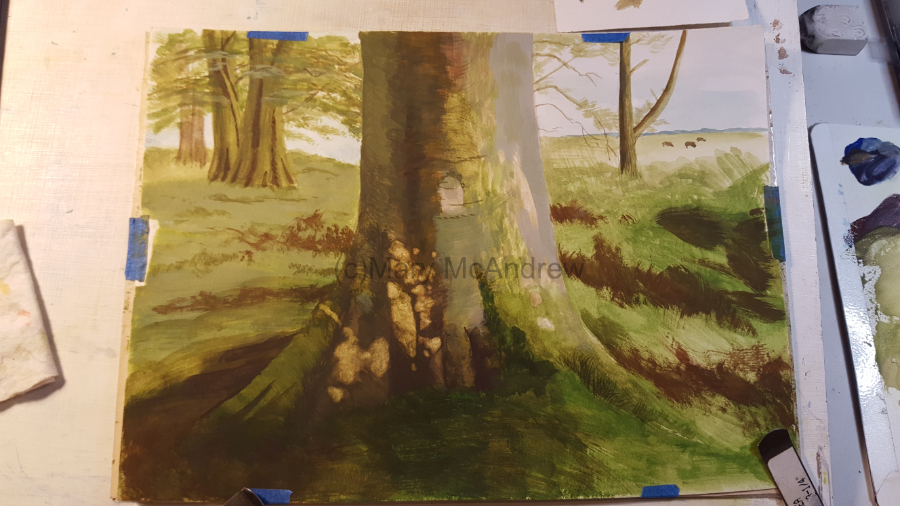
The background trees get brushed in. Whoever said trees have brown trunks? Most tree trunks I see are green and grey in color!
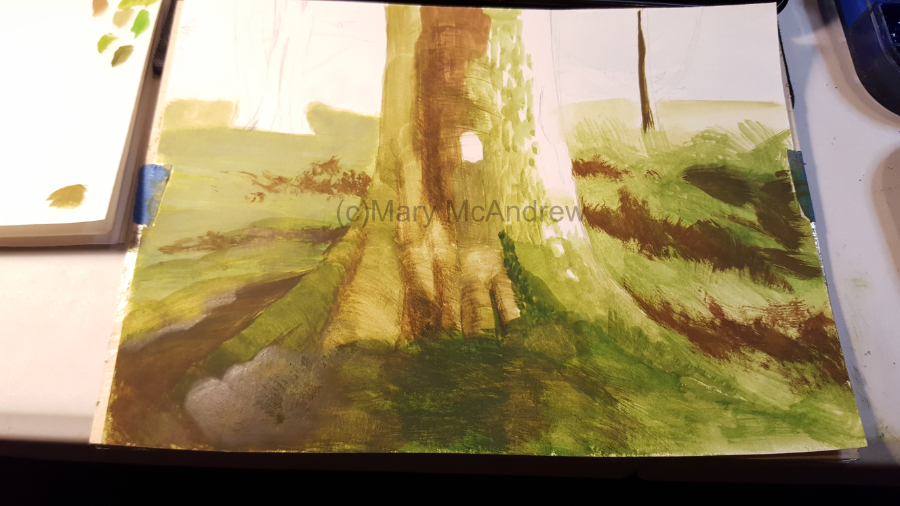
Here you can see I’ve added grey on the right side of the tree. Then because gouache paint can be lifted quite a bit if you wet it, I was able to carefully lift the dark color off where I plan to put light patches of paint. I could probably have painted right on top of the dark, but this way I figured it had less chance of mixing and getting muddy. It was a good way to ‘sketch’ out exactly where I wanted to put the light patches.
I’ve also added more opaque color to the tree on the left which is giving it so much more ‘solidness’. And I added leaves/branches to the background trees and don’t forget the wee cows!
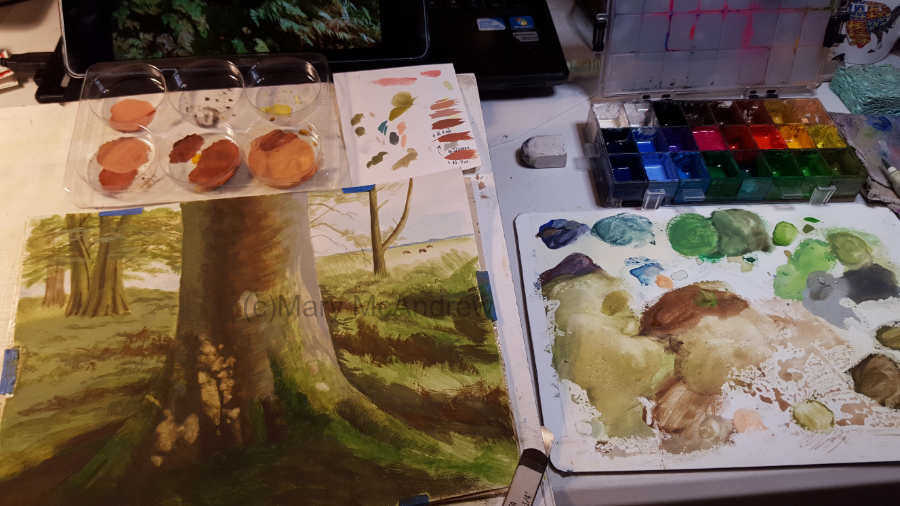
This is showing how I had it set up on my table, plastic palette on the right, gouache paints above that in a resealable palette. Just above my painting you see a clear plastic tray with round depressions, that was some packing material from battery tealights, it makes a great mixing area for paints! The colors in there were for painting the light bracken and finding the right color and value drove me crazy!
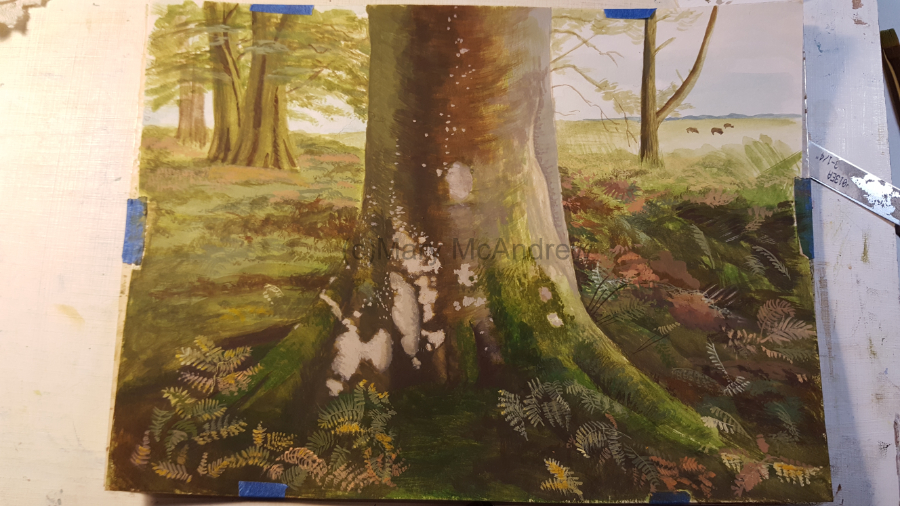
A lot has happened here, the light patches going onto the trunk and some very light speckles, bracken fronds all over, more texture on the ground in the back.
Here I worked on that grey area on the right side of the trunk, more texture and some sharpening of the dark edge to show the tree goes in there, like an old wound maybe?
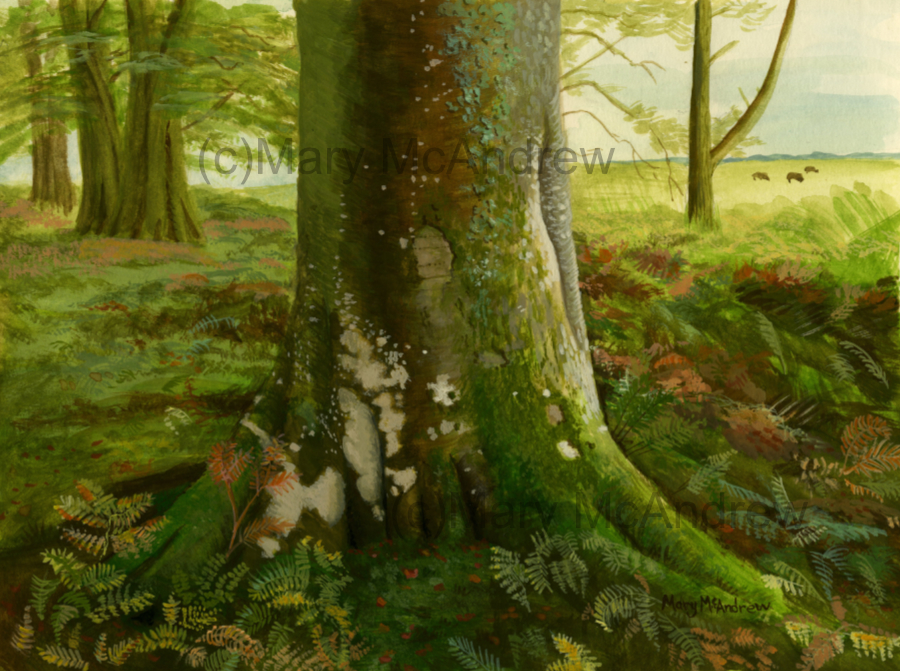
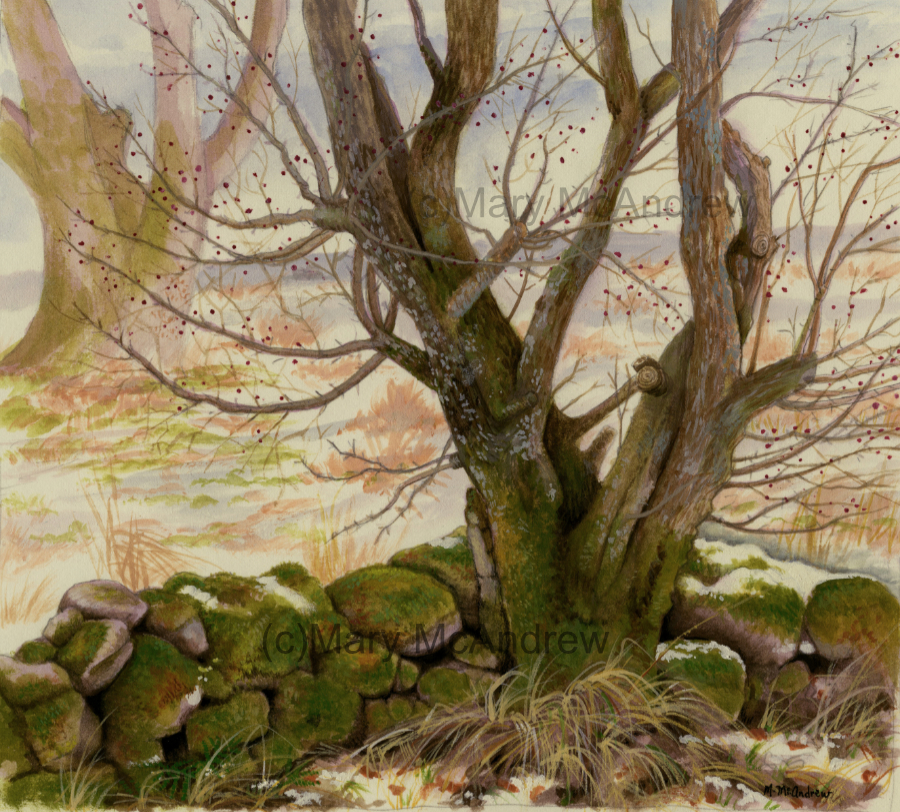
Now I know the color of this picture is hugely different from the pictures of the stages of painting, this is the scan of the painting. You can really see the vibrancy of the greens, whereas the other pictures are all taken with my cell phone under lamps and some with cool natural light.
Once I get set up with a printer again, I’ll definitely be making prints and note cards of this one; I love the colors and textures! I hope you liked seeing all the steps of painting as I worked, please leave me a comment if you like. Please share my website with your friends! You can also follow me on Instagram to see more updates on my projects, look for Mary_McAndrew_Artist.
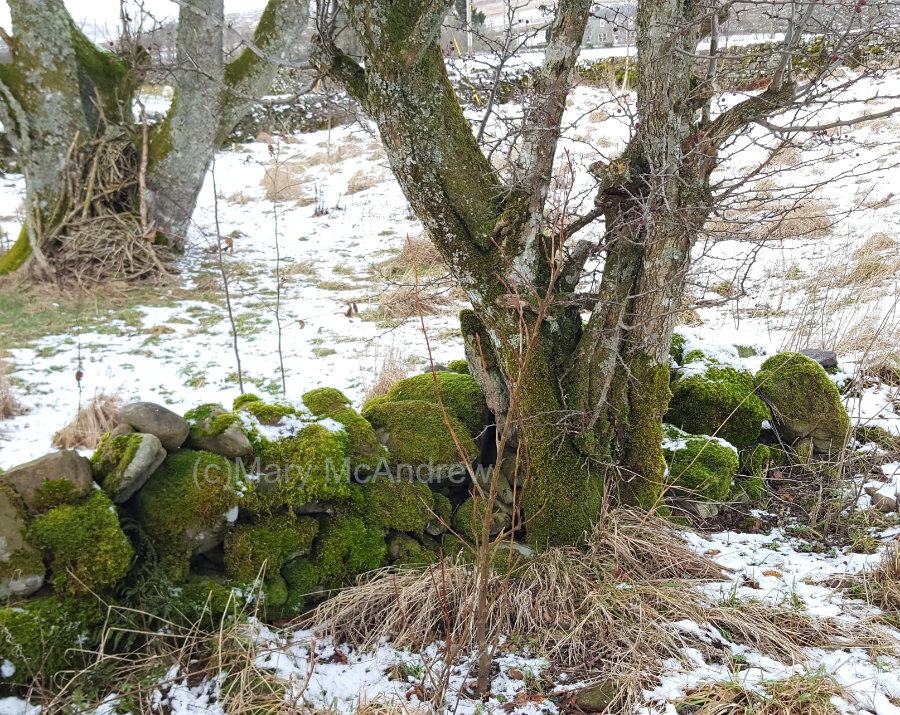
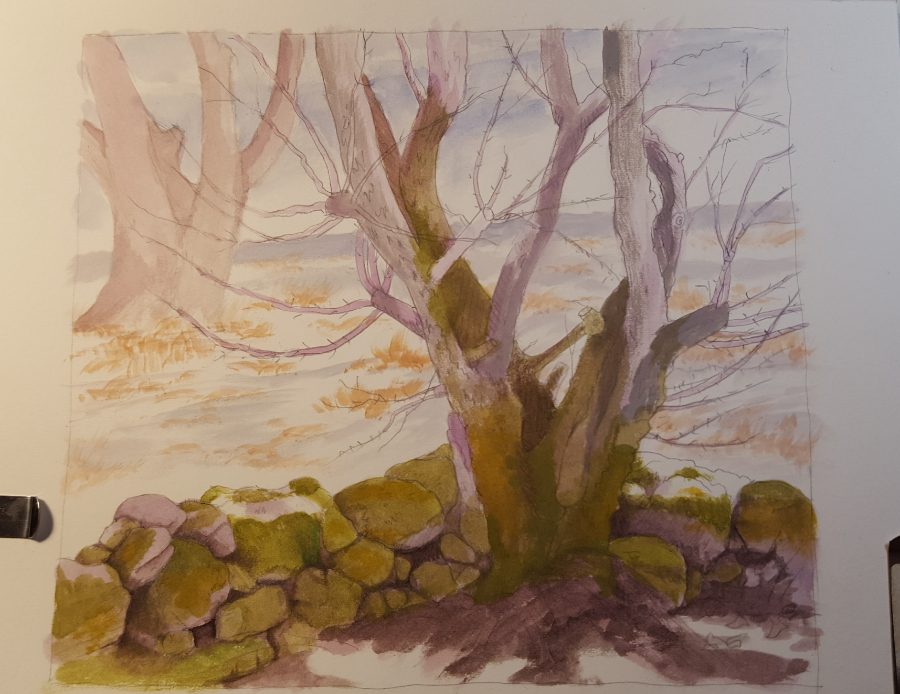
Another adventure into the snowy, cold back garden! I sketched this scene on January 17, 2023 then worked on the painting in February. I seem to be drawn to this Hawthorn tree and wall, it’s the same one I sketched last year in March on a rainy cold morning. I just love old Hawthorn trees because they usually twist and twine together and bend and grow shaped by prevailing winds.
Another thing I love in winter is the dry grasses; the color of it and how it lays in clumps, it’s strands making such interesting forms. I like looking at them to see where voles and mice have made entrance holes to hideaways. The other thing I love about this wall is all the moss of course! It’s a fun challenge to paint and I will be doing a lot more paintings and studies of it.
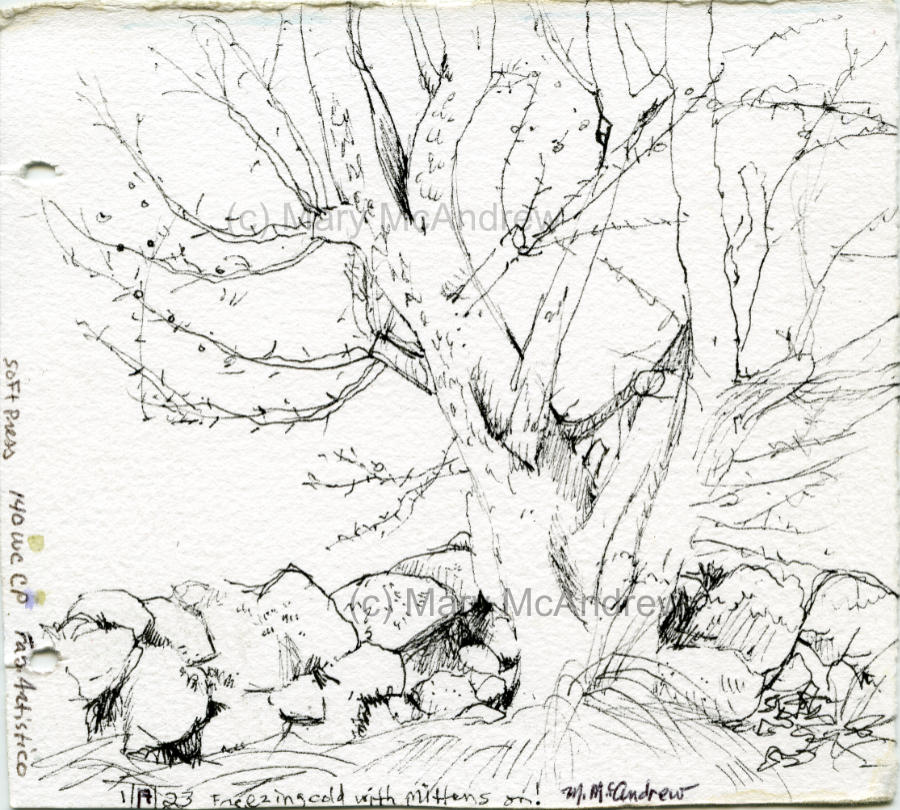
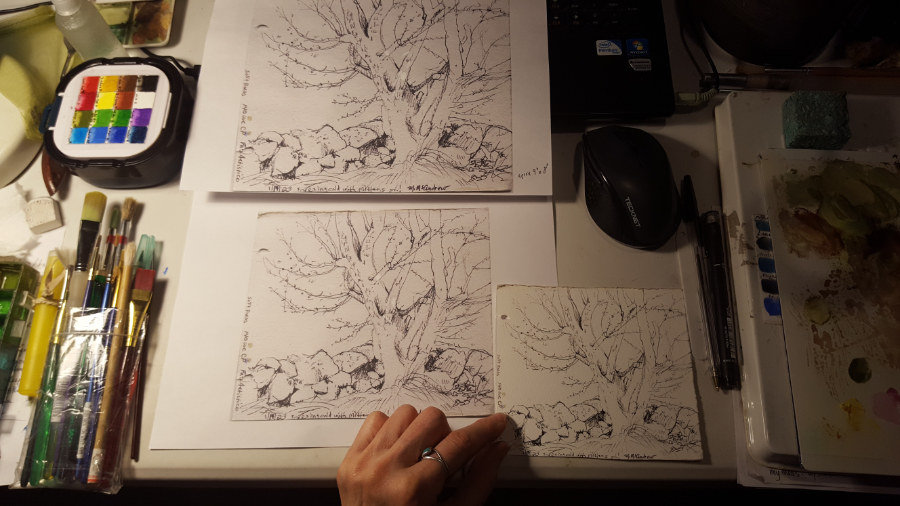
I used my very small sketchbook and drew the sketch above using a permanent ink pen. I did this from life, standing right in front of the tree and wall as you see in the previous photo. I did have my big mittens on with the flip back top so I could use my fingers, but it’s still a challenge to draw!
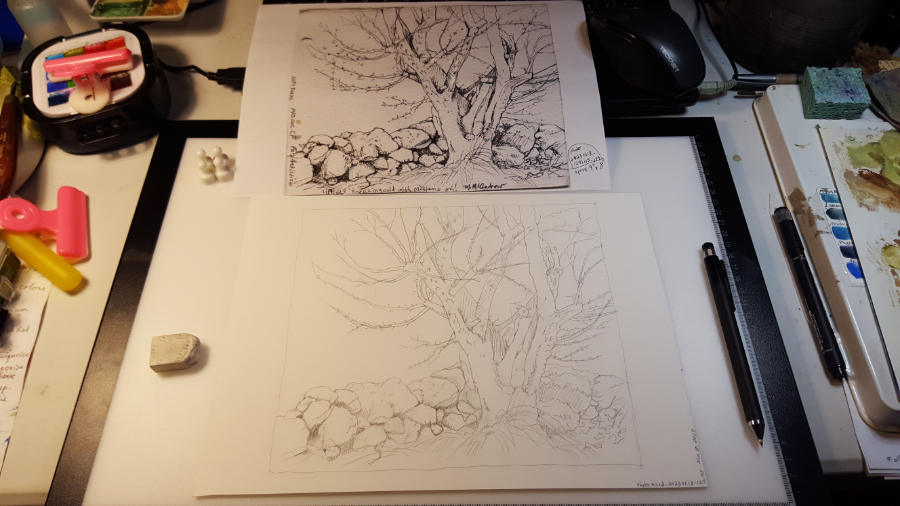
The picture above shows what I did next. I took the small original drawing (bottom right) and scanned it. Then I printed it out on plain computer paper, and looking at the photo I took, I drew darker lines on the printed paper and used white out to block lines that I didn’t want, like where I drew lines through a branch etc. Then I scanned that large one I edited and printed it again but at the size I wanted, a bit smaller.
Above it shows my light table, I put the scanned edited drawing on the light table and taped my watercolor paper on top. Then with the light on (of course) I traced with light lines using a pencil. Now it’s ready to use for painting! I like doing this because it’s always from my original sketch, not traced ever from a photo! A sketch/drawing will always have more character, not a perfect copy but maybe unnecessary details left out and others enhanced.
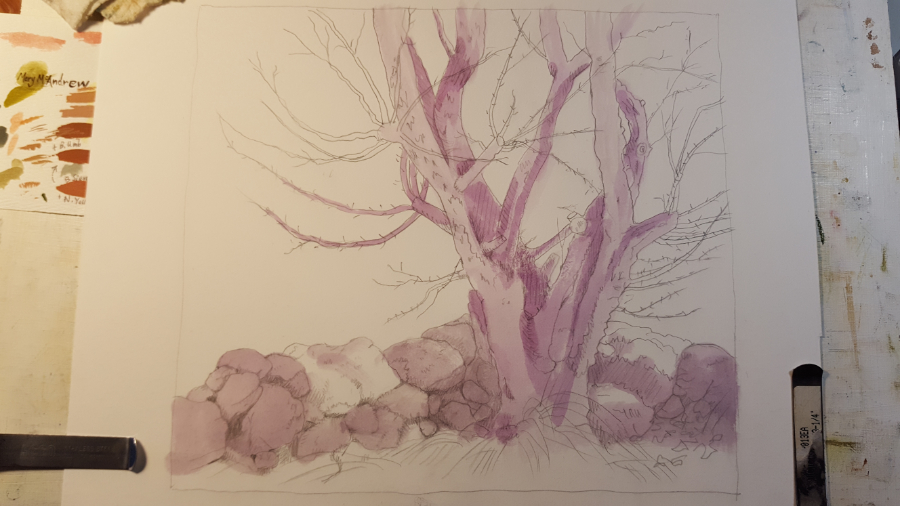
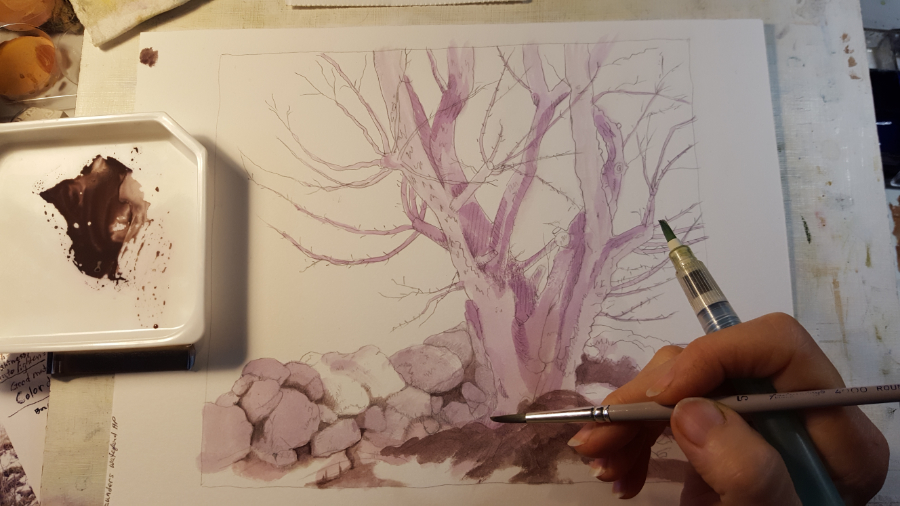
I decided to do this painting in gouache, as it’s my new medium and I love exploring it’s properties. I decided to use a thin base color of purply violet, I started light then darker layers to define the shaded areas.
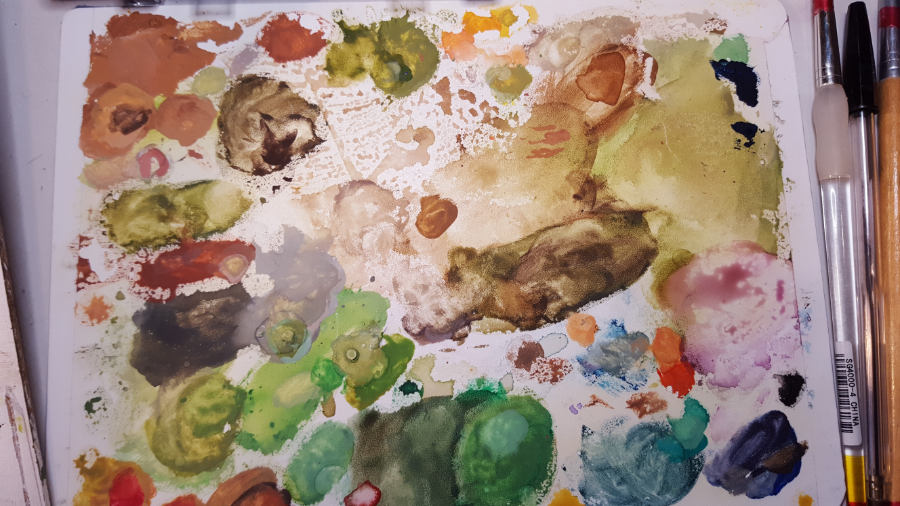
This is a shot of my palette where I’m mixing my colors. I made it from the plastic cover of a notebook that I cut off and taped it onto mat or mount board. I have a travel palette that keeps the paint wet and soft just above this. I take a bit of wet gouache out and put it in little blobs on the mixing palette as I work, this keeps my travel palette cleaner. I especially do this with the white to keep it clean. As these little blobs dry out, I just rewet them as needed.
Above I mixed up some brownish purple color for the ground and wall dark areas in a little plastic dish. As I painted I used the waterbrush to blend out the edges to keep it soft, this is a technique I use in watercolors too.
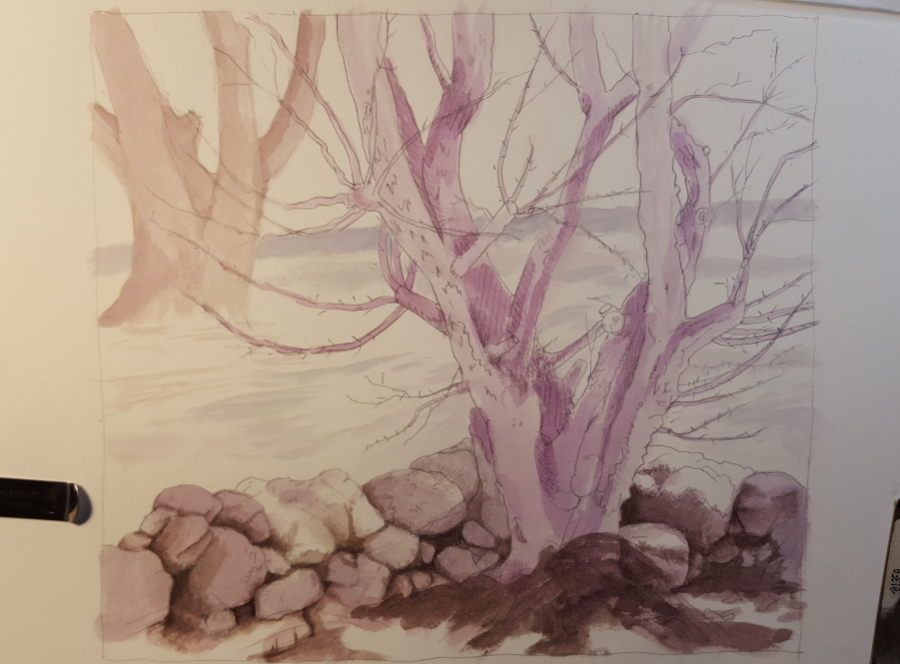
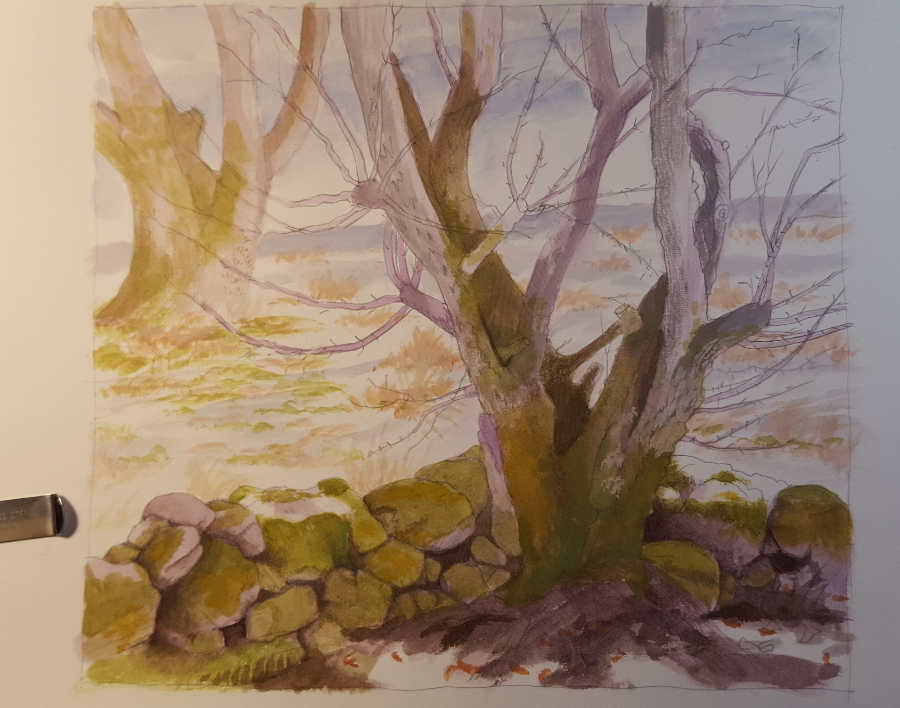
Here you can see I started to put the background tree in and some of the distant wall. The thing is, I really was on the fence as to if I would put any background in at all! I can picture this tree and wall with just a white background, but it’s the landscape painter in me that wants to just put the whole scene in! Maybe someday I’ll repaint it with no background and see how it looks.
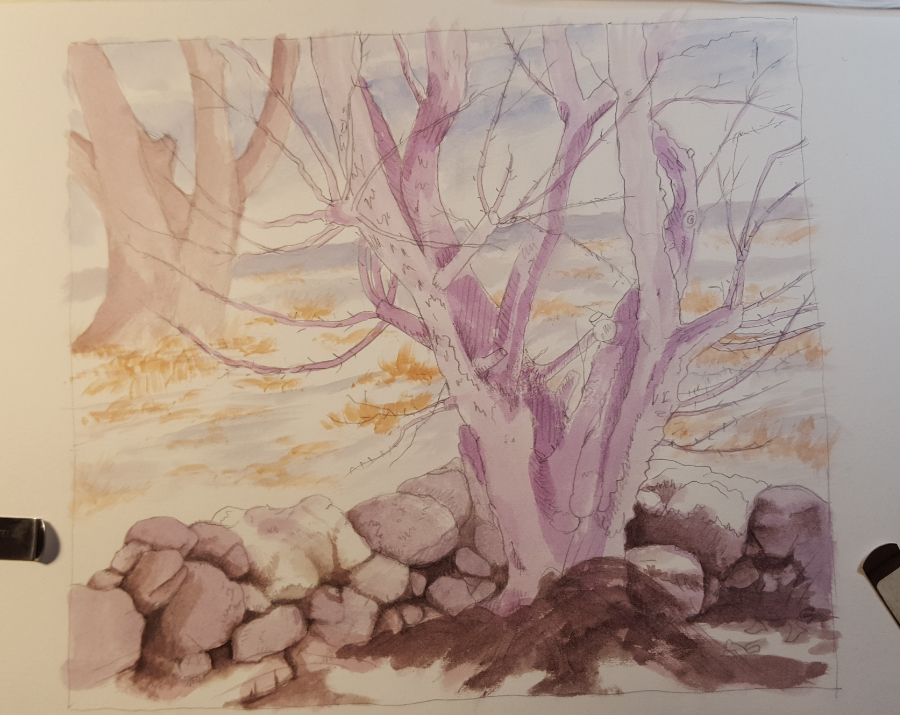
I added some sky and grass colors in the field behind.
Here I started to add the greens of the moss and bark on the Hawthorn.
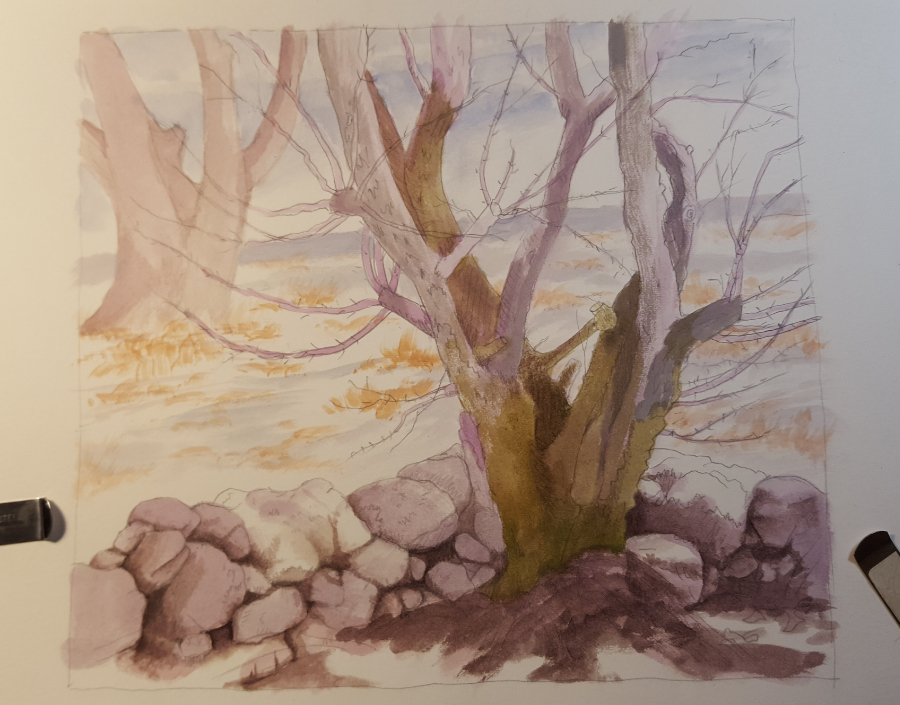
Finally I start to add the greens of the moss on the rocks, trying to be careful and not painting areas of rocks with no moss.
And here I put more color onto the big Ash tree in the background, but try to keep it light. The lighting on my painting is terrible but I think I was painting at night time and this is using my cell phone.
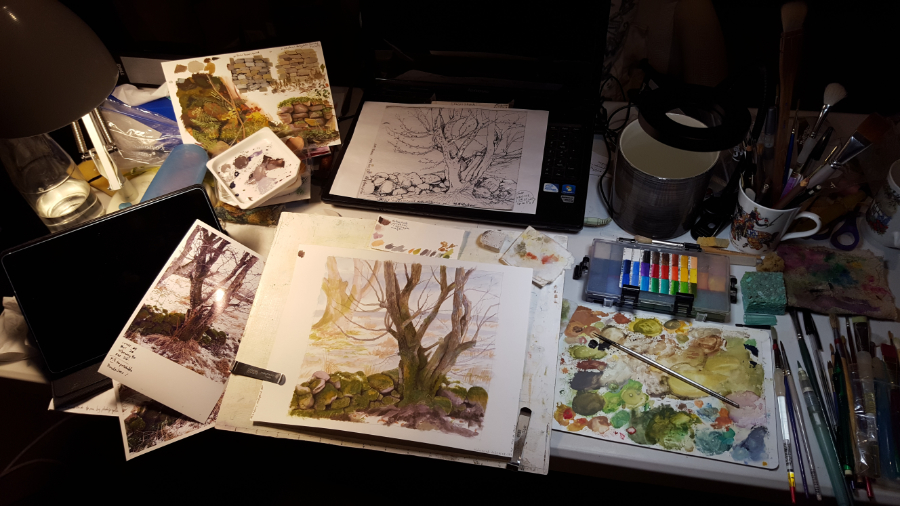
Oh boy, look how crowded it looks on my table! This is working at a plastic 2’x4′ folding table in the living room, because that’s where the WOODSTOVE is!! haha. You can see my mixing palette and the paint container palette just above it, with my water just above that in a ceramic container. In the middle is the painting clipped onto my work board and above that is the printed out drawing I did. On the left is a photo reference for details and a bit for the color, and above that can you see the little study I did in my blog post “Stone Wall Studies in Gouache”. That is a great reference for color, moss and stones that I can refer to anytime.
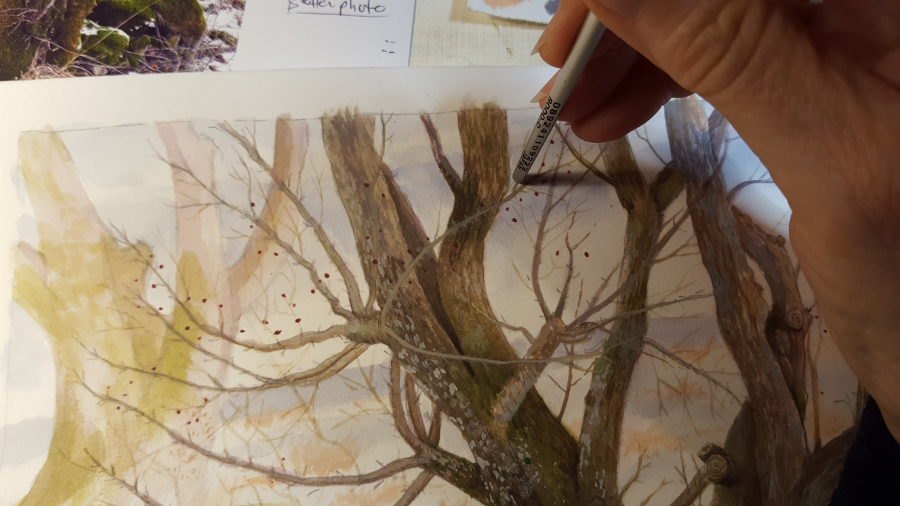
I really liked how my painting was looking now, it’s really come to life for me, but a Hawthorn isn’t a Hawthorn without it’s berries! The tree had lots of dried out berries of deep red, just waiting for hungry Blackbirds or greedy Fieldfares! So I used an old trick by touching the end of my brush to paint on my mixing palette then made the round mark one at a time. I practiced on scrap paper first to see what color and thickness of paint I should use.
“Hawthorn and Mossy Wall”, gouache.
And here it is finished finally! I didn’t talk about putting the grass in front of the tree but that is an important part. As shown earlier, I put dark colors down first then this allowed me to use very light gouache on top to make grass strokes. It’s fun to arrange them so they look natural and they give a lot of movement to a drawing or painting. Then I added the dead leaves on the ground too.
I know I did this weeks ago when the snow was still flying, but today (April 2) I’m posting it after being outside in a sunny garden! We thought the sun would never shine again, it’s been so cloudy and grey! Soon we’ll be planting veg and flowers in the gardens and watching all the bees and insects come. I’d like to do some insect and wild flower studies and paintings, so we’ll see what comes this spring and summer!
(You can also follow me on Instagram as “mary_mcandrew_artist” and Facebook as “Mary McAndrew Painting and Illustration”, both of these I share more up to date progress of things I’m working on.)
Hello everyone! As I said in my previous post about the toad in ink, I wanted to try and do some ink drawings in the month of October for what’s called “Inktober”. It’s a challenge that artists do to try and create ink artworks maybe everyday, but I knew I would never be able to do that!
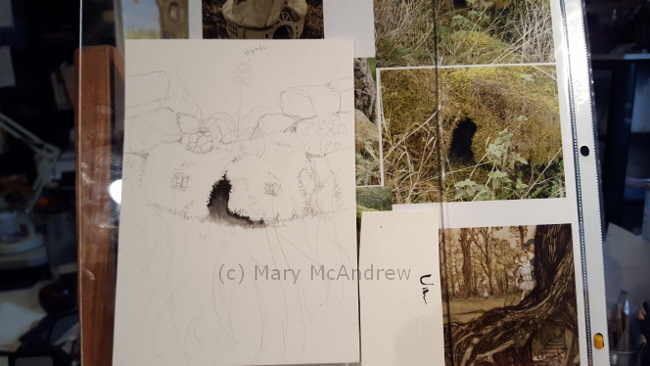
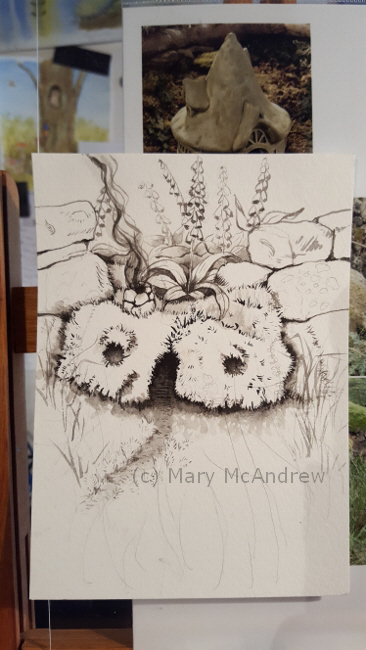
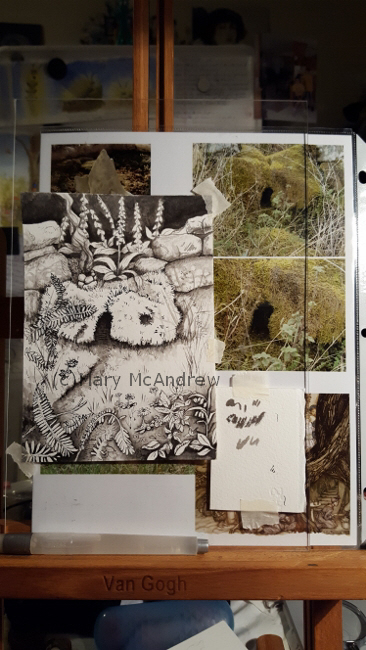
So I did get this little drawing of the “Mossy Fairy House” done using inks and I did a bunch of fun cat cartoons. I’ll share them next time I think, there’s not many but it was a lot of fun! This Fairy House was a good practice for me as I did it entirely with brushes, no ink pen. I’ll show you from start to finish the stages it went through, it’s more interesting and educational in my opinion.
This shows the very beginning next to the reference photo.
I sketched my drawing out on a 5×7″ piece of bristol board that I taped to a piece of clear plexiglas. I like using this a lot in the studio, I use it like this and it’s easy to lay on top of reference materials or you can put a lamp behind when you need to trace from your sketch. I also put a piece in front of current illustrations that are leaning behind my easel on the table, don’t want any paint splashes on them now do we?
Anyways, the reference photo is one I shot years ago while hiking in the woods near our village, there is NO shortage of luscious moss growing here in England! It was growing on some rocks that had fallen down ages ago and to me, well it just looked like a Fairy house! What would you think if you saw it?
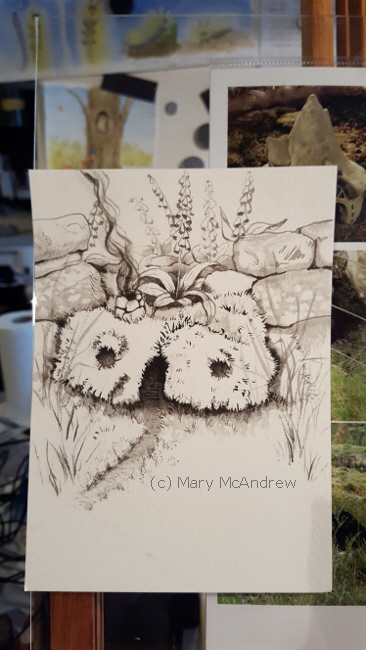
Starting to brush ink in, deciding how to make it look more ‘house’ like.
Then I started to brush ink in, trying to decide where to go with this, because the whole thing has got to come from my imagination. I added two ‘windows’ but never felt right about them. You can see I sketched rocks behind and added a chimney.
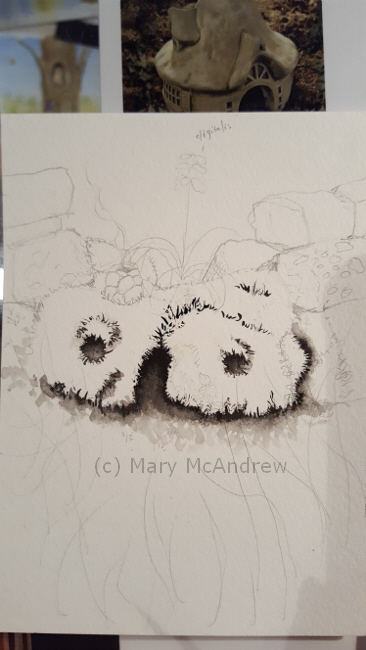
More ink as I pick out the rocks of the wall and put some smoke from the chimney.
More ink goes on as I pick out the rocks of the wall and put some smoke from the chimney. I also add one Digitalis or Foxglove flower behind. This grows commonly here and I love it, so do the bees!
I add more flowers and the path to the Fairy House.
Now I’m adding more flowers behind to fill it out (or fill it in however you want to look at it!), and I start to make a path lightly in grey wash. I also flick in some simple grass to start to set a scene, thinking all the time, “what will I put in the foreground?”. I would like to make it a nice illustration and add a fairy but nothing was hitting me.
I next do a bit on the stones on my mossy fairy house.
Then I start to add washes to the stones of the wall. This was fun because I got to look back through my reference photos of stone walls, which inevitably takes me MUCH longer than it should because I end up thinking about all the different walks it took to get all those photos! Actually more than that, it’s seeing so many photos of things I’d love to paint and this distracts me like crazy! Haha…oh well back to little mossy fairy house!
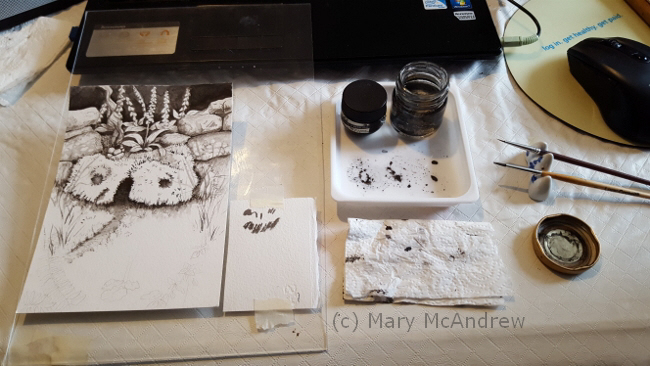
Now I’ve set up in front of my laptop so I could look for reference photos I’ve saved.
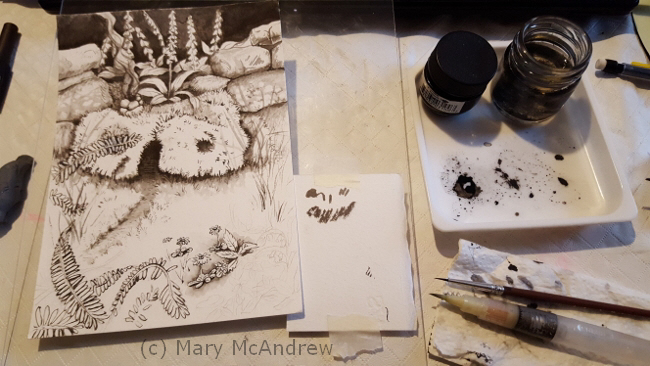
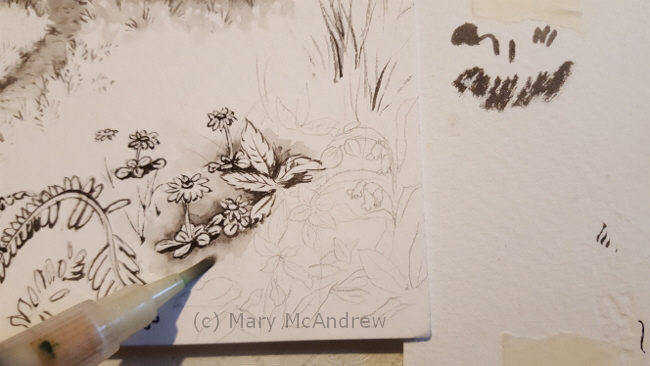
This photo shows I’ve moved off the easel, I’m done with that little reference photo and am looking up reference photos on my laptop to get inspired for the greenery in front. You can see how I’ve put my ink out, this is a little jar of Speedball Acrylic Ink, next to it is a small jar of water and they are sitting in a plastic paint mixing tray. The ink is permanent so I know I was taking a chance on permanently staining the tray, but it’s ok, I’ll use it for ink now. My brushes are resting on a tiny paintbrush stand I got years ago with a set of chinese brushes and ink. I have a small scrap of paper between the art and the ink, this is for testing marks etc. It kind of looks like I made a Jack O’Lantern face doesn’t it?
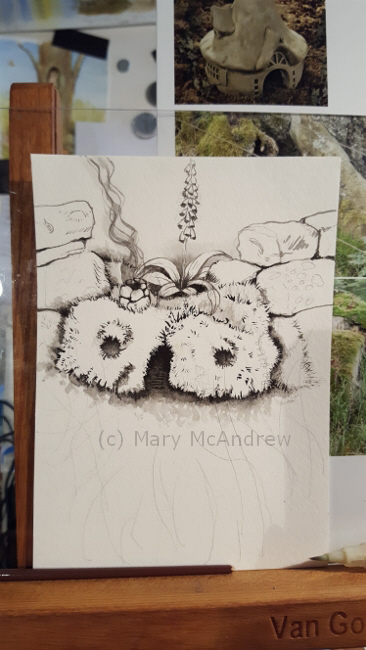
Now I add more ferns and flowers to the fairy house.
Ok, so the way the windows looked like two stark dots was bugging me, enter my husband. I like asking him his opinion as he has a sharp eye and doesn’t hold back on opinions! (though sometimes not what I want to hear!). He right away pointed out he didn’t like the windows, they looked too symmetrical, yes, that’s it, they had to be changed! It was nearly impossible to rub out or lift the black ink so I resort to illustrative techniques….out comes the white gel pen! I drew in pencil first how I wanted the fern to go and as you can see I added more in the foreground too. I drew on each leaf with the white pen to make it show, perhaps gouache would have worked well but it’s so tiny I opted for the pen.
Here’s a close up showing my waterbrush used to create a wash of ink around things.
You can see I have my waterbrush out now, this is great for making the soft shadows around the plants. I shot a video clip with my cell phone showing a bit of this. Next time I’ll try and set it up on a holder – tripod or something. I first paint the outline of the plant, then you can either let it dry and go back to it or try to quickly brush along the edge to draw the ink out. I usually like to get the drawing done first so I can think about where I want the ink wash shadows to go all together.
I was able to upload the clip to my YouTube channel, click here if you want to check it out! If anyone knows of some free program that compresses your videos please let me know in the comments, I have an awful time uploading videos.
Now we’re back on the easel, working on those plants!
Now we’re back at the easel and I’m working on adding more ferns, flowers and details in the foreground.
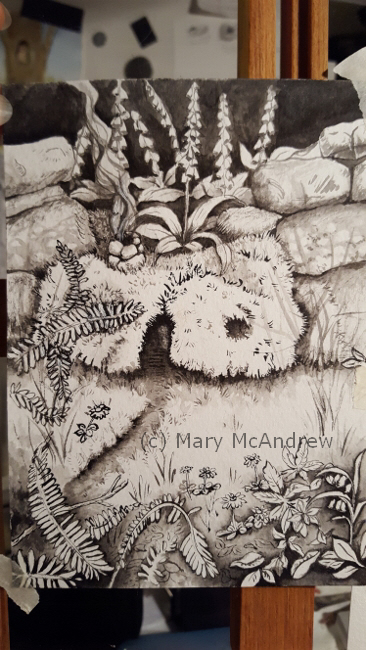
Almost finished!
Well we’re almost finished now, I lift a light patch inside the doorway, I really wanted to add something but felt the pressure of wanting to be done too. I’ve left a ‘free’ area on the grass in front of the Fairy House in case I come back to it later with a little fairy or creature. Something that bothered me about the drawing too is how I added so much dark under the house and it looked disconnected from the ground too much, do you know what I mean? So I tied it down a bit by adding grass blades with the help of the white pen and drawing grass with my ink.
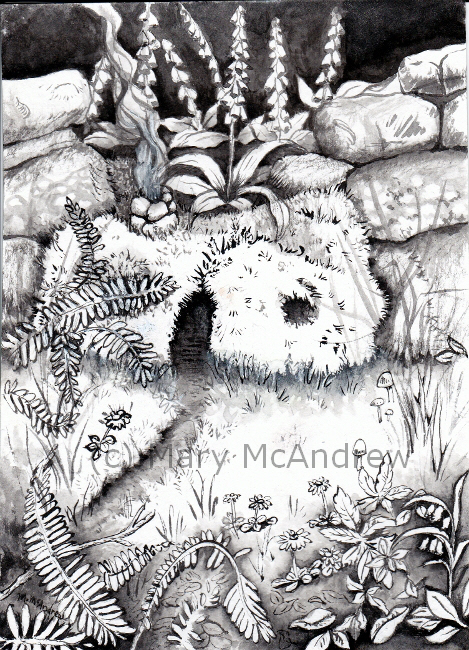
And it’s finished!
Here’s the final drawing finished. It came out nicely I think, mostly I’m pleased with doing something that looks a bit different for my style. Adding the black background and darkness in the foreground I find to be exciting looking and graphic. I’m not happy about the smoke from the chimney and could have gone back with a wash of white gouache, but I really was trying to push myself to just use ink. Someday maybe a fairy will find it’s way in here, but that will probably be if I do another version of it. I was ready to say it’s done and get onto the next thing! I’ll share that next, some fun little cat cartoon drawings inspired by illustrator Edward Gorey!
I hope you enjoyed seeing the steps to this little ink drawing, please leave me a comment or any questions below. Cheers!
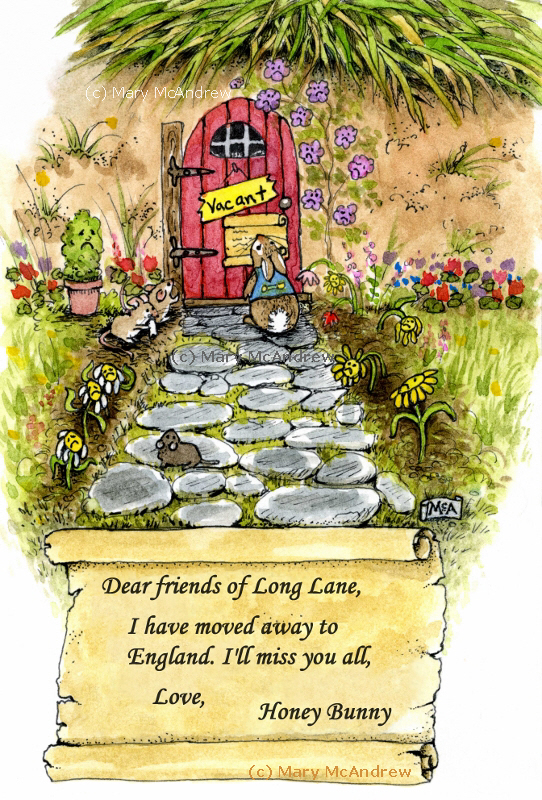
Honey Bunny left a message for her friends at Long Lane.
Honey Bunny made her decision, she’s moved away from Long Lane to England. But her little friends and she have promised to write to each other. She wants to know what happens back home and they want to hear about her adventures!
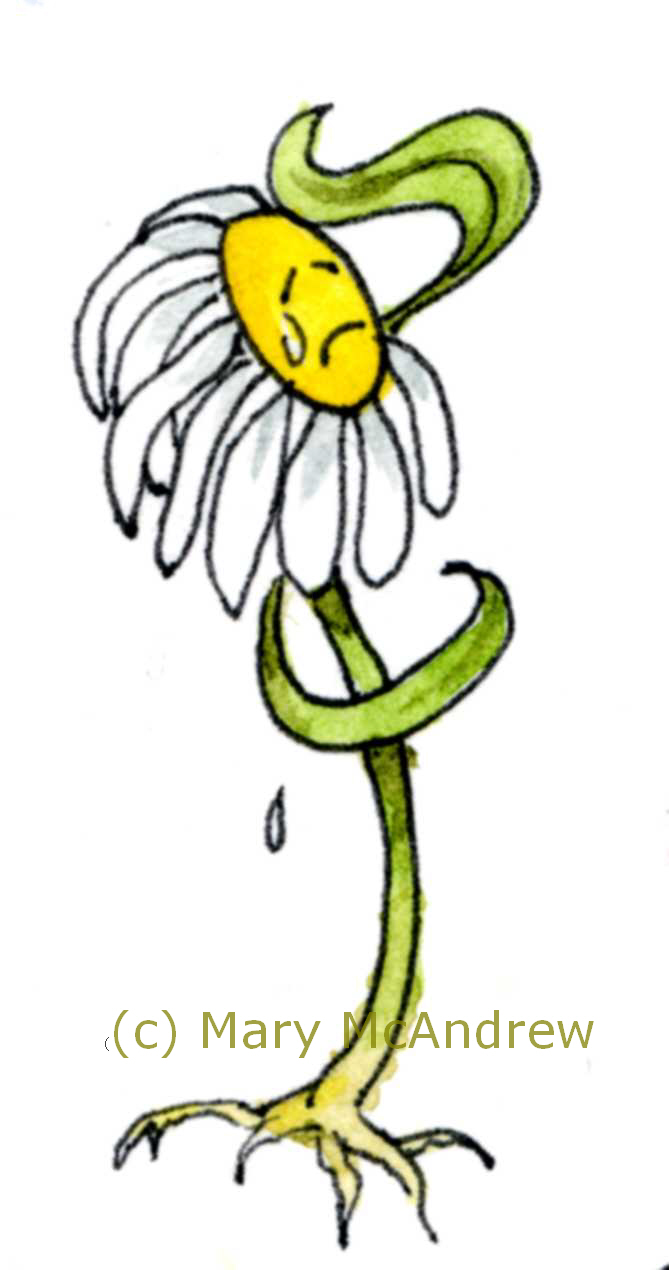
The little flowers of her garden are sad.
Her leaving has made the little flowers of her garden very sad. Honey Bunny always cared for the little living things at Long Lane and they all will miss her.
Her little mice neighbors were sorry to see her leave.
Her mice neighbors had lived near her at Long Lane for such a long time, they were very sorry to see her leave.
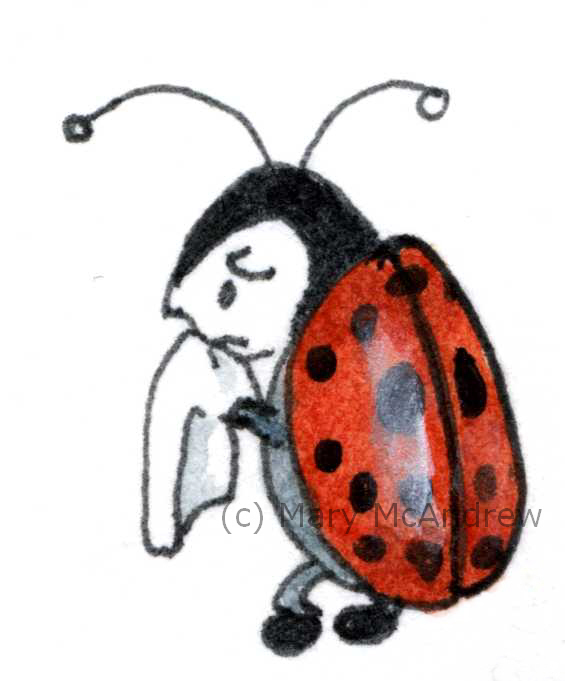
Even the little insects were sad.
When friends leave it can be very sad and lonely feeling but it can also mean something new and exciting is happening.
Life keeps expanding if you let it grow.
Well life has been expanding for me, as I am now sitting at my laptop in a cottage, in Northumberland England. Expansion doesn’t happen all at once, I guess if it did it would hurt! What I mean is I think it’s going to take me some time to settle in and feel like this is home. Before when I came, it was for long visits and it was all new and exciting. I’m not saying it isn’t new and exciting now, just that it does feel different. We don’t have that countdown of ‘days until I leave’ now and that’s such a relief!
But I do keep referring to the place I left, back in Clarence Center, New York, as home! I’ll give myself some slack with that; I still refer to the place I grew up, Endicott NY, as HOME. “Going home to Endicott”…I referred to it like this all the years my boys were growing up, so much that even they used to say…”when can we go home to Endicott and see Grandma and Grandpa?”
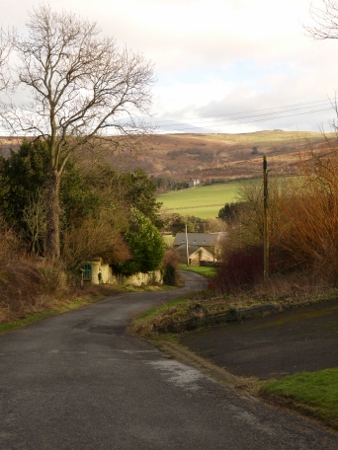
Walking down the lane in a small village.
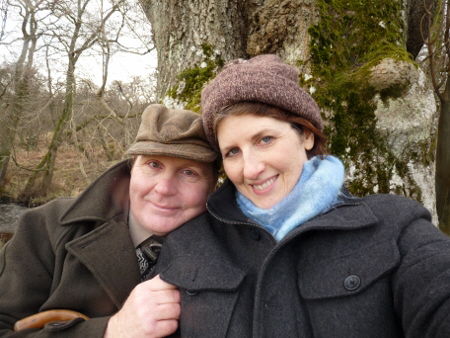
But as they say “home is where the heart is”, and my heart is here with Gary, my soon to be husband. We share a love of nature and walking the hills, listening to good children’s stories and old tales and just being silly and laughing a lot. When I have a new idea for a story or character, and share it with him, it usually expands effortlessly, as he just ‘gets it’.
Gary and I on a walk by a burn or creek.
So as I explore my new gorgeous surroundings, I promise to share lots of photos here. The drawing, painting and felting are a bit on the back burner because we’re still working on arranging things to make room for my soon to arrive shipment. “Groan”….I have a lot of boxes and plastic bins coming!! (Remember all those boxes I kept packing?) But I DO miss my ‘stuff’ and can’t wait for it to arrive!
Well here’s a selection of photos from some of the walks I’ve taken. I’ve done a few little sketches but will share them later.
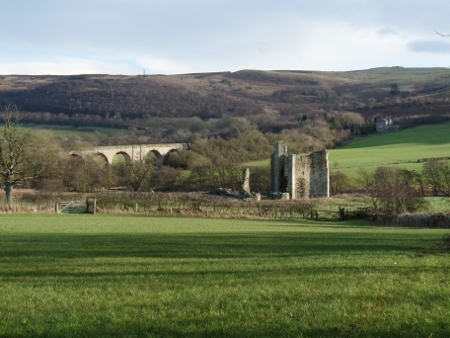
Edlingham Castle and viaduct, right next to an 11th c church.
The viaduct was built in the Victorian age and was part of a railway line; I’d like to do some sketches of it someday. The views are spread out here, that is you can see really far especially if you get up a hill, and I’ve noticed people just walk to things they can see.
“My Northumberland!” from on top of the Crags looking down on the village.
Like above, we walked up to the top of the Crags and you have an excellent view for miles and miles!
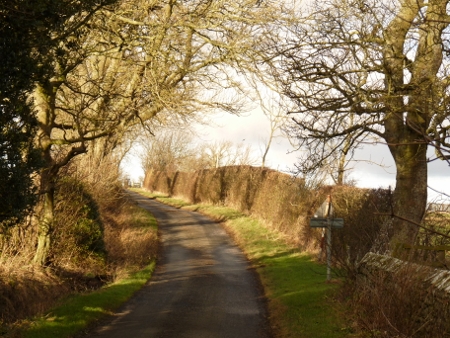
This is the upper or back lane to the village.
This is the upper or back lane to the village and it’s one of my favorite (favourite 😉 ) places to walk…do you blame me?
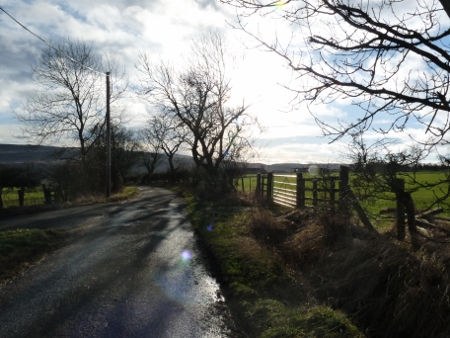
Another view on the upper lane, coming back.
This is usually how the upper lane looks as I come back, with the sun low in the winter sky.
There are sheep everywhere!
Most of the fields and hills have sheep on them. I can guess at three breeds- Norfolk, Scottish Black Face and Texel. They’re all nice but the Scottish Black Faced ones are especially bonnie!
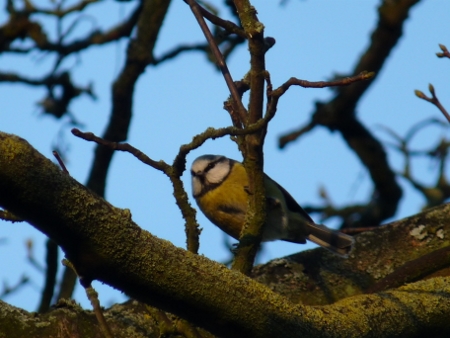
A tiny beautiful bird, the Blue Tit.
There are all new birds here for me to learn too. I’m frustrated when I hear them sing or twitter and I have no idea ‘who’ it is! I’m getting good at identifying them on sight though.
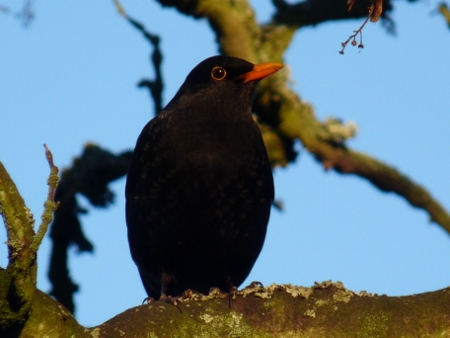
A male Blackbird, in the thrush family and closely related to the American Robin.
This beautiful bird is a male Blackbird…the same that were baked in a pie and that the Beatles sang about ‘singing in the dead of night’. They are thrushes just like ‘our’ American Robin; so things it does reminds me of it, and yes they’re known for their song!
Walking down by the burn, wearing my gators!
It’s spring. It’s muddy. When I go out walking and I put on my leg gators first, I’m always glad I did. The gators wrap around your lower leg and ankle and zip up. They stay put because of a strap that goes under your boot and a hook at your laces. I bought them years ago when I came here and just love them!
A walk along the burn in January.
Can you see how beautiful this is? I love the tangle of roots, the moss covered trees and the branches that scraggle in all directions. I just hope I can start to capture it all when I start painting.
The livestock fence across the burn.
Farmers use old pallets strung together across the burns or streams, to keep livestock in the proper pasture. I really like the way this one looks, like it’s blended in with it’s natural surroundings.
Well I’ll leave you here, time to go get busy. I’ll post more pictures as I go and hopefully some sketches. Please leave comments below as I love to hear from you all!
It’s been a long while since I posted! I’ve been busy with packing up and also selling things in my house for my eventual move. Wow I didn’t realize I had so much STUFF! I was also busy with my eldest son’s University Graduation, which was in Washington DC. and afforded me an entire day at two fine art galleries that would blow your mind. Well it did mine! I’m going to post about that visit next I think!
moss study in watercolor, of same tree
Back to the moss now… I did these studies in March (click pic to see detail) when it was sunny but still chilly and actually quite nice to be out on the land. Trees were still working on their buds; leaves, grasses and wild plants were all just coming up through the dead, wet leaves of winter. But everywhere I looked there was gorgeous moss growing on all the bases of my trees. I have very wet land and there is no shortage of moss!
I did these studies because of a little story I made up about a mouse…and I needed to do moss studies. Wow, a great excuse to go out and paint!! haha. This first study (above) I did the same tree twice; sometimes I do that, the second time going faster, more bold or just trying a different technique. For the one on the right (the second study) I stepped back and just looked at darks and lights of the green, also tried to do the bark quicker. I’ve left a good amount of clean paper because I may be able to use it later to add in some characters or more trees.
moss study in watercolor on tree in Aspen Hall
The study above I was really happy with! I went to Aspen Hall, a special place on my land that my boys and I used to go to, and I picked this one tree because the moss had a different hue. When the mosses are ‘blooming’ or sporing (?) they have little rusty brownish reddish heads that come up on hairlike stalk. If you get in close you can see them; it’s these that give the moss a sort of rust patina on top of the green.
I firmly believe if you want to paint something right, the more you can study and understand your subject the better. You don’t have to scientifically understand all about it, but get up close and really look at it’s parts, ask yourself what those parts are maybe. I find the more you do this, the more you SEE, you will get really good at seeing details you would never have thought about before! That’s my two cents!
A beautiful fuzzy budding bush, close up
On my walk I took a few pictures (of course!!) Here’s a few beautiful, soft buds on a bush. Don’t they look like those fireworks that explode outward? There’s such symmetry in the unopened bud, like a pine cone and the opened ones are irresistible to stroke to feel their softness.
Here's a snail keeping company with the tiny frog eggs
And then there were frog eggs in the wet lane, some tadpoles that had hatched and a snail friend on top of them all.
This could be the mom or dad of those eggs!
I see countless Leopard Frogs while I walk, all jumping this way and that as I come along the lanes. This was a big one so I assume an adult that overwintered and had something to do with those eggs! Now (at the end of May) I go walking and see many young frogs leaping into the wet areas of the paths, new frogs of the year!
A male (American) Robin has his crest raised while looking at me
This male American Robin was in “Pasture Lane” as I walked, he has his crest raised like someone with big eyebrows would lift them to look at you! He’s on alert.
This is a typical pose for robins, with wings held slightly hanging
Here he is again, it’s a good pose to show you how they typically hang their wings a bit. He’s still looking at me you can see!
Well I couldn’t resist adding a few more pictures from my walk, so here they are:
Two beautiful Mourning Doves, watching me from a high branch.
A beautiful setting of moss, grasses and dried leaves on a tree.
And here's my view looking home, along "Pasture Lane", a very wet but ALIVE with creatures lane!
I hope you enjoyed my moss studies and nature pictures from my day out. Please leave me a comment or ask a question, I love getting comments! I promise to TRY to put aside packing for planned sketching time everyday and get back to my posting here!
Some of my pictures link to my Zazzle Shop, please have a look around as I put many photos there that aren’t on my blog.
In the morning looking out my window, I was greeted by an unusual sight, sheep in the courtyard! I guess it would be very frustrating to have a garden here as the sheep kind of wander where they like, especially if their gate is left open. The owners of Cote Howe B+B told me it was hard to protect the garden and they try to put fencing around it.
This morning I was leaving Rydal Water, I was sad to say good-bye. I went out behind the B+B to wait for my friend Gary to come, it was chilly and damp. I climbed up on top of a big wooden gate with huge stone posts and did a balancing act as I swung my legs to the other side. The stone wall is fascinating in itself to study, notice the huge cap stone at the end on the left…I don’t know how deep it goes into the ground, but I’m sure it goes down a few feet at least. This is how the stones were set for Stonehenge and the other stone circles around England and Ireland. The big stone here is used as the post, the wall being built up against it and also gates can be hung on it. The wall has a niche in it, I forget what the owner told me it was for? Does anyone know? Above you can see some beautiful forms of fungus’s and moss. It seems anything that wasn’t moving in England this fall, was covered with mosses! I’ll try to identify these later from my field guides, if anyone has some good identification, leave me a comment please! There were sheep in the field, an occasional hiker and just a beautiful view looking towards Rydal Water and the path I took yesterday for my hike. I sat on a gate and sketched the sheep and path view, the bunny is from when I was standing by the garden and saw him there. I sat so quietly sketching that the sheep came right up under me, when I spoke to her, she was very surprised to see me! That’s the neat thing about sketching in nature, you sit so quietly engrossed that wildlife will come around you.
Below you can see my original page, this is what I did as I sat on the fence, I painted it in while looking at the photos on my computer screen, using my tiny Altoids watercolor kit and just one waterbrush. You can see my tiny color tests in the spiral area of the paper.
This is a continuation of my weekend at the Allegany Nature Pilgrimage at the end of May. This post I have some pictures of fungus, lichens and moss from the non flowering plants hike I took led by Alice Brown. This is a fungus I’ve seen growing on my land in Clarence Center NY, in the Adirondack mtns. and at Allegany. It’s a fungus I identified as Trametes Versicolor, the common name is Turkey Tail, so named because of the variable bands of color. I’ve seen it in all seasons which makes it kind of fun to look for, check dead trees and branches on the ground etc. I read on a website that a tea can be made from it and that it’s used to fight cancer and hiv. Don’t quote me on that but it’s what I read, I do know that mushrooms can be very good for you. I wouldn’t recommed going out and eating these though…my mushroom book (Simon and Schuster’s Guide to Mushrooms- Excellent Book!) says that it’s inedible because of texture. This is a flat fern type of moss, I don’t know my mosses yet so if someone can help me out here. I have to look for a good field guide, you know…tall, dark, handsome! haha…no really, the kind with pages is fine! This is a picture of mosses on the side (type?) and in the center is a type of lichen, foliose type I think. I’ve always liked the cool color of lichens..like the green patina copper gets when it’s out in the elements. Then there was the night I was headed to bed, enhausted from all the hikes and early mornings, but saw this show-stopping Luna Moth! Wayne Gall had a simple white sheet up each night with a really bright light to attract all kinds of bugs. I never imagined I’d ever see a Luna Moth and there it was! Wow! It caused quite a bit of excitment. I definitley have to do a painting with one of those in it. Notice the antennae…so large. This is a page from my sketchbook, just some quick sketches of the dragonfly talk led by Jeremy Martin. Below is a picture of a dragonfly that just came out of the ‘Exuvia’, or shed skin. That’s what I did the small sketch of above. I have written in my sketchbook that I took a picture of a Springtime Darner…maybe that’s the type below. Well as I said, not too many drawings on this Nature Pilgrimage…I needed the whole following week to stay there and digest all that I learned, and go back and sketch things. Be sure to check my post about Thunder Rocks coming up!
Welcome to my Blog!
The most up to date information about my artwork, nature sketching adventures, or step by step demonstrations. Search using Categories or Tags, or use the search box in the left column.
Please sign up below to get notified when I post new articles.


fuzzy budding bush (12)")
frog eggs (8)")
Leopard Frog")
male Robin (3)")
male Robin (8)")
 two Mourning Doves")
")
")


