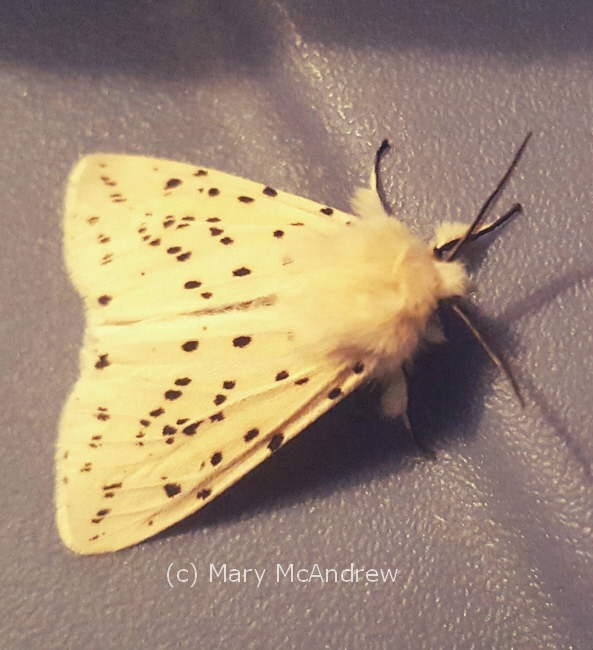
This is the White Ermine Moth that came to visit the other night.
This is the White Ermine Moth (Spilosoma lubricepeda) that came to visit us here in Northumberland the other night. What is it about moths that gets my interest so much? There are so many kinds, they hold their wings in different ways and seem to ‘sneak’ into the house and surprise you. This moth has a wonderful ‘Ermine’ fur coat and furry legs. He has long slender antennae with delicate fringe and speckles on it’s wings that are different on every single moth!
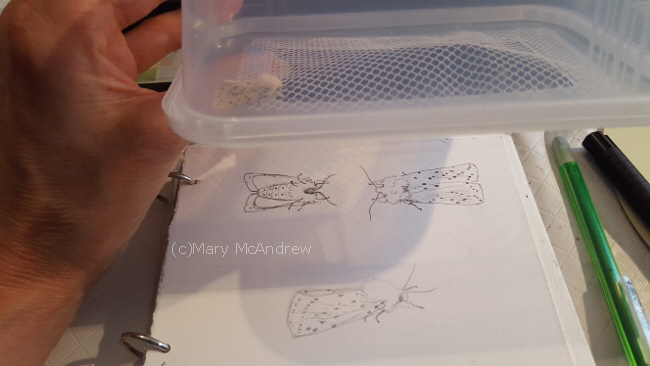
Sketching the moth in my little field sketchbook.
I made a simple holding container for when I catch interesting bugs and want to study or draw them. This is just a plastic container from Wilko, I cut a rectangle in the lid and taped some mesh over to cover it. I had a better container before I moved to England made from a clear plastic container, but like so many things I had to leave it behind, so this one will do for now.
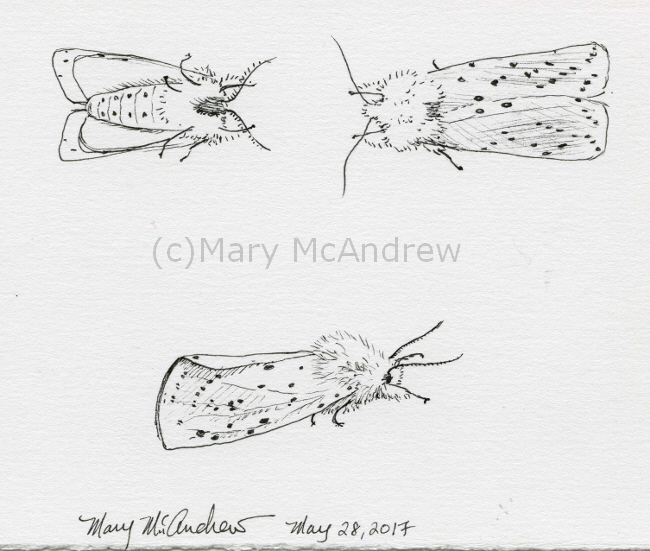
Ink studies of White Ermine Moth
First I sketched the moth in pencil, then used permanent ink and erased the lines. I know it would look nice if I did an ink wash around the moth so it will really show how white it is, but this is just a brief study. I feel I have no time for lengthy studies lately! I think when I have some time I’ll go back and put a watercolor wash around the three studies to make them stand out white.
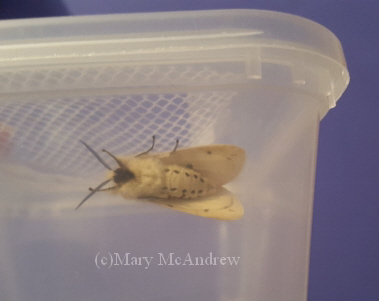
The underside of the White Ermine Moth
This shows the underside of the moth, his little furry black ‘face’ and neat rows of ‘buttons’ down his front! It’s things like that that inspire me to think of drawing little characters! One of these days I’ll make a better container, a jar is also very good to use.
The way he holds his front legs and the ‘fur’ on them and his body reminds me of the beautiful moth I discovered back in NY. Here’s the post I did about it: http://marymcandrew.com/beautiful-wood-nymph-moth-june-2011/ I hope you take a look, it really was a ‘beautiful’ moth!
Click this link to see some really great photos of other White Ermine Moths: https://www.ukmoths.org.uk/species/spilosoma-lubricipeda/ It was this website that helped me to get a positive ID on my moth, but I would have had much trouble doing it if I didn’t already know that it was an Ermine Moth.
Do you remember my last post about the cocoon I was watching all winter long?
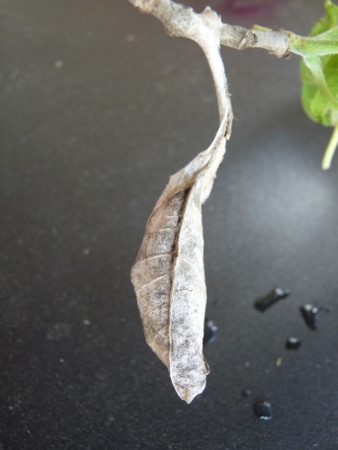
Unhatched cocoon hanging in tree, April 20, 2014
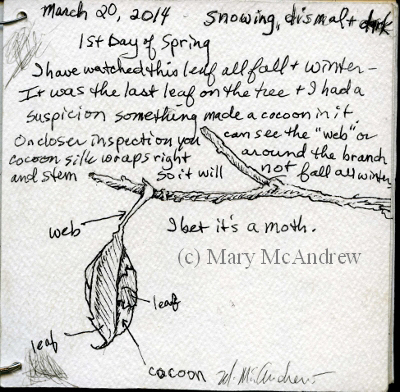
I did sketches of it on cold snowy days, while it hung in the tree, disguised as dead leaves.
March 20, 2014 – first day of spring, snowing, dismal + dark!
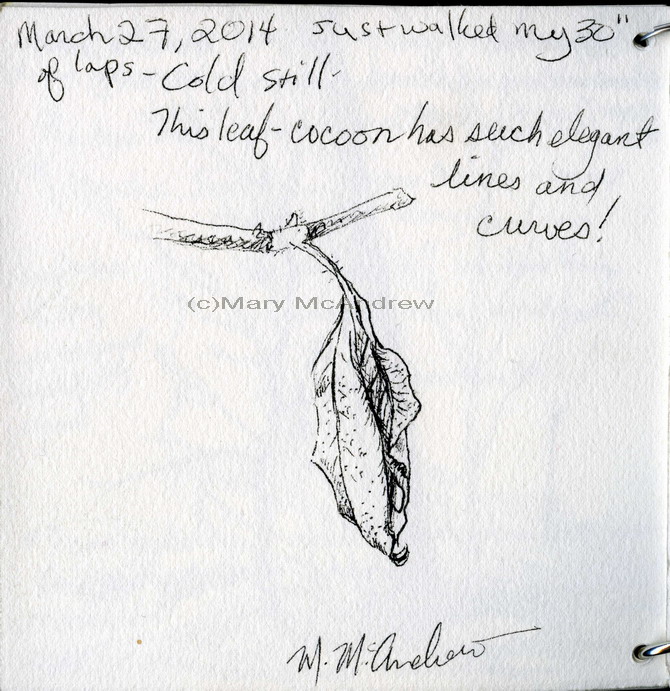
Another sketch of the ‘leaf cocoon’ after my walking was finished. (March 27, 2014)
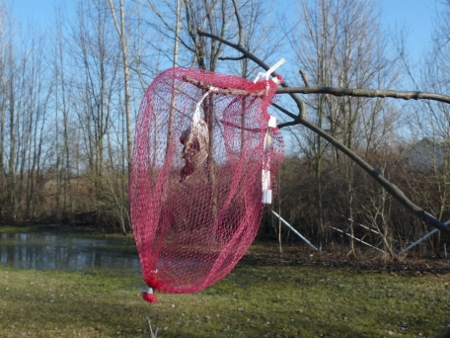
Then one day I got the bright idea of putting mesh around it so when the mystery bug hatched I may have a chance to see what it was. I also knew that I now took responsibility for this creatures’ welfare, I had to check it everyday so if it hatched I could release it! I fastened it with wire bread ties.
Plastic mesh onion bag I carefully put around the cocoon.
Well as the weeks dragged on into spring I sort of gave up hope; I observed a small hole at the top and thought maybe something got at it. Also a ‘bug friend’ told me that sometimes wasps will parasitize these cocoons and it may not live. Leaves from the tree were now poking out through the mesh and black ants were crawling around everywhere, where was my ‘creature’?
June 1st, still not hatched!
Well one morning while walking around the yard I spotted something big and dark in the mesh bag from way across the yard! I actually ran across the yard, I was so excited! (yes, I really did! lol)
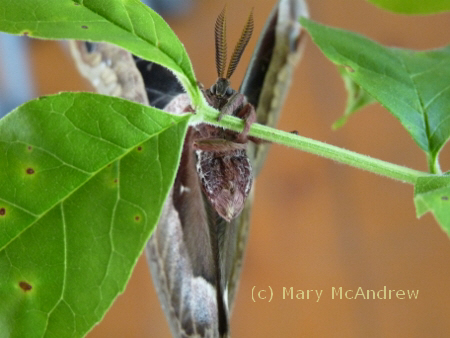
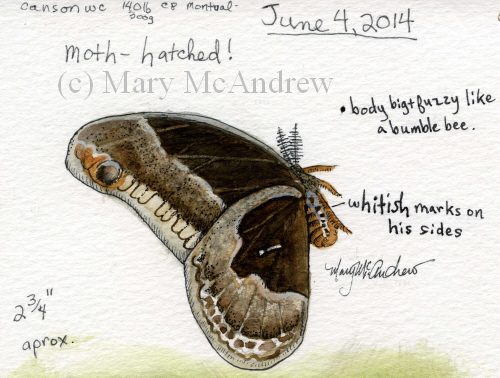
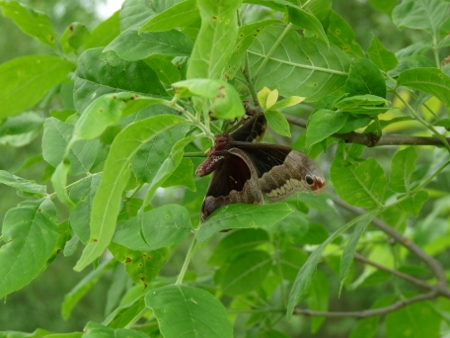
Much to my delight, not only did it hatch but it was HUGE! Introducing the “Promethea Silkmoth”! (Hatched June 4, 2014)
I love this photo, you can almost see his ‘face’ saying “Help, I can’t hang on!”
I ran in the house and got my pruners and clipped the small branch it was on. I took it into my shady back porch and stood it up in a vase of water, then thought about how to sketch it quick so I could release it. Well it had that ‘ugly’ red plastic netting around it, but being that I was in my screen porch and it had only just hatched I decided to carefully cut away the netting. Lucky me, the moth still needed to hang out a bit to get stronger, so I took lots of photos then settled down to sketch.
I did this watercolor from life then later finished from my photos.
Like many moths, his beauty wasn’t in his bright colors but in the subtlety of his patterns and earthy colors, and boy was he beautiful! I also loved his fat, furry body, it was deep rusty color with interesting patterns on the sides. In the sketch above I used my permanent ink pen along with the watercolors for real definition.
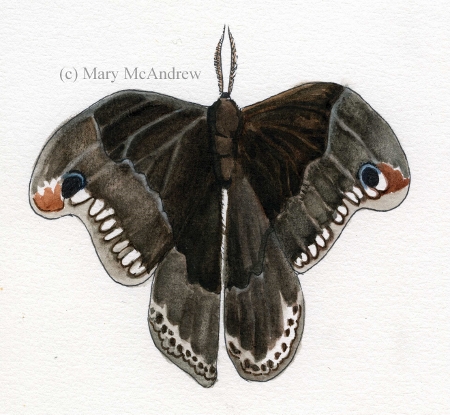
This one I avoided using the ink pen to see how it would look with just watercolors.
The sketch above I avoided using the ink pen just to see how it would be with just watercolors. It’s softer looking but I favor the other one, which I actually spent a lot more time on too. I traced around a card to create the box look, then just colored around it; a nice way to ‘decorate’ your sketches!
Promethea Silkmoth with his wings partly open.
Then I painted this view from a photo, where he had his wings partly open. I loved the ‘teeth’ patterns on his wings, above and below. It was when he decided to fly around in my screen porch that I noticed when his wings are open, he looks like a fearsome beast with many big teeth!! Well imagine your small too, and want to eat this moth, suddenly you have all these teeth and eyes (two black with blue spots) looking at you! Another interesting thing with his behavior was he shook his wings, something I’ve seen other moths do when frightened. He wasn’t shaking in fear! He was making himself look fearful! How cool is that?!
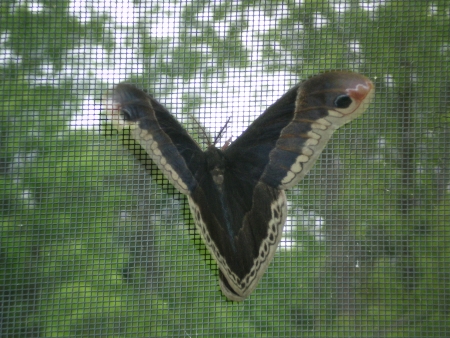
Flying around in my screen porch.
Above, here he is on the screen, shaking or vibrating his wings at me.
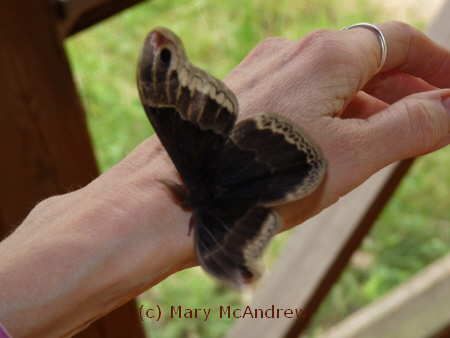
A nice photo showing how beautiful his antennae and body are.
His little feet tickled my hand!
This photo above really shows the scale of how big he was. Now he was getting active, time to release him to the world!
I put him back into the tree his cocoon was on.
I put him back onto the tree his cocoon had hung in all winter. It didn’t take him long and he fluttered around then disappeared…off to find a mate I’m sure or find dark shelter for the day.
Now all that’s left is the cocoon.
I hope you enjoyed this excited discovery with me! I know I’m late posting about it but as many of you know my time is taken up lately with preparing for my big move. I do have some other interesting photos and sketches from my backyard adventures, I’ll try to post as I can.
I know it’s already November and I’m way behind! I have more trouble getting online and having time to edit photos since I’ve been here in England. But I’m trying to go with the flow and keep up with posting my sketches and photos. I’m also using a tiny new laptop and my usual photo program isn’t on here, so I’m getting used to editing pictures with something new (sorry if they look small etc). I’ve also felt really down since my dad passed away and it’s hard to feel creative, as many of you probably know how that is.
But here’s a few cows to start off with! It’s what I see most of around where I’m staying so they’ve gotten my attention. I just love the velvety look of their fur in fall. The days have been very cold, damp and windy but I did these sketches standing along the field in the wind! Brrrr.
Red Cattle in the Field, Oct 1
I wrote a poem as I watched them, just put a few words down then later I changed two words to make it better. I’ll retype it here:
“September ends…October is here,
The little Robin sings, Winter is near!
The red cattle in the field look so nice,
Fur like rust velvet, ready for Winter’s chill and ice.”
(c)Mary McAndrew 10-1-11
Overthwarts on the Hill, watercolor
The page above I did on October 2nd, it was windier, colder and wetter still than the day before! I wrote a note on the page about how hard it was to draw, of course I was wearing my fingerless mittens too and they are hard to paint in! There’s a farm called Overthwarts up on that hill as I looked from where I stood near Edlingham castle.
Cows at rest and an Angle Shade moth, ink.
The same day I walked a ways up the lane where it got even windier, I found some cows to sketch and sat down along the lane where I could see them through a break in the hedge. Getting down low really got me out of the worst of the wind.
Then another day an Angle Shade moth paid us a visit by coming inside, I guess it’s hibernation time! He didn’t want to leave. I put some sugar water in a little jar lid and he sucked it all up and grew very fat! Anything to help a little hungry wanderer. It hung around a few days just sitting there then disappeared, so I don’t know if he’s hiding out in the house or went back outside.
The furry red cow eyed me warily
Here’s one of the bovine beauties watching me, I tried to walk slowly and talk quietly to her but they are so skiddish, she turned away and made a retreat as I approached.
Well I hope you enjoyed my outdoor sketches, more to come, slowly but surely!
I had some fun creating note cards with cow (and sheep) photos I took in England, have a look in my shop!
I headed out to the back fields today, before the day got too hot. As I picked up my straw hat and plopped it on my head Ginger got all excited, her eyes riveted to my every move. Her whole body tensed and ready to run out the door, as she knows this means we’re going out. Now…when I have my sketch bag in hand and pick up my camera and sling it over my shoulder she knows we’re in for it! The ‘Big Walk’ hahaha…well it means we’re leaving the yard and going out to the ‘wilds’ of the fields and lanes. Yes, if I was a dog I’d be acting just like her!
Ginger waits expectantly!
As I walked I was VERY mindful of watching out for the huge yellow garden spiders that I discovered in my overgrown field, I didn’t want to walk through one of their webs! I’ll show you pictures in another post! Every step I took about three grasshoppers or more would fly up and over the grass for a short bit then land again. As I studied them I laughed to see when they landed, many times they did a sort of “moonwalk” backwards down the stalk they were clinging to.
Red Legged Grasshopper I think
If you stop to study them close, using the zoom lens on a camera is a great way, you’ll notice how many different varieties there are. I am guessing some of the many types may just be different ages of the same grasshopper, or males and females, all were really interesting.
Fat Yellow Grasshopper
Most had some kind of interesting pattern and colors that I’d like to do some studies of someday. First I need to start identifying them better, my field guide to insects is woefully lacking in species of many insects, grasshoppers included.
Nat. Wildlife Fed. Field Guide to Insects and Spiders of North America
Though it’s not a bad all round guide to start with, I find now I need much more species to choose from.
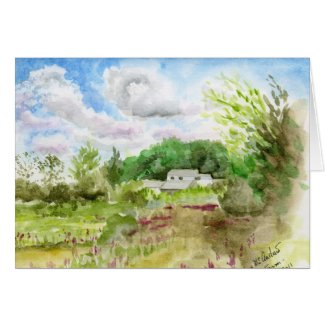
Long Lane Farm in August - watercolor
Well as I got out into the field a ways, I paused and looked back and this is what I saw. The Purple Loosestrife was blooming, clouds billowing, wildflowers dotting the field. I did this small watercolor using one waterbrush and my pan of colors, while standing in some very hot sun. It was really hard to find any shade and it made me a little ‘snow blind’ looking at my page.
A tiny Eastern Tailed-Blue butterfly
After that Ginger and I made for the lane for a bit more shade. I’ve been noticing this tiny butterfly now sometimes when I walk on the lane. It first caught my attention flitting around the grasses and I thought it was one of those tiny white moths I always see. (It’s only as big as the end of my thumb!) There was something about it though, it seemed to have a bluish look too. So I followed it with my eyes to see where it landed then zoomed in with my camera and there you go! Ahha! A butterfly. Just one of my little discoveries this summer.
He shows a peek of blue wing
They don’t give up much, this tiny, tiny butterfly hardly ever opens it’s wings to show off it’s gorgeous blue!
Hummingbird Moth feeding on Teasel
I couldn’t resist slipping this picture in to share. I have a great big area behind my barn that’s overgrown now with Teasel. I found the Monarch and Viceroy butterflies, and to my delight Hummingbird moths, loved feeding on them. I would encourage everyone to grow some for them to feed on and for their beauty of form.
Teasel drawn with permanent pen
I love drawing Teasel and long into winter you can enjoy their elegant forms. This is a drawing I did years ago in the fall, (sorry I don’t have it scanned large enough to enlarge much) can you see how much fun you could have looking at it’s bristly but graceful form?
I hope you enjoyed our little walk on Long Lane Farm. I always see or find something new when I stop and look for awhile. I want to point out that I have been adding great links for identifying things on my “Nature Links” page, please have a look. I use these links often when I need to identify bugs or blooms. I’m adding links all the time so everyone can use it, please let me know if you have a favorite you want to share!
Below are a few note cards I created in my shop from my sketches or photos, I hope you enjoy them!
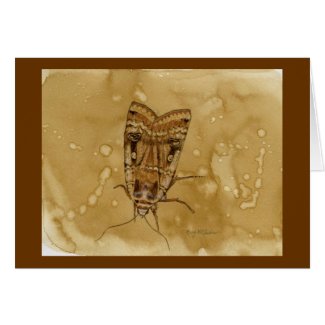
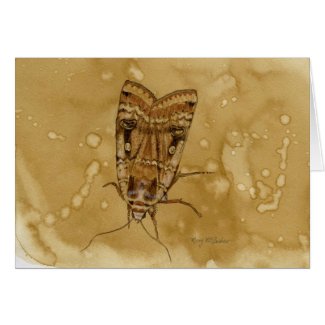
This moth is a little watercolor painting I did on coffee stained paper (click it to see it larger and clearer). Using instant coffee to stain your paper is something I taught in my Creative Journaling class. It’s great to use lightly on your paper to make it look antique or like parchment. Here I just played with it like watercolor and brushed it around, then splattered water drops into it. Let it dry totally then you can draw or paint on top of it as I did. I have a few small sheets that I did at the same sitting, so I can grab one when I’m in the mood and use it. I lightly sketched with pencil first then just used burnt umber, burnt sienna, black and a touch of white for highlight. This was from a “Yellow Underwing” moth I photographed last year.
I have always loved the illustrations of Arthur Rackham and it’s the works he did using mostly brown colors that inspired me to work with brown tones alone. Click on any of the illustrations to see cards or gifts I created in my shop! There’s more items coming in the category Vintage Illustrations.
Flippant Fairies Floating Freely
Just look at how gorgeous this painting is!! Sigh…I love his work. (Sorry I don’t have a bigger copy to view) The background is just subtle tone, there’s a hint of tree tops below and then the sparrows come into view as they nonchalantly go about their business of preening. The branch is laid out as a perfect design element reaching across the paper and reaching up to lead your eye but not take you totally away from the subject of the fairies. Yes, those fairies, painted lighter than the rest to really make them stand out, aren’t they wonderful? Not having pointy ears, pointy eyes, pointy hair, sexy clothes and striped socks. Good God some of the awful modern day interpretations of what a fairy is is shocking! Just plain tacky and awful!
Oh but this is one of my favorites!
This is one of my favourites! SIGH….that’s how I feel when I look at work by another artist I revere. I love her dress, the attention to it’s detail but it doesn’t take over the attention of the piece, do you notice how the lower part blends into the tone of the ground and the skirt is the same as the background? It’s all married together, floating but on the same ground, do you know what I mean? Just like the tree roots coming from nowhere out of the paper and growing up into this tree that is alive. I love how he combined just enough elements that say man and tree at the same time, the fabric hanging adds a touch of color that picks up in her cheeks and it’s form adds a floating liveliness to the painting; movement. Not to mention the tenderness of the way they clasp hands….sigh.
Subtle tones means less distraction
In “The Man in the Wilderness” above, I love the way he draws his trees to be just like people, look at the ‘arms’ of the one in the background reaching up to the sky. For a child (or adult) reading the story this illustration would be something to pause over, study and discover. They’d see the obvious girl and elf and think about what they are doing but then they’d look at the trees and realize with delight they have faces and arms! Here again I like how he’s used such simple color to make this illustration, just a simple bit of red and gold on the elf to show the main subject. I can’t wait to use the card in my shop (click picture to see) as an invitation or birthday card, “Can we meet for tea?” “May your day be full of discovery”. Oh, how about a funny one for your friend…”I know you’re kind of different….but I like you all the same!” haha
The Queen floats in as if on air
This illustration shows use of line at it’s best, do you notice how in some places it’s thicker and heavy then it gets thin and light? This is very important in drawing, good drawing. This one is definitely more of a drawing than a painting, hardly any range of values used, quite flat. It’s all about the lines and what lines!, all swirling and curling, sweeping like there is a magical breeze blowing just her skirts and delicate lace veil. To give some depth and interest I like how he put the pale leaves and branches at the top then used a light similar design on her skirt in just the front.
I have wanted to do drawings and paintings starting with a freely painted base of brown or parchment colored paper for ages. The moth is my first one I guess, though I’ve done paintings before that are monochrome browns, (Autumn watercolor, Etain oil, Twilight oil) they were never started on a freely tinted paper. By that I mean a piece of paper where you just play with the color and use water drops and salt to add interest and you end up with something that in itself looks good. I’ve played with coffee staining before (as you can see on this post) but never got around to painting on them. So I’m hoping to do some more starting with small studies like this moth. Hope you enjoyed my discussion on using browns and the great Arthur Rackham! (more sighs) Oh, and I found an excellent, though old, article written about a show of his works in London in 2002 here on the “Telegraph”.
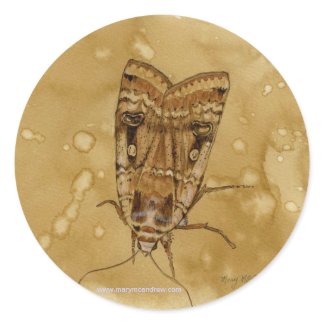
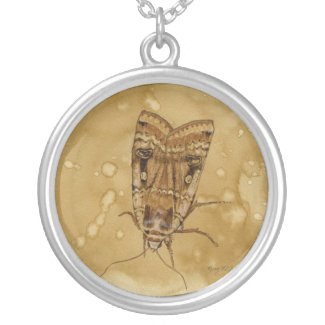
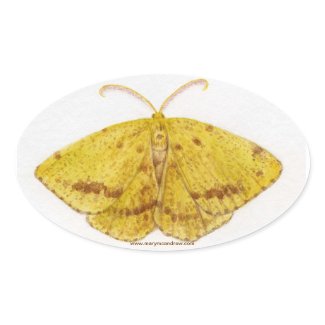
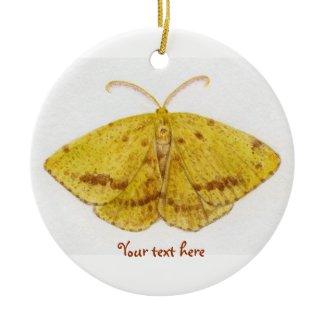
Below are a few items I designed with the Moth painting on it, please click the picture to see them in my shop. Enjoy and let me know if you’d like it on another item!
Try these stickers out, they’re glossy and I love ’em!
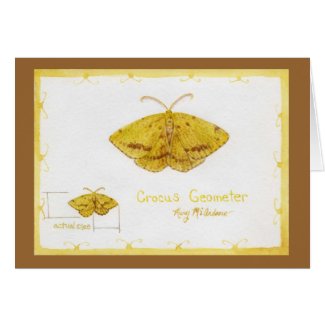
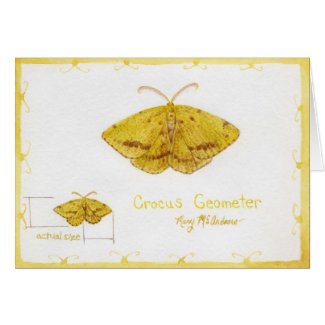
Crocus Geometer Moth full page from my sketchbook journal
In the morning when I let Ginger (my dog) out the back door for her morning wee, I always survey the screen porch to see if any visitors of the mothy type, have overstayed their visit. I used to leave the screen door open so I could be lazy and Ginger would just run right out, but stopped when too many flies were coming in! But I did get all kinds of moths in there! Well even with the door shut, some do sneak in and that’s how I found this little guy. Well sad to tell you it wasn’t alive, but laying on the floor in perfect condition. So I gently, gently picked it up and put it in my “Crisco” container for study.
Above is a full sketchpage from my journal, I did a life size study in the lower left corner and an enlarged size in the middle. I had fun with the border by just using my waterbrush with a matching color and added little ‘butterfly’ heads.
My set up when I sketched the moth
You can see in my picture that I lay the moth on the lid of the “Crisco” container and that way I was able to move it around as I worked. My watercolor pan is under it and the sketchbook is on my little table top easel box. (you can see my last page from the lady bug post!)
Drawing a study at the same size first
Now here I’m showing how nice it was to sketch the same size study by having the moth on the plastic lid. Using my pencil I did comparative measurements to compare the width to the height of the moth. Do you see those lines on the page? I put them just as a teaching tool, to show you that I found the measurement from inside wing to outside tip was the same measurement as the bottom of the wing to the top, his head I think it was. I always use comparative measurements when drawing!
Such a gorgeous colored subject!
Isn’t this a beautiful moth? His antennae were really elegant and graceful, very hard for me to paint with watercolor! The more I studied him under a magnifying glass the more I saw and appreciated it’s beauty.
This is how my larger sketch looked at first.
(Above) Now I’ll show you the steps I took to do the large painting of this Crocus Geometer Moth, mostly how I drew it. Do you see how boring and technical it looks? I know, but if you don’t start with a clear drawing done in PROPER PROPORTION it will never look right! Sorry, I”m not shouting, but it is REALLY important! If you do anything, learn how to draw well!
So I used my pencil to compare the width of the wings tip to tip to the measurement of the moth top to bottom. I put light lines on the paper then drew an arc as close to the shape of the ‘real’ moth subject as I could. Then I decided where the wings ended in the centre, keeping in mind that they overlap.
The second stage is lightly sketching the placement of shapes, wings, body, head.
Above you see a lot more drawn here; I drew an arc lightly for the bottom wings too, then decided where the two wings met and overlapped then drew them. I found the wing tips were half way between the head (top) and bottom wing edge, can you see how there’s a little ‘t’ at the tips?; that’s centre from top to bottom.
It’s really fun when you get into a drawing and start to find things that are the same measurement so you can check other parts of your drawing by comparing them! That’s why it’s called Comparative Measurements! (This is something I teach my students first!)
Then I clean up the lines and decide how the outline will look.
Look back and forth at the subject and drawing, look for areas that might be out of line and fix it now. After you feel your measurements are right, you clean up the light lines and decide on the lines you leave. Keep your final line clean and neat. Use your kneaded rubber eraser now to dab repeatedly at the line to lighten it as much as you can, just enough so you can still see it but you can do watercolor over it and not have it show.
Laying in some washes with watercolor and adding some details.
Here I put the first washes of color on and then started to add where the dark markings are and light wing ‘ruffles’.
Larger study of the moth finished.
And here it is finished! I just kept adding the tiny spots and built up the larger dark markings. Sometimes it dries and just doesn’t look as colorful because watercolor can look lighter and duller after it dries. So I go back and add some light washes when needed to perk it up, I added bright yellow and more browns on this one. (ps. I did have trouble with the antennae! I need to practice how to do such tiny detail with watercolor!)
I’ve created some really pretty note cards and other things in my shop using this page from my journal, please have a look! Please forward my shop (or this post) to your friends to help me spread the word.
(Click on any picture to see larger, picture links at the end of the post go to my shop, enjoy!)
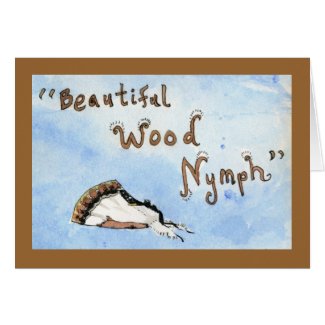
The "Beautiful Wood-nymph" moth...my newest discovery!
As your family and friends get to know how much you love to study new bugs and things, they will start to point things out to you that they find. This is great because it’s more ‘eyes’ watching for things than just your two. Well my son Paul, home from college, said there was an interesting moth on the back screen. I didn’t pay much attention until he again said, “Mom, you really should look, it’s really different looking!”
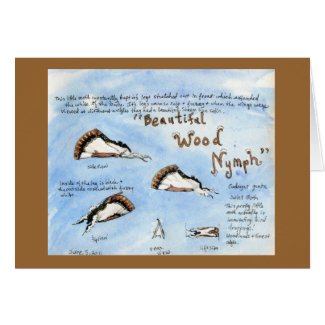
My two page spread of studies from life of the moth.
Glad I listened and glad I looked! It was a small moth who must have made it’s way onto my porch looking for the lights. Above you can see how I used two pages of my sketch book journal to do studies. I’ll share with you the steps I usually take when I find a new bug to study.
View from above taken with my tiny Olympus camera.
Before anyone gets their portrait painted, I get as many photos as I can to file for references, maybe for a future painting or at least to properly identify it. I usually have some plastic containers around that I use, this one was perfect, it’s from a “Crisco Sticks” shortening package; the kind you buy with three sticks in a pack and they’re easy for measuring. One of the plastic containers has a lid and the whole thing is nice clear plastic!
View underneath the moth, many times reveals a surprise color!
I also have some fine mesh that I can put over the top with a rubber band, I never want to kill the creature (unless it’s a house pest, I may not be so nice then!) I love using my tiny Olympus camera to take the close up photos, it works great on the macro setting. This shot is through the bottom of the container. Another tip, I go outside into the natural light if I can to take pictures, the color is always so much better; this was taken in bright sunlight.
This is my set up showing how I positioned the moth under a magnifying glass.
This photo shows you my set up for drawing. Now that I have lots of pictures to save, I put him under an old magnifying glass that stands up and start sketching. Do you see there is no lid? The moth was staying put, maybe because of the light, so I kept the lid off to work. I start with a light pencil sketch and then use permanent ink (you can see my pen in the background, this was an Itoya Finepoint System .2)
I did a 3/4 view to show another angle.
This is a close up of one of the sketches, I try to do different angles to show various aspects of the bug. I thought the furry legs were fascinating! (and made it look ‘cute’ actually!) I colored him in after drawing with the ink, but sometimes I do it in the opposite order. I laid the washy blue background in after I colored all the moths, I wanted it to be lose and just ‘pretty’.
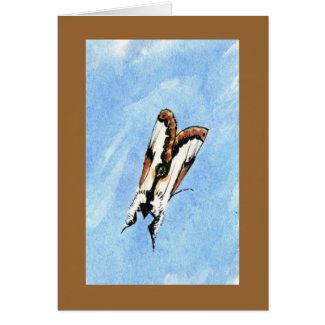
View from above of the Beautiful Wood-nymph.
What an appropriately named moth…”Beautiful” really is in it’s name!
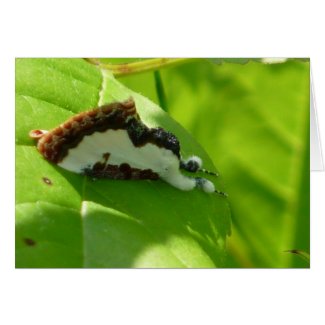
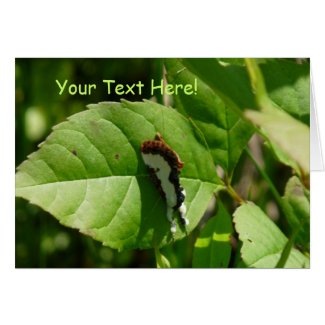
Beautiful Wood-nymph in the 'wild' on a leaf.
Now here’s the cool part of my story! I went for a ramble the very next day, hoping to find some interesting butterflies to photograph. I was into the first pasture and saw a tiny fluttering in a low plant, I watched for where it seemed to end up then just studied the leaves and grasses, looking for a butterfly. See below:
Hiding down low in the grasses, can you believe I found him?!
Ok, I’ll brag a little here, I think I have good eyes for spotting things, because I found him! Hiding amongst all those grasses and leaves. Can you see how well he can blend in, but then, not totally.
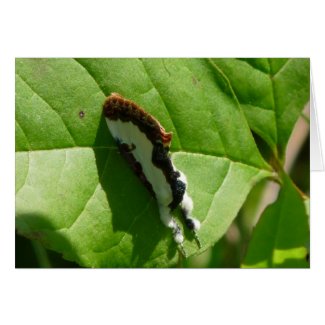
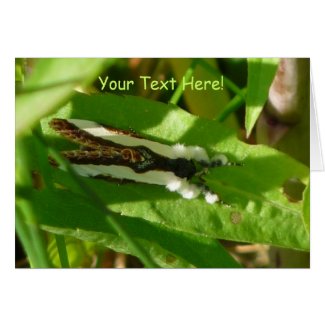
Another shot showing how well they hide on the leaves!
Then he flew around again and re-landed; this shot shows him pointed downward, always keeping his legs stretched out in front.
The Beautiful Wood-nymph imitating bird dropping, that's his job!
When they do that, it makes them look like bird droppings and that’s their defense!! I’ve seen pics in books about such things, but never saw one myself. Though he imitates such a yuchy thing, the moth itself is really pretty! I enjoyed studying how the wing pokes up through with a curling flourish and the fuzzy legs that remind me of a Poodle dog. The wings had a sheen in the sunlight that looked like white satin.
The big thing all of this made me realize, was that I’ve been living here for about 17 years and I never noticed one of these before! Well, much of that time I was busy raising my boys, taking care of animals and whatever else. I didn’t go out walking in my fields all the time as I do now. What I’m trying to say is there is SO MUCH around us that isn’t seen, unless we start looking closer to see it. And then, like this moth, once you see it and study it, it’s more likely you’ll see it again. Try not to miss anything, try to capture it all and the best way is in a sketch journal!
(No moth was harmed in the making of this blog entry, the names were not changed because he’s not innocent, he’s guilty of being “Beautiful” heehee)
The following pictures go to glossy Note Cards I created using my painting and photographs of the moth. Please have a look and share the links with nature loving friends you think may enjoy them!
Well at first I was going to call this post “Little Brown Moth” as I couldn’t guess what kind it was. Have a look at my sketches below and then read about how I figured out what it was.
The last time I found a moth it was a fugitive hiding behind my kitchen door curtain, this one was very similar. He was inside my kitchen sliding door frame…just another ordinary little brown moth. I dismissed it as such and thought, well later I’ll look at him and maybe do a sketch. All I could find to hold him while I studied him (without hurting him) was an empty camera lens case; it’s extremely clear, round, flat and about 3″ across. I made sure not to close it so he could have air and tried to work quickly, I am mindful of his life in my hands and don’t want to stress him too much.Trying not to touch his wings I gently cupped my hand over him and could feel him fluttering inside my hand.
He did get away I’ll admit, then it was actually easy to hold the lid over him then put the bottom up to catch him from off the exhaust hood over my stove…with me perched on a chair!
"Common Looper Moth Studies"
The first two sketches are done from life using a quill pen and brown ink. The ink will run when wet so I used a waterbrush to gently touch it and ‘make’ it run; it turns a beautiful reddish brown when you wet it. (Pelican ink) I also noted the actual size, you can see it’s quite small so a magnifying glass was handy to help me see him.
The drawing on the bottom of the page (above) is done while looking at a photo I took of him. I put a very light sketch in pencil then used my permanent brown ink pen, to which I added some watercolors. This study is only 2″ tall, pretty small in my tiny sketch book.
Common Looper Moth study with notes
You can see from my notes, what was so interesting about this little brown moth is his profile! When I looked at him from the side I was surprised to find the bristles sticking up like a crown or furry coat. He also has a big ‘nose’ looking thing, I think that’s actually his tongue or mouth parts?
Common Looper Moth side view
Here are two photos I got of him as I released him outside; it was going dark so the lighting isn’t great. I think the best shots I’ve gotten of captured insects are when I am about to release them, outside on my screen porch in natural light. The photo below is blurry, SORRY! but the light was fading, I just wanted to show you his wing pattern.
Common Looper Moth top view
Now a few notes about how I identified him. After studying his form and the unusual profile this helped me, I took note of the whitish marks on his wings and the color of the ‘underwing’. I went to my “Nature Links” page and clicked on “Bug Guide.net”; this site is very helpful but sometimes can be difficult if you’re a beginner like me. I started with “Moths”, click on that, then they showed a silhouette box and that was most helpful. I clicked on the one that looked just like my bug, and from looking it up in my “Field Guide to Insects and Spiders of North America” I at least figured out that it’s some kind of Owlet Moth. Cool, well, now what? My field guide gave me no more help, but on the Bug Guide website I saw another website called “Moth Photographers Group”, (now a link on my Nature Links page!) and when I went to a page it recommended, I was able to really see so many moths and almost certainly identify mine. Then I copied the name and went back to “Bug Guide” and pasted it in the search box, oh wow!, lots of pictures came up now of MY MOTH! Yes, that’s it, an Autographa precationis!
A tip from me, on Bug Guide, if you find a page with pictures you want to look at, use your back button to return from looking at a photo or else it will bring up a whole new set of pictures, not sure why. Another tip, when you visit the Moth Photographers Group, to see pictures go to the “Plate Series” page for links to pictures, BUT I highly recommend starting with Bug Guide or your Field Guide to get an idea of the scientific name, it’s the only way to search on this site.
I hope you enjoyed discovering more about this not so plain little brown moth with me! What it teaches us, if you look at something much closer, with curiosity, you can discover new things you never knew were right under your nose!
Exciting news! Garden 91, a non profit magazine in Taipei, Taiwan has featured my artwork and nature sketching blog in their magazine!
They are a non profit organization that concentrates on the value of nature, the true meaning of design, the life of aging and the vision of education. Does this sound like me?? YES!! The director contacted me to tell me that my blog and what I write and feel about nature is why they wanted to use my work. You’ll see several pages below that are right from my sketchbook pages I’ve posted in the past. Their island was hit by a typhoon in August of 2009 and they want to reveal more stories about people aware of nature and wildlife. They print about 1,000 copies and distribute them to upscale coffee houses, schools and libraries. I apologize ahead of time that I can’t translate the article, it’s written in traditional Chinese! But enjoy the pictures anyways! Here’s a link to their blog if you’d like to have a look, though it’s all in Chinese have a look around: http://garden91.pixnet.net/blog
This morning while eating my oatmeal and sipping my coffee, I heard a strange rustling sound behind the curtain of my sliding door. Hmmm…..dare I look? Could it be a mouse? Err…um…ok, I’m not squeemish about mice so I pulled the curtain aside and a large brown moth came flying out! He was looking for a way out and followed the light, no pun intended. I had no idea what kind it was and in the “old days” I would have said, “yuch a moth!” But now I find it’s much more interesting to take a closer look and study things, understand them. I went to the barn to retrieve my butterfly net, despite the very wet grass and chilly fog.
Once I caught the little guy I put it carefully under my “Britta Waterfilter Jug”, probably first it’s been used in a long time! haha. It’s nice and clear. I grabbed my sketchbook and did some basic outline sketches, and looked at it with the magnifying glass and identified it as a “Large Yellow Underwing”. Then I took pictures with my tiny Olympus camera because it has a nice closeup feature. I started some of the basic patterns while looking at him, but really was able to add the real detail after printing out some pictures. By the way, at first I thought it was a “False Underwing”, as you can see from my crossed out note, but looking closer at his underwing you can see the extra orangy yellow band at the bottom, or in Butterfly wing language “the Margin”. It was interesting to study his legs as they had slender needle like ‘thorns’ on them.
He was at first a dull brown looking moth, but as you can see here, so beautiful when you study the patterns on his wings. After I had some pictures I let him go outside right away, don’t want to stress him. He flew around in my screen porch a bit and that’s when I got the best pictures, no plastic between us!
I’m adding this little sketch that I did yesterday. While looking over my parsley plants, checking for signs of Black Swallowtails, I noticed a tiny Damselfly flying around. It was only one inch long and though it was orangy colored, it was hard to notice at first. I tried to study its color, pattern and size and when I went back inside drew a small pencil sketch. Damselflies hold thier wings together and Dragonflies hold them out, so I knew it was a Damselfly. As soon as I opened my bug field guide to the Damselflies, there it was! A “Rambur’s Forktail”, the adults are a pale blue color. Here’s a link for photos: http://bugguide.net/index.php?q=search&keys=Rambur%27s+Forktail&search=Search
The most up to date information about my artwork, nature sketching adventures, or step by step demonstrations. Search using Categories or Tags, or use the search box in the left column.
Please sign up below to get notified when I post new articles.


grasshopper 7 (3)")
fat yellow grasshopper (5)")

Long Lane Farm in August")
7-13-11 Eastern Tailed-Blue (9)")
7-13-11 Eastern Tailed-Blue (10)")
P1230732")


coffee stain moth 1")


Crocus Geometer")

 small painting sketch")
 Crocus Geometer 1")


Crocus Geometer - lg wc")
Crocus Geometer cr")

Beautiful Wood-nymph cr4")
Beautiful Wood-nymph")
Beautiful Wood-nymph for sketch 2")
Beautiful Wood-nymph for sketch cr")
set up")
Beautiful Wood-nymph cr4-1")
Beautiful Wood-nymph cr5 cr")
Beautiful Wood-nymph (21)")
Beautiful Wood-nymph (28)")
Beautiful Wood-nymph (14)")
Beautiful Wood-nymph (5)")
brown moth studies 4-30-10")


