Support This Site

If you like what I do please support me on Ko-fi

Old Mossy Stump and New Fungi Guide!

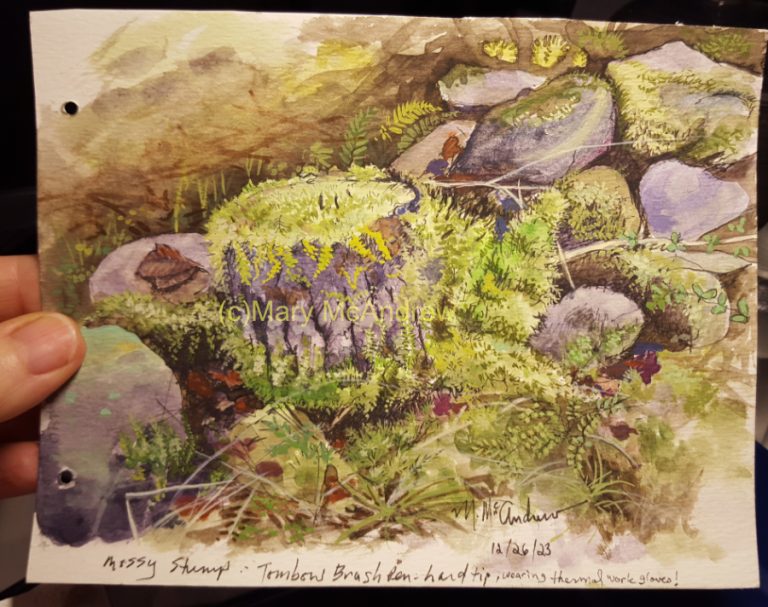
(Click on any picture to see it enlarged)

I did this study back at the end of December, the sketch was done outside and I painted it near the woodstove heat at night! I’ve included lots of pictures to show some stages of painting and other fungi I found.

My view of the stump and rocks covered by moss.

This is the view I had from my place on the damp, cold ground. It’s just a pile of rocks and old stumps but I’m drawn to the deep cracks and crevices the connect them all like a puzzle. When I draw this kind of subject, I usually get a bit lost with all the crevices and rocks, but being that it’s a natural subject, you can just adjust it as needed so it looks ok.

My sketch in progress.

Above shows the size of my sketchpad and the thick thermal gloves I wore. I also had my rubber gardening pants and Wellies on because it was so cold and wet on the ground.

Deadman’s Fingers on the old stump.

The pictures above and below show the interesting fungi that grows out of the stump. The fungi is either Xylaria polymorpha (Deadman’s Fingers, what a name eh?) or Xylaria longpipes. The guide says Xylaria, “look for: hard, tough, usually dark brown to black, clustered finger-like fruit body on dead wood.” Well the black fungi on this stump is much skinnier than what the book shows, but maybe it’s because it swells up at a certain time of year?

Another view of the fungi, Deadman’s Fingers, and lots of soft moss.
Mossy old stump with many interesting fungi growing on it.

This is the sketch I did outside in my small field sketchbook. As it says on the bottom of the drawing, I wore thick, thermal work gloves while drawing, a difficult task! And I used a new pen I’ve not tried yet, “Tombow Brush Pen”, hard tip, I thought it would be better for making quick marks in the cold. I also bought the softer tip, which is in my field bag to experiment with also.

Painting at night from photo reference, using my new Van Gogh watercolors.

Above shows my Van Gogh watercolor set, the color chart I did of each paint and the sketch on my board. I always keep a small bit of watercolor paper for testing colors nearby.

First layer of watercolor.

I used a color called “Moonglow” by Daniel Smith. It’s a dull purple color I’ve used before for underpainting rocks and like experimenting with it.

Above shows more layers of watercolors to build up colors.

Adding gouache for the mosses.

Now that the watercolor layers are on I start to add gouache, which is opaque and is great for building up the texture of the moss. If you plan ahead, the gouache can really stand out nicely, especially on dark areas.

Finished study.

This is the study finished, I took this with my cell phone camera at night in regular lamp light, but the warm hue is pretty close to the original.

Scarlet Elfcup – Sarcoscypha austriaca, beautiful little red cups hiding in the grass.

Every year, since we’ve moved to our property in the Scottish Borders, I’ve spotted this tiny Scarlet Elfcup growing. It springs up in Autumn under the huge ancient Ash tree in our paddock, but so small I have to be careful not to step on it. I pick up a few sticks and place them to form a square around it, just to help me see it and not step on it.

A second Scarlet Elfcup!

This year I was lucky and found yet another little Scarlet Elfcup. I’m hoping it spreads more every year.

Mushroom growing on dead Hawthorn branch.

I don’t know what kind of mushroom this is on a fallen dead Hawthorn branch. You can see several stalks from others that broke off, they are quite small and delicate.

Underneath the tiny mushroom.

Here is a view from underneath the mushroom, showing the gills. I love the fine, soft looking white threads around it’s base, I’m not sure what they are.

The best Christmas present ever!

This was my favorite present from my husband this Christmas, over the new clothes, treats and bath powders etc, I was so excited about getting this book! Does that make me a ‘Nature Nerd’?

It’s full of clear illustrations.

The book is full of clear, well painted illustrations. The introduction is full of clear diagrams and information about fungi in general and it’s a great place to study to learn more about them. Though the book is well illustrated, I still find it very difficult to positively identify each mushroom I find. I belong to a group or two on Facebook for mushroom and fungi identification in the UK, I don’t know what I’d do without them!

Gorgeous lichens on fallen branch.

This is a branch I picked up under the old Ash tree, covered with lichens. I’m learning more about lichens as they really are fascinating and beautiful, BUT I admit it’s super hard to identify different ones unless I share it on the Facebook lichens group where the experts can tell me what it is! I know there are different groups of lichens like Foliose, Crustose and Fruticose. I should’ve shared these pictures on the Facebook group to find out what kind these were, I will sometime. But as an artist the first thing I’m drawn to are the colors, the textures and form. I’m just fascinated as I look closer, at all the little cups and branches!

I mean look at all the tiny little round ‘plates’ on this lichen and then the difference in their colors. The I love the limey green yellow color of the crusty one and the pale mint green of the branched foliose one. If I do some painting studies of lichens then I’ll find out the names of them too and share them. I bought a book on Lichens by Frank S. Dobson, but really it’s still waaaay over my head! I never knew there were so many kinds.

Well I guess that’s enough pictures and talk about mushrooms and lichens! Even though I don’t post updates a lot, I am working very hard on finishing up the first draft of my first Children’s Book. It’s all new to me so it’s taking much longer than it probably should! I’m also messing around with updating and changing things on my website and adding a proper shop, but these things take time when you do it all yourself. It’s frustrating when all I want to do is paint and admittedly work in the garden!

Please leave comments or ask questions, I love reading the comments from all over the world.

Old Castleton Farm in Winter

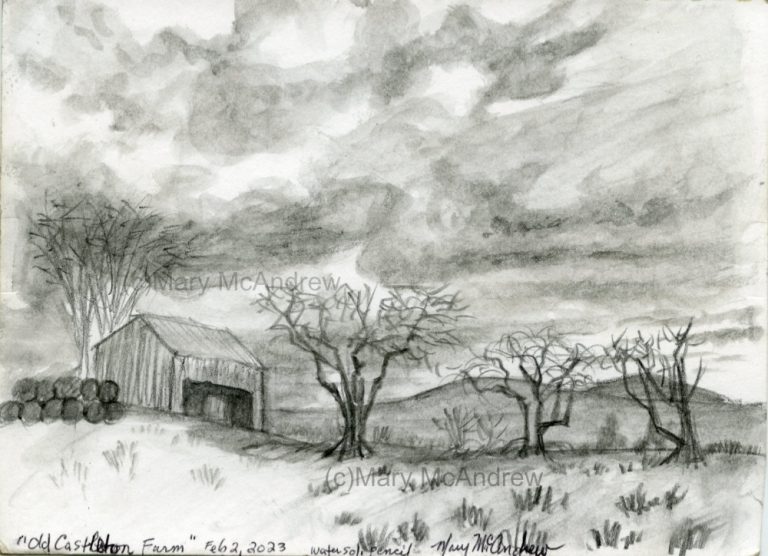
This is a very short post just to share a quick pencil study I did on March 2, 2023. We were out driving and Gary pulled up for a bit so he could go talk to a farmer and I stayed in the car where it was warm! Since he took longer than expected I got out my sketch pad, water soluble pencil and waterbrush then did this very quick study. The sky was stormy and dark in the distance and it was windy. Those are very old Hawthorn trees that look like they used to be part of an old hedgerow.

This is the Old Castleton Farm located in the Scottish Borders not far from Newcastleton. There used to be a village called Old Castleton located here, you can still see the areas where the buildings were, but the whole village was moved to what is now Newcastleton. This sadly happened as a result of the land clearances in the 1790’s when people were forced to move from their homes! Here’s a link to Wikipedia with a bit more information about this area.

“Old Castleton Farm in Winter”. Water soluble pencil.

It’s great to use a dark water soluble pencil in winter for quick studies in the field, and keep your sketchpad small.

View of Old Castleton Farm

This is how it looked to me from the car, but it was a bit darker in the sky. You can see how far away the trees were so I just sketched what I saw and kept it simple. It’s good practice to catch sketches anywhere you can, that’s why I had my small field bag with me, ‘just in case’!

When the weather is nicer we’re going to go and explore the old ruins and area where the village was.

Hawthorn and Mossy Wall

Another adventure into the snowy, cold back garden! I sketched this scene on January 17, 2023 then worked on the painting in February. I seem to be drawn to this Hawthorn tree and wall, it’s the same one I sketched last year in March on a rainy cold morning. I just love old Hawthorn trees because they usually twist and twine together and bend and grow shaped by prevailing winds.

Another thing I love in winter is the dry grasses; the color of it and how it lays in clumps, it’s strands making such interesting forms. I like looking at them to see where voles and mice have made entrance holes to hideaways. The other thing I love about this wall is all the moss of course! It’s a fun challenge to paint and I will be doing a lot more paintings and studies of it.

I used my very small sketchbook and drew the sketch above using a permanent ink pen. I did this from life, standing right in front of the tree and wall as you see in the previous photo. I did have my big mittens on with the flip back top so I could use my fingers, but it’s still a challenge to draw!

The picture above shows what I did next. I took the small original drawing (bottom right) and scanned it. Then I printed it out on plain computer paper, and looking at the photo I took, I drew darker lines on the printed paper and used white out to block lines that I didn’t want, like where I drew lines through a branch etc. Then I scanned that large one I edited and printed it again but at the size I wanted, a bit smaller.

Above it shows my light table, I put the scanned edited drawing on the light table and taped my watercolor paper on top. Then with the light on (of course) I traced with light lines using a pencil. Now it’s ready to use for painting! I like doing this because it’s always from my original sketch, not traced ever from a photo! A sketch/drawing will always have more character, not a perfect copy but maybe unnecessary details left out and others enhanced.

I decided to do this painting in gouache, as it’s my new medium and I love exploring it’s properties. I decided to use a thin base color of purply violet, I started light then darker layers to define the shaded areas.

This is a shot of my palette where I’m mixing my colors. I made it from the plastic cover of a notebook that I cut off and taped it onto mat or mount board. I have a travel palette that keeps the paint wet and soft just above this. I take a bit of wet gouache out and put it in little blobs on the mixing palette as I work, this keeps my travel palette cleaner. I especially do this with the white to keep it clean. As these little blobs dry out, I just rewet them as needed.

Above I mixed up some brownish purple color for the ground and wall dark areas in a little plastic dish. As I painted I used the waterbrush to blend out the edges to keep it soft, this is a technique I use in watercolors too.

Here you can see I started to put the background tree in and some of the distant wall. The thing is, I really was on the fence as to if I would put any background in at all! I can picture this tree and wall with just a white background, but it’s the landscape painter in me that wants to just put the whole scene in! Maybe someday I’ll repaint it with no background and see how it looks.

I added some sky and grass colors in the field behind.

Here I started to add the greens of the moss and bark on the Hawthorn.

Finally I start to add the greens of the moss on the rocks, trying to be careful and not painting areas of rocks with no moss.

And here I put more color onto the big Ash tree in the background, but try to keep it light. The lighting on my painting is terrible but I think I was painting at night time and this is using my cell phone.

Oh boy, look how crowded it looks on my table! This is working at a plastic 2’x4′ folding table in the living room, because that’s where the WOODSTOVE is!! haha. You can see my mixing palette and the paint container palette just above it, with my water just above that in a ceramic container. In the middle is the painting clipped onto my work board and above that is the printed out drawing I did. On the left is a photo reference for details and a bit for the color, and above that can you see the little study I did in my blog post “Stone Wall Studies in Gouache”. That is a great reference for color, moss and stones that I can refer to anytime.

I really liked how my painting was looking now, it’s really come to life for me, but a Hawthorn isn’t a Hawthorn without it’s berries! The tree had lots of dried out berries of deep red, just waiting for hungry Blackbirds or greedy Fieldfares! So I used an old trick by touching the end of my brush to paint on my mixing palette then made the round mark one at a time. I practiced on scrap paper first to see what color and thickness of paint I should use.

“Hawthorn and Mossy Wall”, gouache.

And here it is finished finally! I didn’t talk about putting the grass in front of the tree but that is an important part. As shown earlier, I put dark colors down first then this allowed me to use very light gouache on top to make grass strokes. It’s fun to arrange them so they look natural and they give a lot of movement to a drawing or painting. Then I added the dead leaves on the ground too.

I know I did this weeks ago when the snow was still flying, but today (April 2) I’m posting it after being outside in a sunny garden! We thought the sun would never shine again, it’s been so cloudy and grey! Soon we’ll be planting veg and flowers in the gardens and watching all the bees and insects come. I’d like to do some insect and wild flower studies and paintings, so we’ll see what comes this spring and summer!

(You can also follow me on Instagram as “mary_mcandrew_artist” and Facebook as “Mary McAndrew Painting and Illustration”, both of these I share more up to date progress of things I’m working on.)

Scottish Cottage and Snowy Fell

On January 16, 2023, I spent time just wandering around the garden, taking pictures of the snow on all the dead stems of weeds, flowers and grasses. I had my very small field kit bag with me, determined to do some kind of sketch.

My husband took some pictures of me, showing how bundled up I was! Two hats on my head, my dad’s old Woolrich hunting coat and thick mittens! I ended up standing in the back of the garden and did a small sketch in my little sketchbook. When it’s cold outside I like to use a small sketchbook so it forces me to keep it simple and quick.

Above you can see my little homemade sketchbook, it’s small enough I can also tuck it in my coat pocket. I used a permanent ink pen to do the drawing outside and then took my frozen fingers inside and used watercolor pencils to color it. I looked at a photo I took with my cell phone for reference to help me finish it. You can see the waterbrush I used too. You’ll notice my pencils are all short; I cut them all in half and carry them in a little pouch for taking into the field. Reducing weight is always key to me.

There is my little sketch finished and you can see the pencils tucked into the little pouch I made for them.

“Scottish Cottage and Snowy Fell”, watercolor pencil, ink

I’m happy with how that came out. In my photo you could see our oil tank on the left, I just left it out, artists choice! I tried to simplify by leaving out little things laying around, pots in the garden etc. I had fun playing with the purples in the shadows of the greenery.

I hope you enjoyed this little study, and encourage you to keep sketching. Small quick studies from life, not photos, are good practice and it helps keep your ‘eye’ trained.

Sketching Grass on a Snowy Day

We had about two inches of snow last night, everything is covered in a soft white blanket. All our flowers that were finally coming up are now covered but at least the daffodils haven’t bloomed yet.

Above is the Hawthorn I painted not long ago, and I’ll be putting a post up about that soon. I’m following fox tracks in the snow and they led here, then it jumped up on the wall and walked behind the tree! I love following tracks in snow to see what story it tells, guessing at what happened in the night.

The tracks led here also, where a fox jumped and hopefully got a vole! I did a Youtube video talking about it and will link it at the end. The grass clump above is what I decided to draw.

Here’s my little field watercolor palette, holding it in one hand with my fat mittens on!

It’s hard to take pictures while holding things!

I was trying to show how I hold the sketchbook against me and the palette, both in the same hand. I used to have a small hard panel that I would clip them to, I’ll have to revisit that idea! Kind of like a clipboard but skinnier.

Here’s my field kit I used today, it’s a small one. I stepped into the wood shed a minute so I could put things down to take a picture and video tape.

“Grasses in the Snow”, watercolor and ink

My finished little study, I like how it came out. I put together a short Youtube video about doing this sketch and I show my field kit. Find it RIGHT HERE, give me a like and leave a comment if you can!

I’ll be sharing another post soon, about the Hawthorn tree and Mossy Wall, with lots of stages of painting to see. I’m also saving my pennies (pence?) to buy a new printer so I can get back to offering prints and note cards, stay tuned!!

View From Langholm Moor (Newcastleton, Scotland)

Gary and I went out for a quick drive in mid February even though it was overcast and cold. We drove through Newcastleton in the Scottish Borders and up the lane that goes right out of the village (as the locals refer to Newcastleton) and up onto the moors.

This is the first view you get when you pull up, a nice bench for enjoying the beautiful scenery.

We pulled up to see the views and got out to take a look around. This is a sign about the Langholm Moor Project to help bring back the Hen Harriers. Hen Harriers are the same thing as the Marsh Hawks I used to see over my back fields in Clarence Center, NY!

There was an interesting structure made of rocks down a little grass path, so I went to check it out.

There was a very long sturdy bench built into the wall, which curved around in an arc. It was a great place to shelter out of the wind and I liked the way it blended into the surroundings naturally.

There was a plaque dedicated to Lord Eskdaill on his 21st birthday. I’ll have to look him up and learn about him; I found the spelling of his name interesting and I’m still learning about local history.

This is the view from the shelter, but I don’t think that little tree was supposed to be right there in the middle! It probably grew up by mistake. I was thinking that some wildflowers would look great growing around the grass circle.

This is the view I decided to use for my painting. I worked from this photo even though it’s much duller than the actual colors were. As I worked on it at home, I checked my colors by looking at the land and trees outside my windows.

First I did a light sketch in pencil on 140 lb watercolor paper.

I’m using the gouache lightly, just like watercolors, I’ll build up colors in layers. I’m sorry I didn’t take any other step by step photos as I worked! I think I worked on this one at night and just did it until it was done.

“View From Langholm Moor”, gouache Feb 17, 2023

Here it is finished! (click to see it enlarged) I had fun doing the grass in the foreground by first putting dark browns down then brushing lighter grasses on top. Then I went back and adjusted the colors of the fields in the background, trying to balance colors, lights and darks until it looked right.

I’m looking forward to getting up there again as the spring and summer brings new growth and colors to paint!

Here’s a link to a page all about the Langholm Moor project: http://wildseasons.co.uk/locations/langholm-moor-langholm/204