Support This Site

If you like what I do please support me on Ko-fi

Old Castleton Farm in Winter

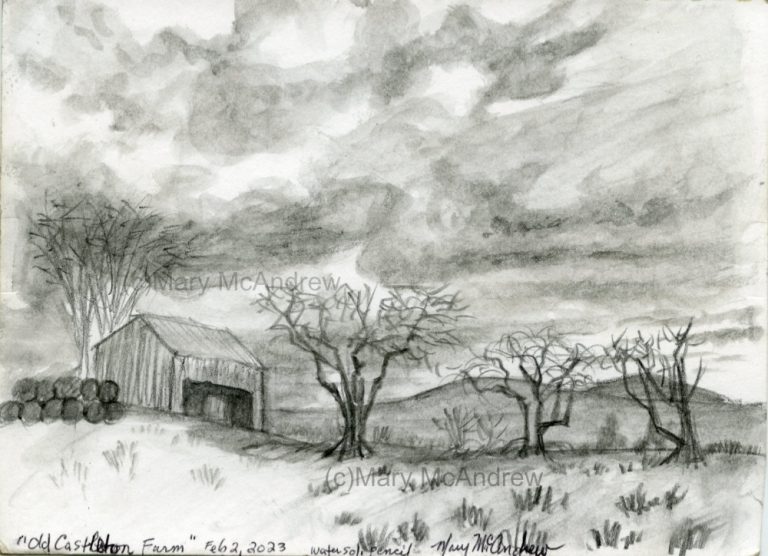
This is a very short post just to share a quick pencil study I did on March 2, 2023. We were out driving and Gary pulled up for a bit so he could go talk to a farmer and I stayed in the car where it was warm! Since he took longer than expected I got out my sketch pad, water soluble pencil and waterbrush then did this very quick study. The sky was stormy and dark in the distance and it was windy. Those are very old Hawthorn trees that look like they used to be part of an old hedgerow.

This is the Old Castleton Farm located in the Scottish Borders not far from Newcastleton. There used to be a village called Old Castleton located here, you can still see the areas where the buildings were, but the whole village was moved to what is now Newcastleton. This sadly happened as a result of the land clearances in the 1790’s when people were forced to move from their homes! Here’s a link to Wikipedia with a bit more information about this area.

“Old Castleton Farm in Winter”. Water soluble pencil.

It’s great to use a dark water soluble pencil in winter for quick studies in the field, and keep your sketchpad small.

View of Old Castleton Farm

This is how it looked to me from the car, but it was a bit darker in the sky. You can see how far away the trees were so I just sketched what I saw and kept it simple. It’s good practice to catch sketches anywhere you can, that’s why I had my small field bag with me, ‘just in case’!

When the weather is nicer we’re going to go and explore the old ruins and area where the village was.

Scottish Cottage and Snowy Fell

On January 16, 2023, I spent time just wandering around the garden, taking pictures of the snow on all the dead stems of weeds, flowers and grasses. I had my very small field kit bag with me, determined to do some kind of sketch.

My husband took some pictures of me, showing how bundled up I was! Two hats on my head, my dad’s old Woolrich hunting coat and thick mittens! I ended up standing in the back of the garden and did a small sketch in my little sketchbook. When it’s cold outside I like to use a small sketchbook so it forces me to keep it simple and quick.

Above you can see my little homemade sketchbook, it’s small enough I can also tuck it in my coat pocket. I used a permanent ink pen to do the drawing outside and then took my frozen fingers inside and used watercolor pencils to color it. I looked at a photo I took with my cell phone for reference to help me finish it. You can see the waterbrush I used too. You’ll notice my pencils are all short; I cut them all in half and carry them in a little pouch for taking into the field. Reducing weight is always key to me.

There is my little sketch finished and you can see the pencils tucked into the little pouch I made for them.

“Scottish Cottage and Snowy Fell”, watercolor pencil, ink

I’m happy with how that came out. In my photo you could see our oil tank on the left, I just left it out, artists choice! I tried to simplify by leaving out little things laying around, pots in the garden etc. I had fun playing with the purples in the shadows of the greenery.

I hope you enjoyed this little study, and encourage you to keep sketching. Small quick studies from life, not photos, are good practice and it helps keep your ‘eye’ trained.

Watercolor of Edlingham Castle – July 2015

Here’s a post I wrote from July, never too late to enjoy a bit of sun I guess!?

July 16, 2015

Did I tell you how much I LOVE living here in Northumberland? I did? Well I won’t get tired of saying it or doing my sketches out in the field.

7-16-15 havin a rest (3) (460x345)

Taking a rest, enjoying the day, in my barn boots of course!

I went up in the field near Edlingham Castle, I had it all to myself, no sheep or cows about. It was just that kind of day that I sat on the ground to think, listen to the birds and enjoy just living. Then I just lay back and put my straw hat over my eyes and let time slip by, and it was ok.

7-16-15 havin a rest (4) (345x460)

Trying to take a selfie with a 35mm isn’t easy!

Laying down amongst the clovers, it made me feel like a kid again. Isn’t that funny? I should go lay in the grass more often! Maybe we could start a national “Lay in the Grass Day”! haha.

Below is a picture of what it looked like, my view from the grasses, the clouds were so beautiful.

7-16-15 mouse eye view (3) (345x460)

My view from the grass, my mouse eye view.

And below, this is what I saw near me, a Ringlet butterfly, a very common sight in the fields here in summer. I’m really enjoying learning the new butterflies and bugs here in the UK.

7-16-15 butterfly (3) (460x345)

A Ringlet butterfly on a clover head.

Well I didn’t just lay around all day, after a little while I went down the field, found a spot to stand and did a small painting. Below is a picture of Edlingham Castle, this was what I drew. You can see by the photo, the lighting never stays the same when you’re painting outside. My painting ended with nice blue skies and sunshine!

7-16-15 drawing the castle (7) (345x460)

Edlingham Castle view from field.

Below is the ink drawing I did first. Sometimes I do an ink drawing then paint with my watercolors, especially if I don’t think I’ll have time to paint it. The other way is to do a light pencil sketch and then paint, drawing with ink a little for details on the pencil before or after painting.

(c)7-16-15 drawing the castle (9)

Ink drawing of Edlingham castle, over the gate.

Below is my finished watercolor painting, only 4.5″ x 6″. You can see how bright the colors are, the day really was so bright, unlike the photo! The ink drawing makes it look more like an illustration than a painting to me. Kind of like all details are picked out at once, but that’s ok.

(c)Edlingham Castle wc

Edlingham Castle, Northumberland. Watercolor and Ink 4.5″ x 6″

I hope you enjoyed a little look back into summer! If you don’t want to miss any of my posts, just put your email in the box at the top right column. It’ll send you an email notice and you just respond then you’ll get my posts right in your inbox. Remember though, it’s best to click to come here and read the post, it lays out better on the page (and you can leave comments here).

Views of Edlingham Castle, Northumberland

I wrote this post way back in July, when it was sunny and warm, now here we are at the end of October! I still have new drawings and paintings to share, it’s just been more hectic than I expected! I’m still settling into this new life, trying to learn how to drive standard (badly!), finding a new accountant, and not being able to find some of my supplies because many things are still packed and stacked in plastic bins! But what has been most excellent is our walks near our home and a few trips to the Lake District. The greatest joy Gary and I share is our love of walking in the countryside. I’m overwhelmed with subject matter, it’s just finding time to sit and work.

So, on to my July post! Please click on the pictures to see them enlarged and clearer, enjoy!

(July 2015) I’m very lucky to have an ancient castle near where I live.  I can go visit the site and walk around it, or view it from the fields.

(c)April 2015 Edlingham Castle from the field

Brown ink drawing of Edlingham Castle done in the field in April 2015.

I did this drawing in brown ink (Faber Castell Pitt pen) while standing in the field where only local villagers usually go, way back in April. It’s great to switch your mediums once in awhile when out painting. I think it’s great ‘brain training’ as you have to approach it in different ways, seeing shapes, values, lines, textures and measurements; and thinking what you will use to capture that.

As I am settling into my new studio space here in England, I am still re-organizing my ‘stuff’ and wanting to play with materials I’ve had packed for ages. One of those is charcoal, I haven’t really used it in a long time so lately I’ve been rediscovering it. Below I’ll show you how I did another small drawing of the castle en Plein Air or sitting in a field with my art kit.

Sometimes I set my stuff out on the ground, this is charcoal drawing supplies.

Sometimes I set my stuff out on the ground, this is charcoal drawing supplies.

This shows my small backpack, a big lawn + leaf type garbage bag, Altoids tin with loose charcoal sticks and one plastic box with charcoal pencils, tortillions, brushes, sandpaper and eraser. I almost always stand when I work but today I had a small folding camp stool to sit on. The garbage bag is great for when you want to throw your backpack or kit on the ground and it’s all damp OR use it for sitting on.

Here's part of my field kit for charcoals, good 'ol Altoids tin.

Here’s part of my field kit for charcoals, good ‘ol Altoids tin.

And the ever popular ‘Altoids tin’, once used by me for watercolors but now I put my charcoal sticks in here. The rubber bands on the lid are holding a piece of paper towel and some cotton balls in place.

Here it is open and ready to use.

Here it is open and ready to use; I put the messy hard and soft sticks in here.

The base holds an assortment of soft vine and compressed charcoal sticks also a piece of chamois for blending and shading.

You can use the 'messy' charcoal powder in the tin to draw with a stiff brush.

You can use the ‘messy’ charcoal powder in the tin to draw with a brush.

When I sharpen points on sandpaper I let the powder fall into this tin and then it’s great to pick up with brushes for shading. A great way to start your sketch with soft blocked in areas of value, using soft or stiff brushes.

Work in progress, my support is just the cardboard back of a sketchpad.

Work in progress, my support is just the cardboard back of a sketchpad.

Above here it is almost finished, just a few touch ups and strengthening of darks and details to do.

Charcoal drawing of Edlingham Castle,  July 2, 2015.

Charcoal drawing of Edlingham Castle, July 2, 2015.

And it’s finished! I hope you enjoyed seeing some of my kit and how I worked. I’ll try to post more of those sketches I’ve done! Leave me comments below, I love to hear from you all.

And my other facebook page: Mary McAndrew Painting and Illustration

“Winter Field Sketch” oil

"Winter Field Sketch"

This is a little (5 x 7″) oil painting I did “en plein air”, or translation… “while standing in the snowy field freezing my fingers off”! What I wanted to do was study the colors in oil and not get too caught up in the finished look of a painting. It was a good exercise in study of color for me, it would not have been as successful if I did it from a photograph.

My oil field kit, closed.

I rigged up a little field kit for oil painting, just for taking out on hikes. Here’s a picture of the kit closed, it’s a plastic case you can buy at an office supply department. I’ve only used it this once but hope to work with it more and ‘tweek’ it. The main objective was to keep it as light as possible.

Here it is open to show you the metal pencil case and use of 'sticky tack'.

This shows the kit open with two areas of gessoed canvas ready to use. Notice the four dots of ‘sticky tack’ on the left, they’ll hold the lid of the metal pencil case when I want to paint, using the lid for mixing. I used tape to make loops to hold brushes; just put tape sticky sides together to make it ‘not’ sticky in the middle.

I created a loop of tape to slide my medium cup into.

I used the tape in the same way here, keeping it sticky on the ends but not in the middle, I created a loop that my medium cup would slot onto. At the angle I would hold the kit, the cup would not come off! It was then held from behind with a dab of ‘sticky tack’.

Here is my field kit in action!

I held the homemade kit in one hand, using my arm for support, and painted with my right hand. It’s all in my reach and I brought no tubes of paint. Notice my fingers are holding one brush at the ready and the other ‘dirty’ or ‘in use’ brushes are kept on the left of the hinge, clean ones to the right in the loop.

Of course Ginger was along for the adventure and waits patiently to continue with our walk!

I put a squeeze of my colors in a metal pencil case and put some in a pill box from the pharmacy before I left the house. The pill box was an experiment and I wasn’t really satisfied with it, it gets too messy on the lids and doesn’t keep the paint really airtight. Since then I’ve moved to using contact lens cases that screw shut…we’ll see how the paint lasts in them as they’re all back in England and I won’t see them until spring!

This shows you my view of the field as I worked.

The above picture shows you the view I had as I worked, it also illustrates how dull the colors look on a photograph and how I perceived the colors with my eyes to be a bit more vivid. This is why working in the field is so important whether you are oil painting, using watercolors, pastels…etc.

When I came back home, I stuck the little study up on a wood post in my living room using ‘Loctite” sticky tack. I hung there for ages and I enjoyed looking at it whenever I walked by. It wasn’t until I found a great frame and laid it on top that it popped out and said “HEY…I’m a good little painting!” hahah…yes sometimes my paintings talk to me…don’t yours? It also told me to stop ignoring it and get it framed so it could have a proper place on the wall! Yes…yes, the voice of guilt, this painting actually was done last year (12/31/10) and since I traveled to England it got sort of forgotten!

Click to see photos enlarged:

How it looks framed on the wall

"Winter Field Sketch" framed and in cool daylight

Original framed painting $165 contact me

Go here to see all my Landscape Paintings in the Gallery.

I also made some nice products in my Zazzle Gift Shop with this, please click on the pictures to have a look!

Glossy Note Cards- 2 sizes
Glossy Post Cards

Oil Field Study on New Years Eve, 2010

Here's my field on a dreary New Year's Day

(Please click each picture to see it enlarged)

It is a cold and dreary day here in Western New York, I guess it is in many places around the world. But the drippy dreariness also shows me spring is coming; snow melting on soggy but still frozen ground, dripping of ice from the trees and an almost silent occasional gurgle of air from under the ice as I worked quietly.

Oil sketch field kit, ready to be tested.

I created this lightweight kit to take outside with me, just for oil painting sketches. I mostly want to focus on practicing mixing colors for landscapes from the real thing.  I’m not concerned about finished paintings, though as the weather is warmer I may work longer on them.

It’s a plastic box that I bought at an office supply store.  I used a metal pencil box for my paint and as a palette; it’s held on with blue sticky tack. I also have a pill box that has colors in it, though I want to buy a long one so it will fit better. I have canvas paper cut to standard sizes and tape it in and also created a place for brushes with loops of masking tape.

My mineral spirits container slots over a strap I made out of masking tape.

I had a tiny plastic bottle of mineral spirits with me but didn’t need to pull it out, I had a tiny bit in this metal medium cup. It’s got a screw on lid and I created a strap with masking tape that it could slip over to hold it in place. Then I stuck a blob of blue sticky tack behind it to keep it from slipping off. (Just love that sticky tack!)

Here's how I held the kit and painted while standing.

It was very lightweight as I worked. As all tests should do, it helped me find what was ‘not’ working great; I need to make a little holder for dirty brushes on the left and both need a holder with some kind of bottom, like a pouch.  My brushes were sliding out the bottom too easily and may get dropped.

A view of the painting and the subject.

Here’s the whole thing in progress. Note the paper towel with red paint all over it!! Ok, I admit it, the very first thing, when I lifted the lid of the metal pan (with my very cumbersome mittens on) I inadvertently got Cadmium Red paint on my mitten thumb, WITHOUT KNOWING IT! It suddenly showed up in three to four places, probably on my face too and I didn’t know it! Ok, those who paint with oils know that sometimes this just happens, oil paint likes to migrate. Cad Red is one of the worse to get on stuff! You see traces of where I had to scrub off the second canvas paper there, sigh. Nobody’s perfect.

Ginger is waiting patiently, telling me her tootsies are cold!

Ginger loves to go out on walks, but gets bored when I stop to paint or sketch. Today was worse because her feet were cold! But a good sign, when I was ready to leave, she didn’t turn towards home, she wanted to go further.

Cleaning my brushes, stand them up in the snow as you go.

When I’m done, I set the kit on the snow and stuck my dirty brushes in the snow (bottom down) and just dipped the tip of each one in mineral spirits and pushed on the lid/palette to work much of the paint out. Wipe it really well on paper towel, it won’t be clean but well enough to travel home for cleaning. Most of my brushes I used were bristle brushes for scumbly strokes and one small, flat, soft but firm nylon brush for the thin line strokes.

The field study for today.

Here’s the quicky field sketch fresh from the icy field.  I know my colors look brighter than the photo, but that’s the beauty of painting from life, the colors were more vivid and beautiful to my eyes, a photo will lose a lot of true color and atmosphere.  If I want I can let this dry and work more on it or do it while it’s still wet. Ideally, touch up what you want right when you return and it’s fresh in your mind. I don’t want to fuss too much over these sketches unless I do one that I feel is worthy of fussing. My main goal is to just get out and get quick color studies and not complicate things too much.

Hope you enjoyed, I’ll be trying out my field kit more and will keep you ‘posted’ as they say! haha.

Happy New Year everyone! I’m looking forward to a year filled with tons of new paintings by me and look forward to getting back to England for more adventures!  Please share my blog with those you think would enjoy it.

“Oil Painting in Coquetdale, Northumberland”

(This post is done AFTER returning home to NY…gosh I miss my Northumberland!)

Come along with me as I do a small oil painting in a very gorgeous location in the Coquetdale (River Coquet Valley) area of Northumberland, England. I think of all the areas I’ve traveled around in Northumberland, the Coquetdale is one of the most beautiful and always catches me by surprise when we drive along it’s long winding path through the valley. It has quite a few meanders before reaching the North Sea which makes it that much more picturesque to an artist, it’s curves reflected in the sun as a shimmering snake in a green velvet valley.

Painting at Harehaugh over River Coquet

Painting while looking over the River Coquet

There I am! We hiked up this great high hill and entered the Bronze Age Celtic ring fort at the top. It’s surrounded by a deep ditch, as was the practice for all ring forts, though I guess a few thousand years ago it would have been deeper and very impressive.  After exploring the fort and ditch I settled down inside a ditch with my back to the VERY brisk wind!  While I painted I had my hood up to keep the wind off and you notice I’m wearing fingerless gloves, a must for outdoor painting!

For my set up, my favorite wooden field easel and a backpack with attached stool. This is a popular one found in many art supply catalogs but I altered it (as usual!), I took the backrest off by hammering on it until it came away. With the backrest off, I can now sit on it in any direction I like, sometimes the bars of the seat hurt the back of my legs and I feel less attachments equals less weight. I’m put a camping inflatable pillow on the seat, makes it a bit better.  All in all, I don’t usually sit when painting outdoors, I find it tiresome to my back; usually I stand up and feel freer with my painting and you can move around to keep warm.

My View Over Coquetdale from Harehaugh

My View Over Coquetdale

Here’s a view of what I saw, you may wonder how my masonite board is staying up so magically on the easel? The wonders of Blue Sticky Tack never cease!! I use it all the time, I have some little dots of it on the easel to hold small boards like this, just where I want them. With a small board, I don’t like the wood of the easel’s clamp to get in the way.

stage 1-View Over Coquetdale from Harehaugh

stage 1-View Over Coquetdale

When in the field I usually don’t pencil sketch the scene on the canvas, but use either Burnt Umber thinned with mineral spirits, or pick a color in the landscape and sketch directly with the brush. Just pay attention as you divide up your canvas with the horizon line placement and other important elements. If you get it wrong in the beginning, it’ll always be wrong! I go for blocking in big shapes in the ‘nearest’ color to it’s overall color.

When I started this one I blocked in some really bright green, later I decided I should have tried to match the color better to begin with. I just wanted to get it going, so I painted into the wet oil to adjust the color. You’ll notice my river color is quite light, just laying it in to mark it, I’ll adjust the color later.  I wanted to have a wet base to paint into. I painted the sky with an all over tone of blue with the gradation of dark to light, later I’ll add the clouds. I also started to establish where the dark areas are, the tree lines.

Stage 2- View Over Coquetdale from Harehaugh

Stage 2- View Over Coquetdale

Now I’m set up back at home and continue working from my laptop where I have photos of the scene. I’m sorry I missed a few stages with the photos as I got involved with the painting! I studied where the background mountains should go and toned down blueish green for them. I continued to study where the tree lines were and payed close attention to the light and dark areas of the hills and tree clumps. Don’t put too much detail in the distant trees, just let them describe the curve of the hills as their lines criss cross and disappear. I also started to tuck darks under  the tree lines and to the shadow side of them. You begin to notice the tree line on the left front is different than the ones on the right. They are different types of trees so the form and colors are different.

Stage 3- View Over Coquetdale from Harehaugh

Stage 3- View Over Coquetdale

Picking out a little more detail of the hills in the mid-ground, I add some lights to define the hills and more detail to the tree lines.  I lightly defined the little dirt road in the front left and a ‘hint’ of a fence, but kept it soft and also added more light to the left field. I put a small path that crossed the field in the middle but then later decided it was just too much of a distraction and took it out.  I also added some lights to the trees on the right, you can see they are more pointy than the other trees as they are pines.

Stage 4- View Over Coquetdale from Harehaugh

Stage 4- View Over Coquetdale

Above you can see I’ve added some darker (but still bright) blues to the river, taking care which direction I stroked it on. I added some yellow to the fields on the left to warm it up and cut down on the lightness. I added more bushes and detail to the front right side by the bank.

Completed "View from Harehaugh" 6x8" oil

Completed "View over Coquetdale" 6x8" oil

The completed painting,6 x 8″ in oil, click it to view it larger in my Gallery of Landscapes. Here you can see I’ve added just a little more detail on the bank and sheep (whitish dots!) on the hills. One thing you notice when driving about the countryside of England are sheep just about everywhere! No hill would be complete without some of these white dots. Of course I didn’t just make blobs but made sure they had a bit of a long shape and slightly darker underneath, it’s just to ‘hint’ at a sheep, not to paint one in full detail at such a distance.

To view prints, note cards and more with this painting, click the links below to see them in my shop! (You can personalize any of them with your own text.)

“Time in a Field in England” June 12, 2010

This morning was sunny so I headed up the country lane to walk above the little village of Edlingham in Northumberland, England. Here’s a watercolor painting I did while sitting in a field, see the pictures following it and ‘come along with me’ on my walk. Enjoy!

"Fields above Edlingham"

"Fields above Edlingham"

After walking as far as I thought I had time for, I picked a corner of a nice field, not far from the road to work. The painting above is almost all done sitting in the field, I added details to the house and changed a few little things on the hills once I got home. There’s a picture later showing how it looked when I came home, before details were added.

Rock from Romans

Rock possibly from Roman times

This is the very interesting rock I sat on, I keep a pad in my bag from an old diaper bag; it’s great to sit on cold damp rocks or ground. I’d like to learn more about this rock, there is an old Roman fort right at the top of a nearby hill; we feel this looks Roman made.

my sketchbook with 3 page layout

my sketchbook with 3 page layout

Here’s a picture to show you how I worked, my sketchbook is on my lap clipped to a small board with watercolor pan handy. I had a small container of water on the ground within easy reach and I’m holding the only two brushes I used to create the painting. One round and one flat, it’s the first time I ever used a flat with watercolors and I’m very happy with what I could do. It was great for making the bush and tree lines on hills.

As you see I was also wearing gloves because it gets very chilly when you just sit still for one plus hours; these are thin kidskin I think, a dress pair that I decided would serve better on my sketch hikes. They’re thin so I can feel what I’m doing still and the leather helps me with grip.

writing on clouds

writing on clouds

Please click to read better, these are the thoughts I wrote before I started to paint.

Close up- left side of painting

Close up- left side of painting

Here’s a close up of the left side of the painting, just to show you more of the details. I touched up the house, posts some of the road and if you notice the tops of the clouds I softened them up. I’ve also totally removed a treeline somewhere…can you find it? (compare to the pic below)

Fields above Edlingham watercolor unsigned

Fields above Edlingham watercolor unsigned

Here’s the painting just as it looked when I left the field to go home.

country cat

country cat

A friendly cat I met while walking up the hill, I caught her with her tongue out! I LOVE the note cards, mugs and stickers I made from some cats I’ve met…including this one and a gorgeous black cat on the castle wall. (Go here to see their pictures!)

country lane

country lane

The beautiful lane I wandered along…it was great.

Sheep resting

Sheep resting

There are many different breeds of sheep here in England, this one I still have to learn. My favorites are the black faced sheep. These moms and lambs are really enjoying the sun. (Go here to see more photos of sheep in fields I’ve seen in England, you can order note cards if you like.)

country lane

country lane

The hedges here are of Hawthorn, when they’re in bloom not only are the pretty but they smell great.

Field view

Field view

The riding lesson

The riding lesson

Here’s a girl getting a riding lesson, walking on a long line then sometimes off.( Here’s some note cards and gifts with my horse paintings, drawings and photos I’ve taken.)

I hope you enjoyed taking this stroll with me and seeing my painting. Please visit my shop on Zazzle to see many of these photographs as note cards and more, here’s Landscape Photos and Landscape Paintings.

“Oak Tree Along Edge of Feild” 11-2-07

I painted this 4″ x 6″ oil painting on an early November day, sunny, cold and gorgeous. I have updated this post with photos of the day out in the field, please see below.

"Oak Tree"

"Oak Tree"

The great thing about painting or drawing outside, en plein air is what you observe…hear, see, feel, smell. This day it was the visit of the bees and teeny tiny spiders. It sounds creepy but when you’re used to treking around in nature you learn to just observe the critters for what they are and do, and not get ‘creeped out’!

Burnt Umber sketch with bee

Burnt Umber sketch with bee

So as a wasp kept landing on my painting and easel, I figured it was interesting. I took pictures of him of course.This shows the first stage of my painting, I used a ‘wipe off’ method here; you paint Burnt Umber on the masonite board and brush it out so it’s a medium value. Then you ‘wipe off’ with a rag and your finger or a brush, the areas that are lighter. It’s like sketching with value, it’s very freeing as you won’t try to catch details you just look for the big shapes and wipe them out. If you don’t like it you brush it back on, easy! Then you lay in darks and bring out shadow shapes with more burnt umber. I have my board attached to a piece of cardboard that has clear tape covering it. There is another small canvas ready to go next to it and they are both attached temporarily with ‘sticky tack’ or ‘blue tack’.

spider on easel

spider on easel

Then every time I started to paint, a tiny spider would appear hanging from the brim of my baseball cap, I’d lift him off with his thread of silk and put him in the grass, then another would appear on my easel. My guess was they were ‘sailing’ on their threads down from the beautiful oak tree.

“Looking to the Edge of Nowhere”

This is an oil painting I did in early November. We’ve been having a mild fall, pretty dry, so I didn’t have to wear mud boots in my field! The painting is 6″x 8″. Before I did this one I completed the small oil sketch of an oak tree (4″ x 6″).