Support This Site

If you like what I do please support me on Ko-fi

Old Castleton Farm in Winter

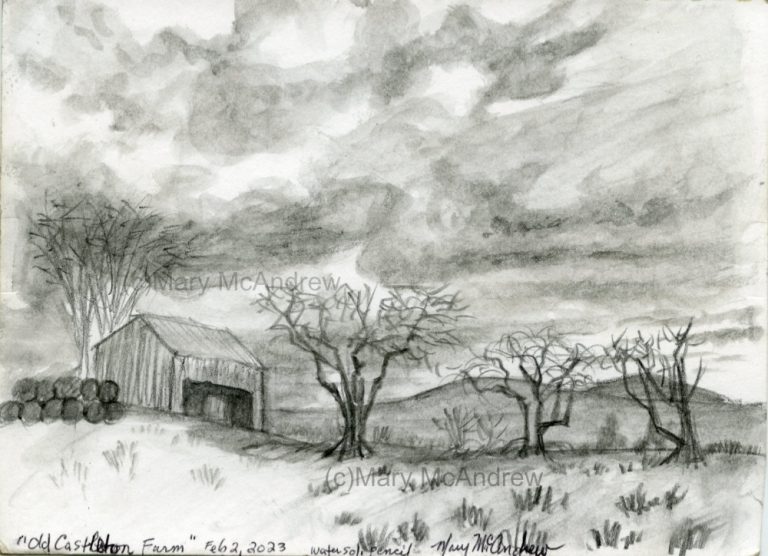
This is a very short post just to share a quick pencil study I did on March 2, 2023. We were out driving and Gary pulled up for a bit so he could go talk to a farmer and I stayed in the car where it was warm! Since he took longer than expected I got out my sketch pad, water soluble pencil and waterbrush then did this very quick study. The sky was stormy and dark in the distance and it was windy. Those are very old Hawthorn trees that look like they used to be part of an old hedgerow.

This is the Old Castleton Farm located in the Scottish Borders not far from Newcastleton. There used to be a village called Old Castleton located here, you can still see the areas where the buildings were, but the whole village was moved to what is now Newcastleton. This sadly happened as a result of the land clearances in the 1790’s when people were forced to move from their homes! Here’s a link to Wikipedia with a bit more information about this area.

“Old Castleton Farm in Winter”. Water soluble pencil.

It’s great to use a dark water soluble pencil in winter for quick studies in the field, and keep your sketchpad small.

View of Old Castleton Farm

This is how it looked to me from the car, but it was a bit darker in the sky. You can see how far away the trees were so I just sketched what I saw and kept it simple. It’s good practice to catch sketches anywhere you can, that’s why I had my small field bag with me, ‘just in case’!

When the weather is nicer we’re going to go and explore the old ruins and area where the village was.

Scottish Cottage and Snowy Fell

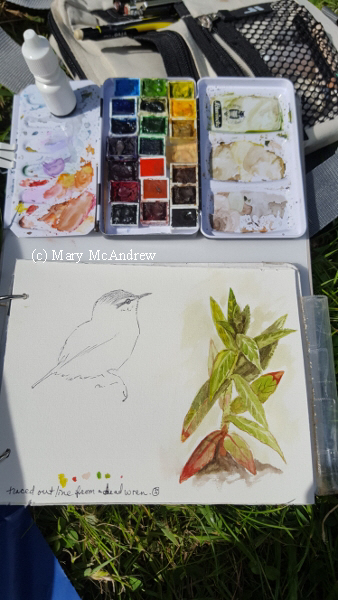
On January 16, 2023, I spent time just wandering around the garden, taking pictures of the snow on all the dead stems of weeds, flowers and grasses. I had my very small field kit bag with me, determined to do some kind of sketch.

My husband took some pictures of me, showing how bundled up I was! Two hats on my head, my dad’s old Woolrich hunting coat and thick mittens! I ended up standing in the back of the garden and did a small sketch in my little sketchbook. When it’s cold outside I like to use a small sketchbook so it forces me to keep it simple and quick.

Above you can see my little homemade sketchbook, it’s small enough I can also tuck it in my coat pocket. I used a permanent ink pen to do the drawing outside and then took my frozen fingers inside and used watercolor pencils to color it. I looked at a photo I took with my cell phone for reference to help me finish it. You can see the waterbrush I used too. You’ll notice my pencils are all short; I cut them all in half and carry them in a little pouch for taking into the field. Reducing weight is always key to me.

There is my little sketch finished and you can see the pencils tucked into the little pouch I made for them.

“Scottish Cottage and Snowy Fell”, watercolor pencil, ink

I’m happy with how that came out. In my photo you could see our oil tank on the left, I just left it out, artists choice! I tried to simplify by leaving out little things laying around, pots in the garden etc. I had fun playing with the purples in the shadows of the greenery.

I hope you enjoyed this little study, and encourage you to keep sketching. Small quick studies from life, not photos, are good practice and it helps keep your ‘eye’ trained.

Sketching Grass on a Snowy Day

We had about two inches of snow last night, everything is covered in a soft white blanket. All our flowers that were finally coming up are now covered but at least the daffodils haven’t bloomed yet.

Above is the Hawthorn I painted not long ago, and I’ll be putting a post up about that soon. I’m following fox tracks in the snow and they led here, then it jumped up on the wall and walked behind the tree! I love following tracks in snow to see what story it tells, guessing at what happened in the night.

The tracks led here also, where a fox jumped and hopefully got a vole! I did a Youtube video talking about it and will link it at the end. The grass clump above is what I decided to draw.

Here’s my little field watercolor palette, holding it in one hand with my fat mittens on!

It’s hard to take pictures while holding things!

I was trying to show how I hold the sketchbook against me and the palette, both in the same hand. I used to have a small hard panel that I would clip them to, I’ll have to revisit that idea! Kind of like a clipboard but skinnier.

Here’s my field kit I used today, it’s a small one. I stepped into the wood shed a minute so I could put things down to take a picture and video tape.

“Grasses in the Snow”, watercolor and ink

My finished little study, I like how it came out. I put together a short Youtube video about doing this sketch and I show my field kit. Find it RIGHT HERE, give me a like and leave a comment if you can!

I’ll be sharing another post soon, about the Hawthorn tree and Mossy Wall, with lots of stages of painting to see. I’m also saving my pennies (pence?) to buy a new printer so I can get back to offering prints and note cards, stay tuned!!

Mossy Fairy House in Ink

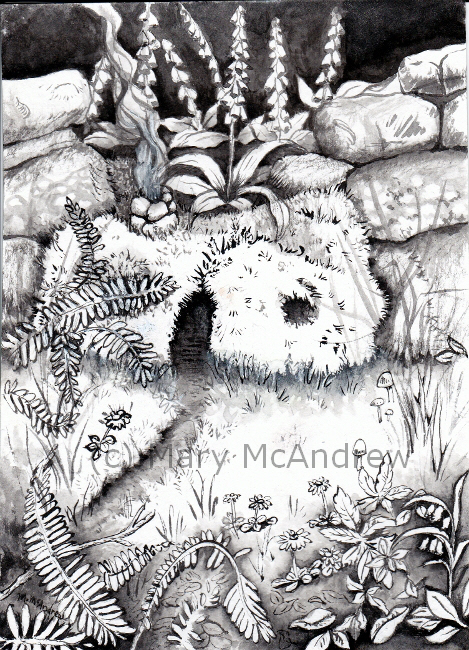
Hello everyone! As I said in my previous post about the toad in ink, I wanted to try and do some ink drawings in the month of October for what’s called “Inktober”. It’s a challenge that artists do to try and create ink artworks maybe everyday, but I knew I would never be able to do that!

So I did get this little drawing of the “Mossy Fairy House” done using inks and I did a bunch of fun cat cartoons. I’ll share them next time I think, there’s not many but it was a lot of fun! This Fairy House was a good practice for me as I did it entirely with brushes, no ink pen. I’ll show you from start to finish the stages it went through, it’s more interesting and educational in my opinion.

This shows the very beginning next to the reference photo.

I sketched my drawing out on a 5×7″ piece of bristol board that I taped to a piece of clear plexiglas. I like using this a lot in the studio, I use it like this and it’s easy to lay on top of reference materials or you can put a lamp behind when you need to trace from your sketch. I also put a piece in front of current illustrations that are leaning behind my easel on the table, don’t want any paint splashes on them now do we?

Anyways, the reference photo is one I shot years ago while hiking in the woods near our village, there is NO shortage of luscious moss growing here in England! It was growing on some rocks that had fallen down ages ago and to me, well it just looked like a Fairy house! What would you think if you saw it?

Starting to brush ink in, deciding how to make it look more ‘house’ like.

Then I started to brush ink in, trying to decide where to go with this, because the whole thing has got to come from my imagination. I added two ‘windows’ but never felt right about them. You can see I sketched rocks behind and added a chimney.

More ink as I pick out the rocks of the wall and put some smoke from the chimney.

More ink goes on as I pick out the rocks of the wall and put some smoke from the chimney. I also add one Digitalis or Foxglove flower behind. This grows commonly here and I love it, so do the bees!

I add more flowers and the path to the Fairy House.

Now I’m adding more flowers behind to fill it out (or fill it in however you want to look at it!), and I start to make a path lightly in grey wash. I also flick in some simple grass to start to set a scene, thinking all the time, “what will I put in the foreground?”. I would like to make it a nice illustration and add a fairy but nothing was hitting me.

I next do a bit on the stones on my mossy fairy house.

Then I start to add washes to the stones of the wall. This was fun because I got to look back through my reference photos of stone walls, which inevitably takes me MUCH longer than it should because I end up thinking about all the different walks it took to get all those photos! Actually more than that, it’s seeing so many photos of things I’d love to paint and this distracts me like crazy! Haha…oh well back to little mossy fairy house!


Now I’ve set up in front of my laptop so I could look for reference photos I’ve saved.

This photo shows I’ve moved off the easel, I’m done with that little reference photo and am looking up reference photos on my laptop to get inspired for the greenery in front. You can see how I’ve put my ink out, this is a little jar of Speedball Acrylic Ink, next to it is a small jar of water and they are sitting in a plastic paint mixing tray. The ink is permanent so I know I was taking a chance on permanently staining the tray, but it’s ok, I’ll use it for ink now. My brushes are resting on a tiny paintbrush stand I got years ago with a set of chinese brushes and ink. I have a small scrap of paper between the art and the ink, this is for testing marks etc. It kind of looks like I made a Jack O’Lantern face doesn’t it?

Now I add more ferns and flowers to the fairy house.

Ok, so the way the windows looked like two stark dots was bugging me, enter my husband. I like asking him his opinion as he has a sharp eye and doesn’t hold back on opinions! (though sometimes not what I want to hear!). He right away pointed out he didn’t like the windows, they looked too symmetrical, yes, that’s it, they had to be changed! It was nearly impossible to rub out or lift the black ink so I resort to illustrative techniques….out comes the white gel pen! I drew in pencil first how I wanted the fern to go and as you can see I added more in the foreground too. I drew on each leaf with the white pen to make it show, perhaps gouache would have worked well but it’s so tiny I opted for the pen.

Here’s a close up showing my waterbrush used to create a wash of ink around things.

You can see I have my waterbrush out now, this is great for making the soft shadows around the plants. I shot a video clip with my cell phone showing a bit of this. Next time I’ll try and set it up on a holder – tripod or something. I first paint the outline of the plant, then you can either let it dry and go back to it or try to quickly brush along the edge to draw the ink out. I usually like to get the drawing done first so I can think about where I want the ink wash shadows to go all together.

I was able to upload the clip to my YouTube channel, click here if you want to check it out! If anyone knows of some free program that compresses your videos please let me know in the comments, I have an awful time uploading videos.

Now we’re back on the easel, working on those plants!

Now we’re back at the easel and I’m working on adding more ferns, flowers and details in the foreground.

Almost finished!

Well we’re almost finished now, I lift a light patch inside the doorway, I really wanted to add something but felt the pressure of wanting to be done too. I’ve left a ‘free’ area on the grass in front of the Fairy House in case I come back to it later with a little fairy or creature. Something that bothered me about the drawing too is how I added so much dark under the house and it looked disconnected from the ground too much, do you know what I mean? So I tied it down a bit by adding grass blades with the help of the white pen and drawing grass with my ink.

And it’s finished!

Here’s the final drawing finished. It came out nicely I think, mostly I’m pleased with doing something that looks a bit different for my style. Adding the black background and darkness in the foreground I find to be exciting looking and graphic. I’m not happy about the smoke from the chimney and could have gone back with a wash of white gouache, but I really was trying to push myself to just use ink. Someday maybe a fairy will find it’s way in here, but that will probably be if I do another version of it. I was ready to say it’s done and get onto the next thing! I’ll share that next, some fun little cat cartoon drawings inspired by illustrator Edward Gorey!

I hope you enjoyed seeing the steps to this little ink drawing, please leave me a comment or any questions below. Cheers!

Snowdrops in the Churchyard

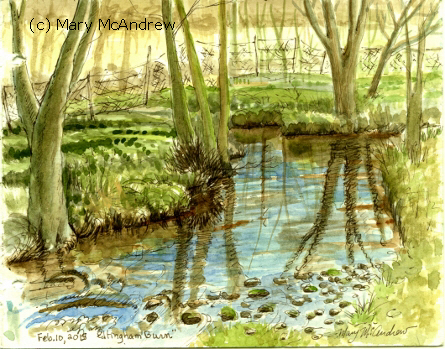
It’s been a long time since I used my watercolor pencils, so I thought I’d bring them out with me on this day (in March). The snowdrops were out in a thick blanket at the “St. John the Baptist” churchyard, Edlingham and the view in the distance with “Edlingham Castle”, the Viaduct and “Corby Crags” was great; so I thought I’d try to capture a bit of it.

Beginning sketch I did while sitting on the wall of the churchyard.

Beginning sketch I did while sitting on the wall of the churchyard.

I took this picture with my cell phone as I sat on the cold stone wall of the churchyard, cold enough I was drawing with fingerless mittens on!

This is how far I got working outside.

This is how far I got working outside.

Above shows how far I got working on it outside sitting on the churchwall. I got most of the important things drawn in the right place and color for a lot of it. I was very stiff and cold so had to stop!

This shows a bit more color laid on

This shows a bit more color laid on

This shows a bit more color layers put on, more on the trees and background detailed a bit. You can’t see it but I also put some color on the castle.

Finished! In all it's vividness and rich greens!

Finished! In all it’s vividness and rich greens! That’s Edlingham Castle and the Viaduct in the background.

This little painting really tidied up nicely! The fence ended up being a bit different than I planned but I think it’s ok. I wanted to leave the whites to show the snowdrops; I mostly showed them by using the greens around them. When I was done I used a white gel type pen and touched here and there helped really pull the flowers out more. I’m also experimenting with using Doc Martin’s Bleed Proof White, a non permanent white ink, to add touches of white (tree trunks).

I hope your Spring is shaping up nicely where-ever you may be! Happy Spring!

Garden Plant Studies

It’s gardening time again! I started a variety of seeds on the window sill and we’re really looking forward to the sunflowers! The spring has been so cold that I waited a bit to plant, but we can hope for warmer weather. Now the sprouts have been moved outside and a few are planted. Fingers crossed, we’ll see what happens!

Sunflower seeds sprouting.

Sunflower seeds sprouting.

Above are two very small studies of the sunflowers sprouting; I LOVE when seeds sprout! After messing around with my sunflower sprouts, I decided to get outside, now that the sun is actually shining!

Photo of the plant I did the watercolor study of.

Photo of the plant I did the watercolor study of.

I wanted to do a small study of some plants and decided on this one. I liked how the tips of the leaves at the bottom of the plant are reddish, a good alizarin crimson red. I’m almost positive it’s a weed, but who cares? It looks good for a study.

My sketchbook and paint kit, where I sat in front of the garden.

My sketchbook and paint kit, where I sat in front of the garden.

I sat on the grass and the plant was about eye level in a low bed. I clipped my sketchbook and the tiny paint kit onto a stiff peice of cardboard, then I could hold it in one hand. I used a waterbrush to paint and the tiny white bottle is water that I can squirt onto the pan for extra wetness, I also use it to wet my colors.

Close up of my kit and sketchbook.

Close up of my kit and sketchbook.

Here it is a bit closer. The sketch of the bird was done from a dead wren that my husband’s cat killed. 🙁 I would usually like to do a study from it but just didn’t have time, so I traced it’s outline. Poor sweet little thing. Happily though, the wrens are nesting behind our house, under the seat of an old bicycle! We keep the cat well away from there!

Coming up soon, a post about an adventurous hike and some watercolors that were inspired by it. (it involves little mice!)

To get automatic updates when I post, sign up your email in the subscribe box in upper right column.

(Belated) Signs of Spring

Ok, so I know it’s summertime so why am I talking about spring? Well I still have sketches and paintings to share that are from late winter and spring before I share my recent work. You’ll notice my winter and spring sketches were all quite small and not as much watercolor going on. As the weather warms up, and thus my fingers, I start to do more. Lately I’ve been doing some charcoal drawings too, but lets not get ahead of ourselves…spring first!

Watercolor of Edlingham Burn, in Edlingham village, Northumberland.

Watercolor of Edlingham Burn, February 10th in Edlingham village, Northumberland.

Above, here’s a small watercolor I did while sitting by the burn or stream that runs through Edlingham. The painting is just small, about 5×6″ or so, but good practice to paint the green trees and blue and brown water. Well actually the water is quite clean and clear, it just reflects all that’s above it! I really enjoyed the sun that day though it was still cold, so I finished the painting at home.

Fuzzy Buds drawing in ink

Fuzzy Buds drawing in ink February 17, 2015

I just love when native bushes bloom with soft fuzzy buds in springtime. They have little shiny, leathery looking caps that their fuzzy little heads push up as they swell to bloom. I brought some twigs in to draw; if you put them in water they look great and last awhile as you draw them.

I set up the jar of buds by the patio windows, getting some natural light to work by.

My set up for drawing.

I set up the jar of buds by the patio windows, getting some natural light to work by. I like sitting here with my porridge in the morning to read and watch the birds outside.

Painted with watercolor from live branches I brought inside.

Painted with watercolor from live branches I brought inside. February 17, 2015

I really enjoy trying to paint the soft look of the buds and also showing that they are white. You can’t (well I can’t) help but stroke them and think of how it feels like the ear of my bunny I had years ago!

One of many snowdrops, done in ink and watercolor.

One of many snowdrops, done in ink and watercolor. February 11, 2015

Spring here in England, wouldn’t be spring without the Snowdrops! They were everywhere and lasted so long, a real promise of more spring flowers to come. I had planned to paint a Snowdrop open, but ran out of time. I took a lot of pictures though so maybe in the future?

Sketch of a bit of Edlingham Valley.

Unfinished sketch of a bit of Edlingham Valley.

Here’s another from February; do you notice how small this is? It’s from one of my tiny 4.25″ x 5″ sketchbooks I like to use in the winter. (see pic below). It’s great for tucking in your pocket when you just might want to draw something interesting, and I draw while standing up so it’s easy to hold too.

Finished watercolor 4.25" x 5", view in Edlingham, Northumberland.

Finished watercolor 4.25″ x 5″, view in Edlingham, Northumberland.

Later I finished the color on the trees and grasses. As the page says, it was cold that day!

This is one of the small sketchbooks I designed, it's great for winter sketches because it's small.

This is one of the small sketchbooks I designed, it’s great for winter sketches because it’s small.

There’s the sketchbook I made, designed complete with a pen holder made out of duct tape!

The Vole Hole, watercolor, 4.25" x 5".

The Vole Hole, watercolor, 4.25″ x 5″.

Another tiny one, done on the backside of the sketch of Edlingham Valley view. Who can resist a tiny hole belonging to a vole or mouse? I know my husband’s cat can’t but neither can I for different reasons. I just have this little childlike vision of cute mice straight from Beatrix Potter coming out of the holes. I like to practice drawing these kinds of homes for future stories I may illustrate.

4.25" x 5" ink drawing of our ancient Sycamore.

4.25″ x 5″ ink drawing of our ancient Sycamore.

I did this sketch with the intention to study the wonderful colors that are on this tree. It’s an ancient Sycamore covered with lichens of many colors, mosses of green and the tree bark’s own reddish hue, just waiting (still) to be studied by my watercolors.

Well I think that’s all for this post, I still have lots of small spring sketches and watercolors to share soon though. Next time I’ll post some more photos too. I’ll be posting soon, stay tuned!

“Winter Sketches in England”

Winter has passed by and I’m still settling into my new life in England. I did some sketches as I could, being tired from unpacking, cleaning or just being overwhelmed in general. But happily I can see my sketching has increased as the months slip by and I will share all that in further posts to catch up.

Waiting at Gate 12, Buffalo International Airport...the big day way back in December!

Waiting at Gate 12, Buffalo International Airport…the big day way back in December!

Today I’m posting sketches I did way back in December and January. The one above I did while waiting in the Buffalo International Airport, Gate 12, for my flight to the UK. I like the way it came out, a person sitting ‘almost’ in silhouette in front of the huge windows. It definitely helped to pass the time and calm my nervous excitement.

Ink sketch of a very old Hawthorn in a farmers hedgerow.

Ink sketch of a very old Hawthorn in a farmers hedgerow.

After I settled in I started walking in the mornings, mostly on my favorite lane above the village. Just like at ‘home’ in New York, sketching in winter I mostly use very small pocket sketchbooks. It’s just too cold to stand around freezing my fingers off, so I just do smaller quicker sketches; the most important thing is just to keep sketching.

The drawing above is actually tiny, done at the top of the page, but I like how it came out. It’s done with a brown Faber-Castell ink pen; I love using these pens. It’s a twisted little hawthorn along a sheep field, very exposed to the winds at the top of a ridge. I like it’s character because it reminds me of a bonsai tree. Some of the little trees you see hedges made of are actually very old trees that are trimmed all the time.

"Tree on Upper Lane", a rough sketch on a very cold day, using water soluble pencils that I haven't wet yet!

“Tree on Upper Lane”, a rough sketch on a very cold day, using water soluble pencils that I haven’t wet yet!

This sketch was done very quickly because it was so darn cold! I love walking on this one lane that goes out of our village because it’s lined with ancient trees and gorgeous views of distant hills and fields. I did it using water soluble pencil but wanted to scan it before I wet it. When you wet them they can get very dark and intense…it still waits for me to wet it with my brushes and mess around.

This is one of the small sketchbooks I designed, it's great for winter sketches because it's small.

This is one of the small sketchbooks I designed.

This is one of the small sketchbooks I designed, it’s great for winter sketches because it’s small. I made a pen holder out of duct tape and attached it to the back cover. I have another one that’s even smaller that I used at home a lot too, just loved sticking it in my barn coat pocket when I went walking.

Small watercolor done while sitting along the bank of Edlingham Burn, on a very cold day in January.

Small watercolor done while sitting along the bank of Edlingham Burn, on a very cold day in January.

January 7, 2015 – I walked down to Edlingham Burn (small river) and found a mossy rock to sit upon with this lovely view. Well maybe it’s hard to imagine from such a small sketch, but it was a view of the burn and moss covered trees everywhere, just lovely!

(c)me sketching 1-7-15

Me in the freezing cold, painting Edlingham Burn.

I was very cold painting this, I did it with mittens on mind you, no easy task! I sat on a bit of rock, cold and damp, but it felt so good to be out and finally messing with my watercolors, that I didn’t notice (until I got up, all stiff!) I used one medium sized waterbrush to do this.

The livestock fence across the burn.

The livestock fence across the burn.

Farmers use old pallets across small streams or ‘burns’ here, to keep sheep and cattle in sectioned off fields. I put it in the background of my watercolor sketch you can see above.

A walk along the burn in January.

A walk along the burn in January.

This is Edlingham Burn, I walked along it looking for a spot to paint. Where the rest of the land was pretty bleak and bare, the river was/is fascinating to me.  With all it’s mossy trees, ivy climbing everywhere, dry grasses draping over dark banks touching the cold water and the sound of splashing water, wonderful.

From my small sketchbook, I love the way these two trees were twisting together.

From my small sketchbook, I love the way these two trees were twisting together.

These two trees I found behind the old church, in the farmers field. I really like how this sketch came out. They twisted together, almost in an embrace, part lichen covered, part moss. Standing in a cold, bare hedge, naked of leaves or flowers, just waiting till spring! Maybe someday I’ll do a larger color study.

Pine tree across the road from us, I noted the birds I saw while sketching it.

Pine tree across the road from us, I noted the birds I saw while sketching it.

January 26th – I did this sketch on a day where I was tired and not feeling particularly inspired. That’s an especially good time to stick to your small sketchbook, just do something small until you ‘do’ feel inspired. It helped me to focus and relax; practice is always a good thing. I noted the birds I saw while doing it, Seagulls, Jackdaws and a Tree Creeper.

A pretty view of sheep over a country fence.

A pretty view of sheep over a country fence.

I thought I’d leave you with two more photos, from Jan. 6th on my morning walk. I love watching the sheep in the fields all around me, there are so many kinds here!

A sheep wondering what I'm doing in his field.

A sheep wondering what I’m doing in her field.

This little ewe was watching me, they run away if you get too close, so having a zoom is needed! They are all carrying lambs at this time and I can’t wait to see them in spring!

Check back for more updates, yes there are more sketches, paintings and photos to catch up with from this spring and I can’t wait to share them with you! Sign up in the right column with your email, if you want to be notified when I do new posts. Please leave me comments if you like!

Small Flowers + Plants In My Yard

Hello there! Yes I know it’s now October November, but I’m super busy getting ready for my big move to England so I haven’t had much time for posting! During the summer I did get my sketchbook out and go adventuring into my wild fields but most of what I observed just so happened to be right in my backyard. I have a really big yard and lots of wild stuff just dying to burst through the fence all around! I love it!

(Please click on pictures to view larger)

The back fence barely holds back all the wild plants and flowers in the field!

The back fence barely holds back all the wild plants and flowers in the field!

I took a break and sat in a lawn chair on a very nice day to do this little watercolor sketch. It’s only a couple inches in diameter but I got to play a bit with the watercolors and that was so relaxing.

A collection of wild plants and flowers.

A collection of wild plants and flowers.

I like studying the little plants and flowers that grow in my grass, above is an old sketch I did when I started to notice them.

I’ve been noticing this tiny purple wild flowering plant (below) for years, but just realized that there are two plants! So now I need help identifying them.

This plant grows very short when in the mowed lawn and still flowers!

This plant grows very short when in the mowed lawn and still flowers!

Bees just love these tiny flowers.

Bees just love these tiny flowers.

Look how beautiful these little clusters are!

Look how beautiful these little clusters are!

The three photos above are all the same kind of plant. Notice the leaves are oval/lance shaped and smooth margins? Also the flowers always grow from one spiked cluster at the top of the plant. What gets confusing is where the plant is found in my trimmed lawn, sometimes the spike is cut off and looks very different when flowering.  Each individual bloom is really quite beautiful (if you get down on your hands and knees and take a ‘mouse eye view’!)

Below are photos of the second purple wildflower.

Study of purple wildflower #2 I did years ago.

Study of purple wildflower #2 I did years ago.

I ‘think’ this might be called “Gill Over the Ground”?? I did this study years ago. I love how the tiny leaves look like round geranium leaves and have wavy margins. When the new leaves are forming they make the nicest little clusters that are really fun to draw! I really need to do more studies of this one.

Here's a photo of the same plant.

Here’s a photo of the same plant.

This photo doesn’t show many flowers, but they grow more than this example. Their flowers can grow from sections along the stem and not so much from a spike like the other flowers.

A beautiful Hawkmoth hovers over the flowers as it feeds.

A beautiful Hawkmoth hovers over the flowers as it feeds.

I know it’s a bit hard to see, but there’s a Hawkmoth hovering over the tiny flowers! Below I cropped the photo so you could see it better.

A fascinating Hawkmoth, can you see it's clear wings?

A fascinating Hawkmoth, can you see it’s clear wings?

See how important all these little flowers are in your grass?

For tiny flowers you get tiny butterflies and bugs.

With tiny flowers you get tiny butterflies and bugs.

Above is a photo of that same plant in my grass…and what is that tiny little blue flutter I saw?

A gorgeous Spring Azure Butterfly!

A gorgeous Spring Azure Butterfly!

Yes, for tiny flowers you have tiny butterflies, tiny bugs and bees. This butterfly was a dainty flitting little thing, until I identified it I was calling it a “Fairy Blue Butterfly”! I kind of like my name better! So it looks pale blue now, but when it opens it’s wings (extremely hard to catch a photo) it’s very blue. So when it flies you see the white and blue of under and upper wings combine to make a light blue! Just like one of those flat paper toys you spin on a string and it makes a new picture or color.

An old style illustration using the wild plants in my yard.

An old style illustration using the wild plants in my yard.

Above is a study I did in my field sketchbook years ago using the tiny plants in my yard. I really like it and will do more studies like this in the future! Do you see the little purple wildflower #2 in this?

A watercolor study of Knapweed (as far as I can tell).

A watercolor study of Knapweed (as far as I can tell).

I ventured out on my land here at Long Lane Farm, towards the end of summer. Out in what we call “The Maze” there’s this beautiful wildflower growing; I think it’s Knapweed. I tried very hard to find photos like it online and since all my wildflower books are packed away I didn’t really figure it out definitively.

This is another study of Knapweed, done in bright sunlight.

This is another study of Knapweed, done in bright sunlight.

Yes, this is the same type of plant, just different lighting when I painted it. I worked in full sunlight and tried to paint the colors I saw. I tried to take more note of the leaves so someday I can get help with identifying it. Though I love it I have a feeling it might be one of those dreaded invasive weeds?

Skipper butterfly on sweet white clover.

Skipper butterfly on sweet white clover.

Above is white clover with a Skipper butterfly on it. All summer I enjoyed the multitude of clovers and Moneywort growing in my grass…weed killer?? God help us, NEVER! I have all kinds of beautiful tiny plants and flowers in my lawn…their leaves are green, they add to the ‘greeness’ of my lawn and also beautiful tiny flowers.

White clover blooming in the warm grass of summer.

White clover blooming in the warm grass of summer.

And when that clover is blooming I’ve never smelled anything sweeter! You just have to stop and breath in, and realize that subtle sweet smell is the clover talking to you. It’s saying, “Don’t spray me with weed killer!” Seriously though, when I look across the yard and it’s blooming, it’s so beautiful, especially with the sunny yellow Dandelions.

Tiny study of Dandelions in the grass.

Tiny study of Dandelions in the grass.

Below you see the Skipper on a bending Dandelion head, can you remember the smell of that pretty little flower? And how soft it is when it tickles your nose?

A tiny Skipper butterfly on a soft dandelion head.

A tiny Skipper butterfly on a soft dandelion head.

A small study I did years ago of Moneywort, not in bloom.

A small study I did years ago of Moneywort, not in bloom.

The Moneywort loves it here because it’s damp and when that blooms it’s stems are absolutely covered with bright yellow flowers. It actually gives the grass a yellow hue when you look at it with a ‘painters eye’. I remember when I did this study all the plants were under freezing cold spring melt-water.

White Asters grow in profusion around my fences.

White Asters grow in profusion around my fences.

The bees are allover, gathering nectar from the wild flowers and pollinating to their hearts content…do bees have hearts? I’m sure they do! Above is a study I quite like of White Asters. They grow in tiny but profuse branched clusters that form little bushes of white dainty flowers. As the flower grows ‘old’ the center turns from a bright yellow to a dark orange-ish to red-ish looking color. I really love these little dainties and even wrote a story about one little aster, someday to share.

Tiny mushrooms growing in the grass. Watercolor + ink.

Tiny mushrooms growing in the grass. Watercolor + ink.

One of my favorite things is to discover little mushroom clusters in the grass. I’m terrible at identifying mushrooms and someday I think I’ll concentrate on learning a bit more, but for now I’m content to just sketch and be inspired.  When I see mushrooms in the grass and get right down at eye level (or mouse level as I call it!) I think about how they look like little houses for wee folk or critters.

Studies of tiny mushrooms

Studies of tiny mushrooms

So we’ll end it here, Fall is almost over now and there are NO flowers in my yard! I have collected lots of photos to use for reference when I do my illustrations in the future. Oh that reminds me! I have one more picture that you’ve seen before but would be fitting here.

Mouse family in the Leaves

“Mouse Family in the Leaves”

It’s great to use the real plants I see in my own backyard when I do my illustrations. I hope to show you more in the future!

Do you have tiny wildflowers growing in your grass? I love reading comments, please add yours below!

Spring Walk, Nature Notes and Poems

It’s been weeks since I’ve been out in the field sketching, and now that I’ve been out I feel renewed! I guess that’s how we should feel in Spring. I put on my Wellies or “Mud Boots” grabbed my sketch kit and camera and set out. Come with me and I’ll show you my walk with sketches and photos! (Please click on pictures to view clearer.)

Dried grasses in “Pasture Lane” on the way to the pond.

The first lane I walk in follows the pasture so it’s always been called “Pasture Lane”. No animals in the pasture now but still lots of wild things to look at. This lane has lots of nice dried rushes and sedges in it; I love this color, especially with the blue sky. It won’t be long I’ll be spotting all kinds of Nursery Web Spiders and underwater little nymphs and creatures.

Natural arch of branches on Long Lane

This is on “Long Lane”, looking towards “Aspen Hall” and it’s a natural archway of branches that’s been forming the past few years. I keep breaking branches when I go under it to keep it a bit under control! I’ve done sketches and paintings of it before, and not too long ago photographed it covered with snow! But as I was standing here I decided to go up “Memory Lane” to my left. This leads me to “Oak Lane”, one of my favorites, where I thought I’d check things out.

Woodpecker hole in dead tree by “Memory Lane”.

Just at this intersection the woods are quite wet and I always see dead trees with lots of woodpecker holes. This one looks like it’s been freshly pecked at.

One of the ancient oaks in “Oak Lane”, standing tall and strong.

I ended up in “Oak Lane” my favorite place on my property where the oaks are huge and tall, standing for many many generations. I made a little place to sit right up next to the tree at it’s base, by spreading my trusty garbage bag out, first checking for pokey sticks and bits. There I sat, ate a snack and enjoyed the peace, then did a small sketch of the grapevines growing about me. Hmm…funny but that seems sort of rhymy to me…lets see:

“Here I Sit”
 
Before I sat down
Upon leafy ground
I gave the spot a good scour
Where I’d while away the hour.
 
There were pokey sticks
And hard little bits
I had to clear before I sat,
So I could sit and have my snack.
 
Well, now here I sit
With favorite sketchkit
Having a think and a good look,
At what will go in my sketchbook.
 
by Mary McAndrew

Well that was fun! I just made that up!

Here’s the start of my “Grapevine” sketch

I put my sketchbook on my knees and decided to draw the big grapevine branch hanging near me…that’s it by my leg.

My watercolor palette, I just love the colors!

There’s a close up of my watercolor palette I take when I go afield, it’s getting pretty stained now and I’ll have to look for a new one. Some of my colors I have in temporary little plastic containers, just to see if I want to add them to the kit.

Using a waterbrush to paint.

This is one of my waterbrushes, it’s actually not one of the more expensive ones but it worked great for me today. It has good juicy water-flow and the tip stayed sharp for details. I also wrote words about the grapevine on the page that I’ll type out below:

“The grapevine grows greatly
reaching upwards with twisted limb.
It’s rough bark twisting tightly tense
along it’s sinuous length.
Great muscle of wooden rope reaching right up
to entangle and strangle it’s host.
And gentle innocent long trailing tendrils
Hang down from above,
stirring in the breeze
to tease.”
by Mary McAndrew

As I wrote the words I let my mind think poetically and freely. I knew later I’d like to write a poem from some of the words I found because I liked the way they sounded together. Here’s the finished sketch below and then the new poem follows:

Grapevine sketch and words done in the field.

Here’s my little poem I wrote just now while looking back at the words:

“The Grapevine”
 
Grapevine growing greatly
Reaching upwards with twisted limb,
Rough bark twisting tightly
Tense, sinuous and slim.
 
Great muscle of wooden rope
Reaching right up to entangle,
Clinging to unwilling host
As you wind about to strangle.
 
Gentle, innocent tendrils trail
Stirring in the breeze.
Stronger than you look so frail,
Climbing any tree you please.
 
by Mary McAndrew

Watercolor started in the field of purpley red bushes.

The watercolor above I did half in the field and half at home.  On my way back I stood in an field we call “The Maze”, because of all the intertwined paths in it, all cut by me years ago using a tractor and brush hog. It was very difficult to paint the stems while standing there in front of them, tired, cold…but I loved the colors so much and wanted to try and ‘study’ it. When I got back I looked at photos I took using my computer, and did more detail and study. I found myself using Dioxizine Violet mixed with Alizarin Crimson for most of the purpley colors; mixing it with Sepia made a nice shadow color. I had to use a bit of Cadmium Red to brighten up the color here and there. You can see my color notes on the left side there. By the way, I can’t really recall what the name of the bushes are, I think “Red Pannacled…something or other! Sorry, I packed all my field guides up, I’ll see if I can look for them.

The old stick bridge at “Aspen Hall”

This is the old stick bridge in “Aspen Hall”, I add to it every spring and summer, tossing on dead branches to go over the ditch. “Aspen Hall” is located along “Long Lane”, so I’ve done a circle and am coming back towards home now.

A very old car frame.

This is a very old car frame just sitting by the pasture, it’s been there ages! I think the former owner of the farm told me it was Model T or Model A …wooden spokes! How cool!

I’ll leave you with one more picture from my spring walk…

Ahhh…this is the life!

I didn’t want you to miss my favorite picture! I love taking pictures of my boots when I go hiking, wherever I am. In my shop I have pictures of my boots in England too! Go here to my shop then scroll down left side column and click “Hiking – Walking + Boots”

Hope you enjoyed our ramble!

Click on the pictures below to see my photos as note cards, it has a nice ZOOM feature that’s lets you look closely.

“Great Old Oak Tree” glossy note cards
“The Old Stick Bridge” glossy note cards
“Old Wheel” glossy note cards