Support This Site

If you like what I do please support me on Ko-fi

Painting on Gummer’s How, Lake Windermere

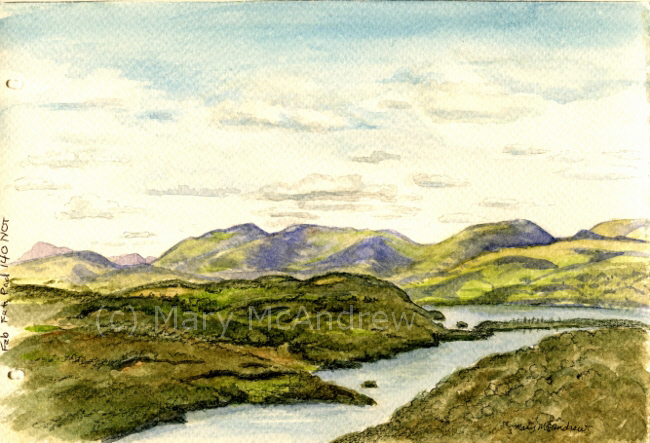
This past summer my husband and I tried to pop out to the Lake District when we could. Unfortunately time slipped by and we only got out there a few times for the day, except of course when my son visited and I got to stay in Keswick two days with him! (but that’s another story). On this occasion we explored Kendal, then some small tarns but the best part was walking up Gummer’s How and having a picnic. (please click on photos to see larger views)

The Chocolate House, Kendal.

The Chocolate House, Kendal.

First we stopped in Kendal and had a quick run around, but lingered a little longer in the Chocolate House. It’s a very small shop filled with all kinds of chocolates and candies. To be honest I didn’t buy any this time, I just didn’t feel in the mood….I must have been NOT feeling myself! Well it’s a reason to go back again.

An amazing old door on a small church we visited.

An amazing old door on a small church we visited.

This is an amazing old heavy wooden door on a small church we visited.

A very scary ford to cross.

A very scary ford to cross.

This is a ford we came to, I’ve never seen one this wide! There was no sign saying not to cross it but I told Gary I’d get out of the car if he tried! It looked far too deep.

I'm so glad we decided not to cross this ford!

I’m so glad we decided not to cross this ford!

We drove around the long way and this is the ford from the other side. It was awful, the ground was all broken up from previous flooding, and it must have been 2 1/2 feet deep! There should have been a sign to warn people!

Gummer's How, waiting for us to come up!

Gummer’s How, waiting for us to come up!

This is Gummer’s How and you can just see Lake Windermere at its base. Time to get our boots on and get walking.

There were some really pretty areas on our walk up.

There were some really pretty areas on our walk up.

We passed small grassy glades and this one had a small stream that sounded so refreshing.

This is the path that curves around towards the top

This is the path that curves around towards the top

As we get near the top the path goes close to the edge and you get a great view of Windermere. I had to stop and take it in, though Gary said to keep on, he knew the view got better!

Now don’t get jealous of this next photo! It looks like a scene from the “Miss Potter” movie and I love that!

Settling down to do a watercolor of the view at Lake Derwentwater.

Settling down to do a watercolor of the view at Lake Windermere.

Of course my big plan was to do a watercolor study up top and I’m happy to say I did. Many times we walk and when we’re at the top of our hill I don’t feel like painting or there’s just no time.

The day couldn't get more perfect!

The day couldn’t get more perfect!

After our picnic of Ploughman’s sandwiches (cheese and pickle), various biscuits (cookies) and a can of apple cider we shared, I settled down on some soft mossy heather to draw.

This apple cider was nice at our picnic.

This apple cider was nice with our picnic.

It helps to carry a plastic bag to sit on, the ground is usually very damp so I always have one tucked in my field kit.

My small sketchbook and travel palette balanced on my knees.

My small sketchbook and travel palette balanced on my knees.

The difficult part is translating that huge expanse of landscape to your small pad, I focused in on several of the distant mountains and first sketched with pencil.

This shows how far I got while working in the field.

This shows how far I got while working in the field.

The above picture shows how far I got in the field. One of the best things about painting or drawing outside, is all the things you see as you sit there! We heard loud airplane engines and then two really big military airplanes flew right up the lake; it was below us and that perspective made it even more exciting! They must have been returning from an airshow?

Finished watercolor of "Lake Windermere from Gummer's How"

Finished watercolor of “Lake Windermere from Gummer’s How”

Here’s the finished watercolor (above). The most challenging thing (as always) was the changing shadow patterns on the hills. You can sit and gaze all day at the moving shadows from the clouds, picking out brilliant greens in one area then fading to appear in another spot. It helped me greatly to look at photos I shot when I finished up details at home. I had to pick a bit from many to fit what my painting was showing.

Click on this Wikipedia link to read more about Gummer’s How. I love the quote by Wainwright at the end, I guess I don’t have to hang up my boots just yet!

https://en.wikipedia.org/wiki/Gummer%27s_How

The sunset as we drove home.

The sunset as we drove home.

The end of a very nice day, this was the sunset as we drove through the Pennines back to Northumberland.  I hope you enjoyed the extra photos today, though I know August is long since gone, I’ll always remember our hike and painting on Gummer’s How.

Spring Walk, Nature Notes and Poems

It’s been weeks since I’ve been out in the field sketching, and now that I’ve been out I feel renewed! I guess that’s how we should feel in Spring. I put on my Wellies or “Mud Boots” grabbed my sketch kit and camera and set out. Come with me and I’ll show you my walk with sketches and photos! (Please click on pictures to view clearer.)

Dried grasses in “Pasture Lane” on the way to the pond.

The first lane I walk in follows the pasture so it’s always been called “Pasture Lane”. No animals in the pasture now but still lots of wild things to look at. This lane has lots of nice dried rushes and sedges in it; I love this color, especially with the blue sky. It won’t be long I’ll be spotting all kinds of Nursery Web Spiders and underwater little nymphs and creatures.

Natural arch of branches on Long Lane

This is on “Long Lane”, looking towards “Aspen Hall” and it’s a natural archway of branches that’s been forming the past few years. I keep breaking branches when I go under it to keep it a bit under control! I’ve done sketches and paintings of it before, and not too long ago photographed it covered with snow! But as I was standing here I decided to go up “Memory Lane” to my left. This leads me to “Oak Lane”, one of my favorites, where I thought I’d check things out.

Woodpecker hole in dead tree by “Memory Lane”.

Just at this intersection the woods are quite wet and I always see dead trees with lots of woodpecker holes. This one looks like it’s been freshly pecked at.

One of the ancient oaks in “Oak Lane”, standing tall and strong.

I ended up in “Oak Lane” my favorite place on my property where the oaks are huge and tall, standing for many many generations. I made a little place to sit right up next to the tree at it’s base, by spreading my trusty garbage bag out, first checking for pokey sticks and bits. There I sat, ate a snack and enjoyed the peace, then did a small sketch of the grapevines growing about me. Hmm…funny but that seems sort of rhymy to me…lets see:

“Here I Sit”
 
Before I sat down
Upon leafy ground
I gave the spot a good scour
Where I’d while away the hour.
 
There were pokey sticks
And hard little bits
I had to clear before I sat,
So I could sit and have my snack.
 
Well, now here I sit
With favorite sketchkit
Having a think and a good look,
At what will go in my sketchbook.
 
by Mary McAndrew

Well that was fun! I just made that up!

Here’s the start of my “Grapevine” sketch

I put my sketchbook on my knees and decided to draw the big grapevine branch hanging near me…that’s it by my leg.

My watercolor palette, I just love the colors!

There’s a close up of my watercolor palette I take when I go afield, it’s getting pretty stained now and I’ll have to look for a new one. Some of my colors I have in temporary little plastic containers, just to see if I want to add them to the kit.

Using a waterbrush to paint.

This is one of my waterbrushes, it’s actually not one of the more expensive ones but it worked great for me today. It has good juicy water-flow and the tip stayed sharp for details. I also wrote words about the grapevine on the page that I’ll type out below:

“The grapevine grows greatly
reaching upwards with twisted limb.
It’s rough bark twisting tightly tense
along it’s sinuous length.
Great muscle of wooden rope reaching right up
to entangle and strangle it’s host.
And gentle innocent long trailing tendrils
Hang down from above,
stirring in the breeze
to tease.”
by Mary McAndrew

As I wrote the words I let my mind think poetically and freely. I knew later I’d like to write a poem from some of the words I found because I liked the way they sounded together. Here’s the finished sketch below and then the new poem follows:

Grapevine sketch and words done in the field.

Here’s my little poem I wrote just now while looking back at the words:

“The Grapevine”
 
Grapevine growing greatly
Reaching upwards with twisted limb,
Rough bark twisting tightly
Tense, sinuous and slim.
 
Great muscle of wooden rope
Reaching right up to entangle,
Clinging to unwilling host
As you wind about to strangle.
 
Gentle, innocent tendrils trail
Stirring in the breeze.
Stronger than you look so frail,
Climbing any tree you please.
 
by Mary McAndrew

Watercolor started in the field of purpley red bushes.

The watercolor above I did half in the field and half at home.  On my way back I stood in an field we call “The Maze”, because of all the intertwined paths in it, all cut by me years ago using a tractor and brush hog. It was very difficult to paint the stems while standing there in front of them, tired, cold…but I loved the colors so much and wanted to try and ‘study’ it. When I got back I looked at photos I took using my computer, and did more detail and study. I found myself using Dioxizine Violet mixed with Alizarin Crimson for most of the purpley colors; mixing it with Sepia made a nice shadow color. I had to use a bit of Cadmium Red to brighten up the color here and there. You can see my color notes on the left side there. By the way, I can’t really recall what the name of the bushes are, I think “Red Pannacled…something or other! Sorry, I packed all my field guides up, I’ll see if I can look for them.

The old stick bridge at “Aspen Hall”

This is the old stick bridge in “Aspen Hall”, I add to it every spring and summer, tossing on dead branches to go over the ditch. “Aspen Hall” is located along “Long Lane”, so I’ve done a circle and am coming back towards home now.

A very old car frame.

This is a very old car frame just sitting by the pasture, it’s been there ages! I think the former owner of the farm told me it was Model T or Model A …wooden spokes! How cool!

I’ll leave you with one more picture from my spring walk…

Ahhh…this is the life!

I didn’t want you to miss my favorite picture! I love taking pictures of my boots when I go hiking, wherever I am. In my shop I have pictures of my boots in England too! Go here to my shop then scroll down left side column and click “Hiking – Walking + Boots”

Hope you enjoyed our ramble!

Click on the pictures below to see my photos as note cards, it has a nice ZOOM feature that’s lets you look closely.

“Great Old Oak Tree” glossy note cards
“The Old Stick Bridge” glossy note cards
“Old Wheel” glossy note cards

“Winter Field Sketch” oil

"Winter Field Sketch"

This is a little (5 x 7″) oil painting I did “en plein air”, or translation… “while standing in the snowy field freezing my fingers off”! What I wanted to do was study the colors in oil and not get too caught up in the finished look of a painting. It was a good exercise in study of color for me, it would not have been as successful if I did it from a photograph.

My oil field kit, closed.

I rigged up a little field kit for oil painting, just for taking out on hikes. Here’s a picture of the kit closed, it’s a plastic case you can buy at an office supply department. I’ve only used it this once but hope to work with it more and ‘tweek’ it. The main objective was to keep it as light as possible.

Here it is open to show you the metal pencil case and use of 'sticky tack'.

This shows the kit open with two areas of gessoed canvas ready to use. Notice the four dots of ‘sticky tack’ on the left, they’ll hold the lid of the metal pencil case when I want to paint, using the lid for mixing. I used tape to make loops to hold brushes; just put tape sticky sides together to make it ‘not’ sticky in the middle.

I created a loop of tape to slide my medium cup into.

I used the tape in the same way here, keeping it sticky on the ends but not in the middle, I created a loop that my medium cup would slot onto. At the angle I would hold the kit, the cup would not come off! It was then held from behind with a dab of ‘sticky tack’.

Here is my field kit in action!

I held the homemade kit in one hand, using my arm for support, and painted with my right hand. It’s all in my reach and I brought no tubes of paint. Notice my fingers are holding one brush at the ready and the other ‘dirty’ or ‘in use’ brushes are kept on the left of the hinge, clean ones to the right in the loop.

Of course Ginger was along for the adventure and waits patiently to continue with our walk!

I put a squeeze of my colors in a metal pencil case and put some in a pill box from the pharmacy before I left the house. The pill box was an experiment and I wasn’t really satisfied with it, it gets too messy on the lids and doesn’t keep the paint really airtight. Since then I’ve moved to using contact lens cases that screw shut…we’ll see how the paint lasts in them as they’re all back in England and I won’t see them until spring!

This shows you my view of the field as I worked.

The above picture shows you the view I had as I worked, it also illustrates how dull the colors look on a photograph and how I perceived the colors with my eyes to be a bit more vivid. This is why working in the field is so important whether you are oil painting, using watercolors, pastels…etc.

When I came back home, I stuck the little study up on a wood post in my living room using ‘Loctite” sticky tack. I hung there for ages and I enjoyed looking at it whenever I walked by. It wasn’t until I found a great frame and laid it on top that it popped out and said “HEY…I’m a good little painting!” hahah…yes sometimes my paintings talk to me…don’t yours? It also told me to stop ignoring it and get it framed so it could have a proper place on the wall! Yes…yes, the voice of guilt, this painting actually was done last year (12/31/10) and since I traveled to England it got sort of forgotten!

Click to see photos enlarged:

How it looks framed on the wall

"Winter Field Sketch" framed and in cool daylight

Original framed painting $165 contact me

Go here to see all my Landscape Paintings in the Gallery.

I also made some nice products in my Zazzle Gift Shop with this, please click on the pictures to have a look!

Glossy Note Cards- 2 sizes
Glossy Post Cards

“Stink Bug…What a Name!”

Yes I know, what a name! This bug is a type of “Shield Bug”, so named because when viewed from above it looks like a shield. I don’t have a definitive identification on it but closest I could come was a type of Stink Bug.

My sketch page with finished paintings of Stink Bug

This one I found was much smaller than others I’ve seen in the garden, you can see from the picture below.  I put my subject into the “Crisco” container that I like to use for bug study and photographing. It crawled around constantly and was a real challenge to draw!

Stink Bug and sketch book

Below you can see an experiment I tried, I colored swatches of watercolor pencil on a heavy piece of watercolor paper. I used it with a waterbrush to paint the Stink Bug studies. I wanted to try it because it’d be great to take along right in my sketchbook into the field. It worked pretty good for small studies and I’m going to try it out some more.  It helped to mix the colors on a small metal palette to the side to keep this color palette clean.

Watercolor pencil palette and waterbrush

Another tip, if you need to show some white highlights you can carefully scrape off layers of paint using a very sharp blade. This was just a small penknife I sometimes have in my field bag. Scrape sideways, gently and repeatedly to remove layers; sometimes scrape the opposite direction to remove it.

Scraping with a sharp blade

Here’s a bunch of pictures of the interesting little bug. If bugs aren’t your ‘thing’ I want you to just take notice of a few things.  You can appreciate some things in insects that you may also appreciate in birds. What catches me about birds is how you identify them by checking their shape, patterns, colors and behavior. Well the same is true of insects; you can identify species by their special shape, patterns, colors and behavior!

Stink Bug 5

This guy has an interesting shape from every angle you look at him. Just check out those red antennae!

Stink Bug 4

And the spotted legs! Looks like he needs a shave! But isn’t it fascinating that it has such pattern?

Stink Bug 3

This angle is very interesting, his head seems to streamline right into his body, and the eyes are right along the edge.

Stink Bug 2

Stink Bug 1

Here we see his pointy shoulders, like he’s wearing football shoulder pads! And I love the pattern along the edges of his back. Can you see the fine veins patterns in that little section at the bottom of his back, that’s part of his wings folded up. His underside was a gorgeous light green that reminded me of marble, but it was hard for me to capture as he kept running around! After I took all these photos in the garden, he flew away, I think just to show off!

Hope you enjoyed my insect study, I’ve been on a real bug kick this summer! More coming!

PS. I have a Flickr page that I’m trying to add to when I can. Check it out here.

“Wet Walk in March”

As my page describes, it was overcast, wet and dreary. I did the small landscape sketch while standing up, just a small little thing but it reminds me exactly of the time and place. At the bottom I wrote words I associated with where I was sat, this is a great way to begin creative writing. When I got back to the house I added the background colors behind the words and around the landscape to perk the page up. Without it it was quite plain looking! Then I outlined the leaf shapes under the crocuses to give it more ‘umph’.

Wet Walk in March (2011)

I was sitting on a small pile of dead trees that I stacked as I could during the winter, right in the middle of “Aspen Hall”, a favorite place on my land. It’s just a clump of Aspen trees that sticks out into my field and can be seen from the house. As you walk up the lane, lined with bushes and some trees, you come to a place where there are thick trees on both sides and it forms a sort of shady canopy, so we named it “Aspen Hall”.  When my boys were just two and four (when we first moved here) we found it to be just the right distance to hike from the house and have a picnic. I then planted daffodils, crocuses and maybe some tulips some seventeen years ago! When I went out the other day I was excited to see shoots coming up! Today there were crocuses ready to open, I can’t wait to see what will be out next time I visit.

Mud Boots and Paint

This picture and those that follow I took with my cell phone! I guess I was glad I had it, sometimes it is great to get some pictures. Had to add this photo! The mud boots or “Wellies” are standard fare around here; if you want dry feet you practically live in your mud boots! I just reached down to use the colors but it wasn’t the most comfortable after awhile for my lower back, even though I was on a low seat.

My Watercolor Paints and Watersoluble Crayons

Here’s a closer look at my watercolors and crayons. I didn’t use the crayons but put them out just in case; they’re new to me so I want to play around with them more while out in the field. I also used just a tiny round watercolor brush with a small container of water I had, not my usual waterbrush.

Ginger's Big Nose

My little companion Ginger, she loves to walk with me and waits patiently (though she whimpers when she wants to keep going) as I stop often to sketch or paint.  She’s getting older now though so it’s probably good for her to stop.

Water Droplets on Seed Heads

On my return to the house I noticed something glimmering like diamonds in a rather dreary landscape; it was water droplets hanging on the seed heads of the plants.

The World Upside Down in a Drop of Water

Did you know that water droplets hanging like this reflect the world upside down? It reminds me of the drawing I did of a crystal ball reflecting the woods around it (Ravensphere), everything is upside down.  I think someone poetic could think of ways to use this imagery of the world being caught like this.  (This picture is a bit dark but it shows the glimmering of the droplets quite well).

Well I hope you enjoyed coming on this walk with me today! There’s always something to discover outside your door and you don’t have to go that far. I hope you will go out today and see and hear what you can!

“A Chair in the Woods” 2-21-10

It was bright and sunny today but winter still hangs on, the snow is over a foot deep and I wish I had my snow-shoes on! The snow is heavy, wet and deep; as I trudge through it I thought of the word ‘slogging’! Under the heavy snow is a deep, wet slaw of melted snow; I’m glad for my rubber boots.

"The Branches Reach Towards the Moon"

"The Branches Reach Towards the Moon"

Ginger prances on ahead of me, begging me to hurry. Finally along the edge of the pasture I paused to catch my breath and attempt to capture a likeness of the moon with the trees reaching up towards it. At the end of this post you’ll see my small sketchbook and watercolors, and how I hold them on a clip board. Almost all my field sketches are done while standing and holding my book.

"The Field in Late February"

"The Field in Late February"

Well as you can read in my honest notes, Ginger surprised me and did something different; I feed her really I do! I guess you can’t stop instinct. I’m happy with how this little watercolor came out, I’m always trying to capture that color of the bushes in winter, they’re gorgeous. I was standing in deep snow and at the same time had to shrug my coat off my shoulders and take my hat off as the sun made me that warm. Maybe spring is coming?

"Paw Prints"

"Paw Prints"

There are so many things to see if you take your time and look around you. The snow was quite hard on top, if you’re a lightweight animal. I noticed little tracks as I walked,  then saw these little prints and had to sketch them. I brought no camera on purpose today, I wanted to really have to describe all I saw with my brush and pen. For tracks you can use your pencil or pen to measure the real size onto your sketchbook. I call this Comparative Measurements and it can be extremely accurate when you practice using it. These tracks were a bit hard to see because they were so shallow and the snow had dusted over them a bit. I drew the tracks at real size and then measured the distance between the sets, finding they were one pen length. This tells me it’s a small animal, at first I thought raccoon but when I looked on my pocket animal tracks guide I think it may be a skunk! Hey hibernation must be over! Look at this link to see a picture of my pocket track guide which, by the way, I don’t carry with me in the field.

"Snow Burrow"

"Snow Burrow"

Then as my eyes followed some more tracks, made by a fox I think, they led me to a small hole dug into the snow. I guessed that a fox, who used his great sense of hearing to listen for small mammals under the snow, had been by and dug down to ‘no surprise’ a burrow or tunnel of a vole. I like to think about the event that may have taken place, probably while the moon was shining on the snow at night. I wonder if he got his dinner?

"Paul's Chair"

"Paul's Chair"

As I said the sun was shining brightly as I returned from my day’s walk, trudging along the deep snowy lane. I looked off the lane into the woods and saw there a black metal folding chair. This chair is not there by mistake, my son Paul placed it there years ago and would disappear at times and he’d go here to sit in the woods. I think everyone should have a chair in the woods somewhere, where we can go escape or think. I felt a bit sad seeing it there by itself, perhaps it’s owner would never sit in it again as he’s off to college now. I just hope (as his mother) that he’ll always “find a chair somewhere” and sit in the woods.

Clip board with closed sketchbook

Clip board with closed sketchbook

Here’s a picture of my clear clipboard with my handmade 4 1/2″ x 5″ sketchbook and watercolor palette attached. This is how it looks when I pull it from my bag, I use the rubber bands to hold the book shut and the palette. The palette is held on with blue ‘sticky tack’ or ‘blue tack’. The sketchbook is clipped on with metal clips with the front cover.

Clip board with open sketchbook

Clip board with open sketchbook

This is how it looks when open, I use the white rubberband  (actually it’s a hairband thing) to hold the piece of paper towel or to help hold the book open, or you can use a metal bankers clip. You can see I’m using my waterbrush today with the watercolors, I find it easier when hiking and especially in cold weather. Though it won’t work when it’s ‘really’ cold, it turns to ice on my paper!

I hope you enjoyed coming on my walk, please leave me a comment! I’ll have classes this summer in England where you can come along and sketch while we explore the gorgeous countryside. Please sign up your email address in the “subscribe to posts” box in the right column.

“View of Howick Haven, Northumberland England” 10-7-09

Today we visited Howdiemont Sands beach along the coast of the North Sea in Northumberland England. We walked across Sugar Sands and climbed up to a point where we could view the point at Howick Haven. I wanted to sit and try to do a small watercolor landscape so I bundled up and brought the usual field kit.

"View of Howick Haven"

Water color painting "View of Howick Haven"

Here’s the finished painting, I did most in the field sitting on top a windy, grassy cold hill. I’ll share the photographs with you of what I saw and tell you a bit about how I did the little painting.

We walked along this beach

We walked along this beach

When you first arrive at Howdiemont Sands you can choose to walk either right or left. We chose left because it was new to us and we always wonder at what new views might be found or other discoveries.

The sands of Howdiemont Sands

Sugar Sands

The beach here (called Sugar Sands) is unbelievable, a pretty color of ‘sand’ shade, (hahah…) clean, soft and inviting even on a cold sunny October day. You can see many other people and their dogs found the beach irresistible today too.

Bird tracks

Bird tracks

There were lots of interesting bird tracks too, gulls leave a track with a little web foot.  This one? It was big and looked like it would drag it’s front toe in the sand when it stepped;  I wish I knew what it was.

Looking back

Looking back at Sugar Sands

Here’s a view looking back on the beach we crossed, sometimes you have to go up over the grassy banks to get past areas that are under water still.

The red rocks below me

The red rocks below me

This is looking down from where I decided to paint, how beautiful the patterns and colors are in these rocks. As the tide continues to go out the rocks will be more exposed.

View from my painting spot

View from my painting spot

This is the gorgeous view from where I decided to sit, light was fading fast and I had to pick a place quick. It’s really hard to pick a scene when there’s so much to see around you. It helps to hold up your hands and make a little opening like a rectangle and pretend that’s your paper. Move your hands around until you find a cropped scene that you like.

View I painted

View I painted

Because I wasn’t working really big I tried to limit what I was going to paint, also I didn’t have tons of time with the sun leaving soon as it was about 4:30pm when we arrived.

my sketch

my sketch

I sat on a picnic blanket with a waterproof bottom, wore my wind/rain pants over my regular pants, this helped to cut the cold and wind. I also had on my fingerless gloves as usual, sorry no picture today! I’m using a homemade sketchpad that I created so it would be extra long. It’s great for landscapes! I worked with my field pan and regular watercolor brushes, usually when in the field I use my waterbrush. I don’t like the waterbrush for larger works needing big washes of color. You can see in the picture a baggy just off the blanket, tucked into the grass. I forgot a watercup to rinse my brushes in, so I used a baggy with some water in it, it worked great!!

My watercolor field pan

My watercolor field pan

This is the painting/sketch laid out at home, you can see this is how far I got with it in the field. The pan watercolors I used is an old metal kit that I popped the large pans out of and replaced with half pans of Windsor Newton brand paints. I use a bit of sticky tack or blue tack to hold each one in place and you can see the handles on my brushes are cut, so I can fit more “things” in it. I brought that one long brush with me and used only that to do all this so far.

My set up to finish from photo at home

My set up to finish from photo at home

Now I set up my laptop with a photo I took while there, and worked on details with smaller brushes while looking at it. I didn’t touch the sky, just left it the way I did it in the field. If you start to mess around with all of it, it can get stiff looking. Notice I put my coffee on the left side…if your right handed, water should go on that side and you don’t want to be dipping into your coffee by mistake!  So, I worked on trees and details of that main area; I also used a razor blade to scrape fine lines for the white fence. Also, you may have noticed a funny looking cone shape that looks like a child’s’ painting of a tree? It’s a recreation of one of the oldest ‘houses’ in Britain probably from the Bronze age. Remains of one were found on this very spot!  They made their homes from tree limbs in a sort of tee pee style, with turf for the roofing material.  I’ll try to find a link about it to add here.

Go here to see the finished painting in the GALLERY.

To see other watercolor landscapes go to my gallery here: http://marymcandrew.com/gallery/landscapes/watercolors/

Miniature Great Grey Owl Painting 6-5-09

"Great Grey Owl"

"Great Grey Owl"

My finished miniature watercolor painting of a Great Grey Owl, measuring a mere 2″x2″!  Be sure to check it out in my Owl Gallery too. It’s an owl named “Aspen” that I photographed at the Keilder Water Bird of Prey Centre in Northumberland England. I’ll show you the stages of painting and talk about how I did it below.

"Great Grey Owl" -first washes

"Great Grey Owl" -first washes

This shows the first stages of painting, the beginning washes to lay down the values, color hue and expression of the painting. I first started with a light sketch in pencil, lifting it as much as I could with a kneaded rubber eraser before painting.  Then I painted the washes and sprinkled salt on wet areas to see how it would ‘pull’ the color and create interesting patterns. It is at this stage of the painting that you can get a feel for how the painting will go, will you be loose and expressive? Will you go for more details? Sometimes I think we have to let our intuition guide us, or perhaps our mood.

First wash set up

First wash set up

This picture shows you my set up for the first washes, I always start flat on the table so the color doesn’t run. Many times on larger paintings I stand up and work loosely with my brush. (check out this short Utube video of me working on the “Screech Owl” painting, it shows how I paint loosely when standing). This set up shows my photo reference to the left, the salt above that, then my field palette to the right because I’m right handed, the water bowl above that. I keep a white paper towel folded nearby for wiping off excess water and it allows me to see if there’s paint left on my brush. You see my magnifying lamp which I find good because the light is cool and matches daylight; but I don’t use the magnifier on it as I find it clumsy to use my brushes under it and I bump into all the time when I lean in super close! Sometimes I use a hand held magnifying glass or you’ll see pictures later of my glasses.

Great Grey Owl -stage 3

Great Grey Owl -stage 3

Now here in stage 3 you see I’ve jumped ahead with lots of details and color. As you work, squint your eyes at the photo and your painting to catch large areas of value that need to be developed and notice color hues. At one point I felt my owl was too brown so I washed a very watered down blue grey over areas, but only on very dry areas. In areas you need to lighten you can either lift color with a damp brush and blot with a paper towel, or you can add it using white watercolor or gauche mixed with your paint colors.

Now on purpose I’m going to point out some things that I found to be unsatisfactory in my painting and I changed. At stage 3 here, I felt like I did a pretty nice painting! I was feeling like it was done, ah….no such luck. If you let it sit a day or two and return to it, or if you show it with the photo reference to a friend with a sharp eye, they’ll be sure to catch something ‘off’ with it.  If you’re a conscientious artist, you’ll be bothered by it until you fix it and you probably already knew it was wrong to begin with but wanted to ignore it!   Well lets just say my boyfriend has a good eye, sigh, well now he ‘did’ pick me didn’t he?  We both agreed the beak wasn’t right, I pointed it out to him then when he agreed it was back to the easel with it. I can’t believe how much I was able to amend the beak being that this is watercolor after all. People are afraid of watercolor because they think it’s unforgiving, wait until you see the changes I made.

Great Grey Owl -stage 4

Great Grey Owl -stage 4

Stage 4 shows the beak changed, I totally moved the angle of it and lengthened it! (see the enlargements below of these final stages too) If you take a damp brush and gently re-wet an area, and only the area you want to fix, you can then repeatedly rub it gently with a damp brush tip, blot it with a clean paper towel (I prefer Viva!) then clean your brush, wipe it off and repeat. Do this over and over, you’ll be amazed at how much you can lift. When I repainted the beak I thought like an oil painter, I laid down a more opaque yellow layer to clean and brighten the beak, then I kept putting washes over this dry layer to affect the color. It ended up with an unusual translucent look like a real beak would have.

As I did this, of course I started to notice other areas I wanted to improve upon. Sigh…such is the plight of an artist with a picky eye! Notice the area of light tan below his beak, I needed to bring out the lightness of it so I added white watercolor to some cad.yellow, and browns to create a tint for an underlayer. Another note about this painting, next time I will pick a much smoother paper, working with this much detail you need to keep your paper super smooth with no distracting texture.

Great Grey Owl -stage 5

Great Grey Owl -stage 5

Stage 5 shows how I painted detail on top of the tan area under the beak and the beak has more details added. The owl has an overall lighter look, this is because I kept stroking on little feathers with a tint of whitish blue grey to add detail. Now I thought I was done here, but remember that boyfriend of mine with the good eye? Well he helped me notice I had painted out the nostril! SIGH….yes, when I was adding the little hairs by the beak I must have done that so back to the easel. The picture at the beginning of the post is the final stage, fixed and finished!

Working with my magnifying glasses

Working with my magnifying glasses

This is me working with my reading glasses on and a little set of clip on magnifier lenses. In the photo I have the magnifying lenses lifted up so I can look at the paints in front of me, if they were down I’d need to get much closer to see what I was doing. So I would lift the lenses up when I would sit back a bit and take a look at the ‘whole’ painting and the photo, looking for areas that need attention. Then I’d flip them back down and get close for the detail painting. I wouldn’t use them for the initial stages of painting, you don’t want to focus on details at that point.

Also you notice here my setup is different than before, I have another pan of watercolors and have them set up on some jars so they are closer to my painting. Working with a tiny brush ( 10/0 liner) it dries out super fast and keeping my pallet nearer seemed to help. The nice thing about working on a miniature painting was being able to mix small amounts of color right in the pan lid. (the brush in the picture is not my liner brush)

The pictures below are so you can look at one section close up to see the changes I made to the beak and area around it.

Great Grey Owl close up detail stage 3

Great Grey Owl close up detail stage 3

Great Grey Owl close up detail stage 4

Great Grey Owl close up detail stage 4

Great Grey Owl close up detail stage 5

Great Grey Owl close up detail stage 5

Great Grey Owl -close up detail finished

Great Grey Owl -close up detail finished

I hope you’ve enjoyed my post about my painting. I looked forward to showing you my mistakes and how I fixed things as I painted because this is how it goes, it’s a process and doesn’t always go as easy as it looks. I like to encourage my students and others to keep looking at their paintings for more detail but most of all a good beginning drawing is crucial. As you can see here, I missed the beak angle and had to fix it later, but the more you paint and draw the better you’ll be at catching these things in your work. That’s my two cents!  Please leave me some comments and if you are interested in note card or prints please let me know.

For the fun of it, here’s some Utube links with owls!

http://www.youtube.com/watch?v=HErZ6Xp8CcQ&NR=1

http://www.youtube.com/watch?v=gKH_IQr1hAI&NR=1

http://www.youtube.com/watch?v=x_-dkr2AOhY&feature=related

This next one is Excellent! Great footage of a Great Grey Owl!

http://www.youtube.com/watch?v=ekrfclBAjEY


“Everlasting Valentines Bouquet” 2-23-09

A Valentines Day bouquet from your sweetie is very nice…smells so sweet, warms your heart..but doesn’t last forever no matter what you do. Unless you get out your paints and do some studies! After a week of enjoying the blooms…then watching some slowly fade, I picked out the freshest ones and moved them into another vase up to my studio. As I did the tulips dropped their petals in a flourish, woosh…all over the table. I picked some up and looked at them, thinking how beautiful their individual forms and colors were.
I decided to do studies of the petals and laid them on my paper with a strong little lamp above me. I should have titled this post “How to Paint Through Pain”…that is, how to cope with painting while in pain. I painted these on the floor, my lower back has been hurting and sitting in a chair was too much to bear. So, I put it on the floor and kept moving around…kneeling, laying on my stomach…what ever I could. I got a bit messy with some areas of these studies, but then it was hard to concentrate! I started each with a basic gesture of the shape very lightly drawn with pencil. The shadows were the most fun to paint, studying the colors coming through the petals. A tip here, to keep the petals fresh until you’re ready to work, put them in a ziplock sandwich bag with a sprinkle of water, then put them in the refrigerator. Tell everyone NOT to eat them!!
Oh yes, the other thing is I did them with just my waterbrush…see above picture. You can see the petals laying on my paper and waterbrush in my hand. (PS. this was really late at night…actually I think it was 1am!)
So now I can look at the little study and always remember my Valentines surprise bouquet! I wish I had time to do more studies..I had planned to, but you know how that goes!

“Hiking on my Land” 1-23-09

Today as the sun shone and the temperatures climbed to a balmy 30 or so degrees, I felt a very strong urge to just grab my field kit and go for a hike with Ginger. I notice whenever I go out field sketching or work on a painting in the studio, it’s like having a visit to the therapist! I feel like I’ve just had some kind of adjustment, and all is right in my world! Troubles melt away as I stop to catch my breath and listen to the wind gusting through the trees. Today was no different. (click on any picture to see enlarged view)
First small sketch done with a micron 05 permanent marker, it’s along the path that’s called “Long Lane” on my farm. To warm up and to see if drawing with my fingerless mittens would feel comfortable, I did the top of a small oak tree, then turned and looked down the lane where Ginger was disappearing down, and did a quickly scrawled sketch. It’s ok that it’s not beautiful and meticulously drawn, I can remember the scene in my mind just be looking at it. Sometimes the field sketch can have more movement and show more excitement than a carefully executed studio drawing. I also find that being able to work loosely in the field keeps my studio painting fresh and lively looking.
Just me in my dad’s old wool hunting coat that I treasure, using the fingerless mitten ok. I picked up this pair in England at a regular clothes store at the mall, I made sure they had wool in them, and I like the dark brown color (to hide the dirt of course silly!). At this point I think my fingers were cold, sometimes I worked with the top pulled back and sometimes closed. I’m using a waterbrush here and watercolors, I put my kit in a new bag to try out, an over the shoulder binder type thing, but no room for apples or water bottles. Extra things had to go in the back secret pouch on the hunting jacket, made for carrying dead birds that the hunter (dad) would shoot. It’s actually a handy pouch…I slid my sketchbook in there when I would get moving on my hike.
This is a page with a simple color study of the red bark on bushes and the little fern heads coming up through the snow. Their forms, almost silhouette because they’re so dark, are wonderful to study.
The photo above shows a leaf I found in a tiny birds nest that was tucked into a tangled bush. It’s small things like this that if you take time to notice the subtle beauty your enjoyment of the natural world and simple walks would be much more memorable. This leaf is a simple shape, but I love the mixture of subtle colors, there’s a promise of green there that makes me think of spring, it’s almost as if the green was frozen from the fresh times of summer. The pattern of the veins and cells is really something too, the wet sheen on it’s surface reflecting a cool light.
Then turn the same leaf over and it’s a whole other leaf! This side has a network of raised veins showing, like fine meshwork netting and the contrast of the color of vein to leaf is at once noticed. The fall like colors are not showing on this side. When you pick something up, turn it over and explore everything about it; if you draw it, you will study it deeply, noting it’s every interesting detail. Sometimes this is good to do once you get back home and can sit in the warmth and take time to study it.
Here’s another nest I found that almost looks like it has an ice cream scoop for an egg waiting to be hatched by the warm spring sun. (It’ll have to wait awhile still!) Walking in winter is a good time to look for birds nests, just look at bushes or trees for clumps of dark areas, usually made by leaves and small branches. It’s fun to look closely at them, how the tiny branches are laid criss cross and woven, and imagine two birds picked up ever single twig and made that. Some nests are tiny things..some larger and could even be for grey squirrels. I don’t ever disturb the nests…I feel they are there to be used somehow by other creatures, mice, bugs, etc. and I just let it alone. I will carefully pull some leaves out of a nest to see what the cup might look like.
Now this page has notes you can read, but I’ll explain a bit more. I went to a part of my land that has huge old oak trees on it, and one in particular that is dead. This dead tree had all kinds of funguses growing on it and was great to study.
I learned something new that I didn’t expect, there was an interesting type of fungus growing on the underside of all the large branches. It was a beautiful natural yellow with some orangey colors in it, but very muted. The funny thing was I noticed the snow beneath it had yellow spots following the branches, NO Ginger didn’t do that! haha…but as the snow piled on top of the branches melted, the yellow color in the fungus was dripping down to the ground. I wonder if the Indians or settlers used that as a color for something?
Here’s a close up, if anyone can help me identify this I’d be grateful. I looked it up in my mushroom and fungus books but can’t find it specifically.
This fungus is as far as I can tell, a “Redbelt” shelf fungus. I did a painting in the field while looking at it and looked it up when I got home. (The painting is below). The odd thing was, as closely as I thought I looked at this, I still missed something interesting. When I got home and uploaded my photos, I noticed on some close ups there were little blackish bugs crawling all over the place!! Ewww….I have to admit, I like studying bugs, but the idea that there were bugs all over this fungus and tree and I didn’t know it kind of made me uneasy! But the fascinating thing was that there were bugs out doing their thing in the middle of the winter! You would be surprised at what you’ll see on a mild winter day!At this point, at the end of my hike after being out two hours, my toes were frozen and getting numb. This is when the idea of hot cocoa creeps into my mind and Ginger’s happy face asking, “Can we go home yet?” starts to distract me.
This last page I finished at home while drinking that hot cocoa; the tree and fungus I did in the field. I brought home a stick with neat fungus growing on it, the leaf I photographed and a dead leaf. This stick was very interesting to look at under a magnifying glass, the black fungus was shiny and the rose colored had a velvety sheen almost. I made a stab at identifying the rose colored as Hypoxylon Fragiforme, any experts out there can verify this? I added color notes too so you could see what paints I used.
I hope you enjoyed our hike today in the winter chill! Sign up your email in the right column to recieve updates when I post new things. Happy Hiking!