|
|
As I was looking through my small sketches and watercolors from this spring and early summer, I found I have many that are of distant views of the hills. Scenes that are all around me here in Northumberland England, just drive anywhere and you will always see some far off huge hills in the distance that all the locals can tell you the name of. Yes, all have names, very old names! It’s fun to learn the silhouettes and names of them.
Our favorite thing to do is walk up any of the high hills and see into the distance; can you believe we can see all the way to Scotland!? You don’t have to climb a high hill to appreciate the views though, even walking on the upper lane out of our village gives you views across Whittingham Vale or up to Corby Crags.
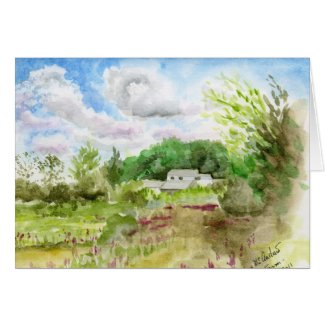
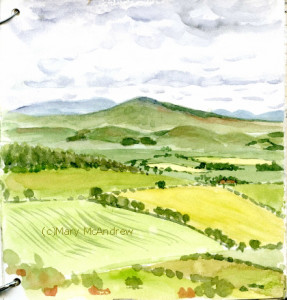 View of the Cheviots and Glanton area in the Whittingham Vale. The tiny watercolor sketch above is from one of my morning walks along the upper lane of our village. The blue hill in the distance on the left is actually two hills in the Cheviots, one being “The Cheviot” itself. The hill in the center I’m pretty sure is Low Pyke in Glanton, the next village that you can see across the valley. It makes you realize that all the way back to bronze age man, people must have named the hills and used them for direction.
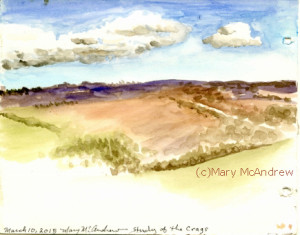 Study of Corby Crags in watercolor, March 10, 2015. This little study above is of Corby Crags, as seen from my side yard in spring. It’s just a quick watercolor sketch to practice clouds and colors, but I remember standing there doing it on a sunny day in March, when winter was breaking.
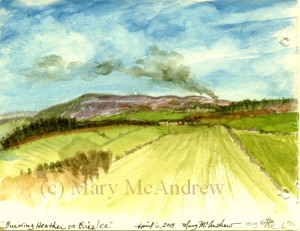 “Burning Heather on Brizlee”, watercolor field study, April 6, 2015 This one was done while walking along our upper back lane, I saw smoke from a fire in the distance and stopped to record it. I leaned on a big field gate as I looked past the buildings in the foreground to the long hill in the distance. My husband told me they were burning heather on the moors up on Brizlee, this is to promote new growth of heather shoots for the grouse and partridges (all for the hunting season). This hill I realized later when I looked on a map is all the way in Alnwick, the next village about 6 miles away!
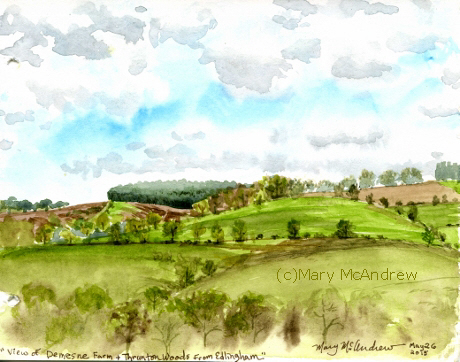
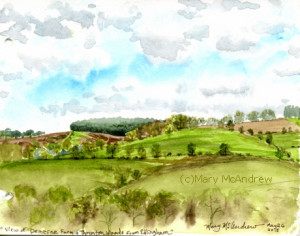 “View of Demesne Farm and Thrunton Woods”, watercolor, May 26, 2015. One of my favorite things here is to watch the clouds cast shadows and patches of sun creep across the face of the land. Where the sun goes the greens and golds of the land come alive, it’s so dramatic! The little 5 1/2″ x 7″ watercolor above I did while sitting on the side bank of the road out of our village looking towards Thrunton Woods and Demesne Farm. It’s one of my morning walks that is relatively short but always windy when you get to the top. I don’t think I’ll ever get tired of this view!
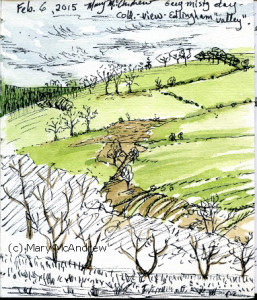
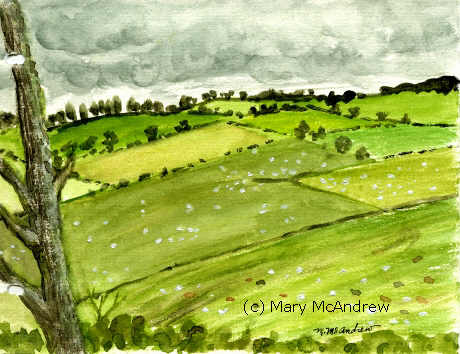
 “View From Edlingham Lane” watercolor, July 21, 2015. This 4 1/2″x 6″ study was done on the same lane but just a week ago. I was near the top of the lane where you really get hit with all the wind sweeping across this valley. It was a misty day and my hands got cold and stiff, yeah even in July! As I painted this it started to rain (see the approaching clouds?) so I quickly put my kit away…then it stopped….so unpack the kit again! The weather here is just like that, dress in layers because when the sun comes out you’ll get so hot and start peeling off jackets, but as soon as the clouds come it’s cold and there could be a surprise sprinkle in that cloud. I usually bring more than the average walker because I end up sitting or standing still a lot and it gets cold when you don’t move around.
Next post I’ll share more photos of my surroundings, but still so many sketches to share too! Besides sketching I’ve been busy testing watercolor paper so I can dig in and concentrate on my illustrations, I also got a new watercolor field box that I’ve been using and love. I’ve been recording (with photos and sketches) the local flora and fauna (would you expect anything less from me?) So far I have positively identified 51 birds, 46 different wildflowers, 10 butterflies, 3 moths and any number of unidentified insects, moths, plants etc. It’s exciting to be in a new country with all these new things! I’ll share more of this coming up, stay tuned!
Ok, so I know it’s summertime so why am I talking about spring? Well I still have sketches and paintings to share that are from late winter and spring before I share my recent work. You’ll notice my winter and spring sketches were all quite small and not as much watercolor going on. As the weather warms up, and thus my fingers, I start to do more. Lately I’ve been doing some charcoal drawings too, but lets not get ahead of ourselves…spring first!
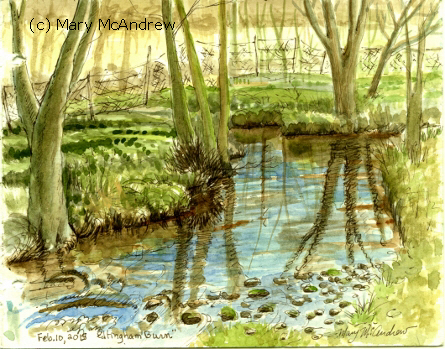
 Watercolor of Edlingham Burn, February 10th in Edlingham village, Northumberland. Above, here’s a small watercolor I did while sitting by the burn or stream that runs through Edlingham. The painting is just small, about 5×6″ or so, but good practice to paint the green trees and blue and brown water. Well actually the water is quite clean and clear, it just reflects all that’s above it! I really enjoyed the sun that day though it was still cold, so I finished the painting at home.
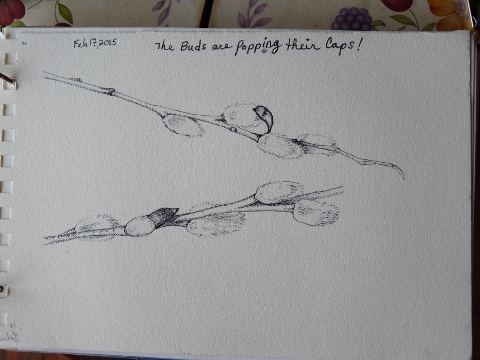
 Fuzzy Buds drawing in ink February 17, 2015 I just love when native bushes bloom with soft fuzzy buds in springtime. They have little shiny, leathery looking caps that their fuzzy little heads push up as they swell to bloom. I brought some twigs in to draw; if you put them in water they look great and last awhile as you draw them.
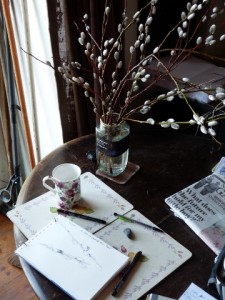 My set up for drawing. I set up the jar of buds by the patio windows, getting some natural light to work by. I like sitting here with my porridge in the morning to read and watch the birds outside.
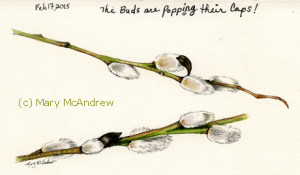 Painted with watercolor from live branches I brought inside. February 17, 2015 I really enjoy trying to paint the soft look of the buds and also showing that they are white. You can’t (well I can’t) help but stroke them and think of how it feels like the ear of my bunny I had years ago!
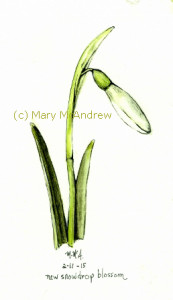 One of many snowdrops, done in ink and watercolor. February 11, 2015 Spring here in England, wouldn’t be spring without the Snowdrops! They were everywhere and lasted so long, a real promise of more spring flowers to come. I had planned to paint a Snowdrop open, but ran out of time. I took a lot of pictures though so maybe in the future?
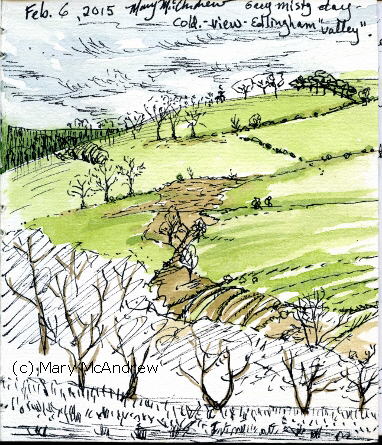
 Unfinished sketch of a bit of Edlingham Valley. Here’s another from February; do you notice how small this is? It’s from one of my tiny 4.25″ x 5″ sketchbooks I like to use in the winter. (see pic below). It’s great for tucking in your pocket when you just might want to draw something interesting, and I draw while standing up so it’s easy to hold too.
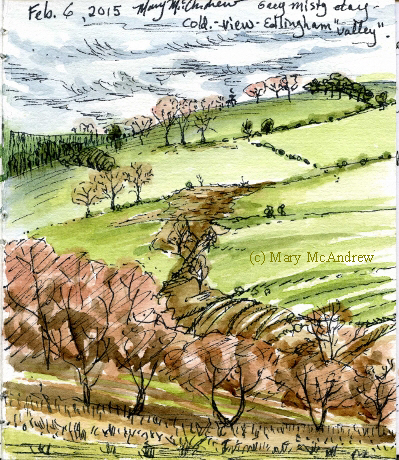
 Finished watercolor 4.25″ x 5″, view in Edlingham, Northumberland. Later I finished the color on the trees and grasses. As the page says, it was cold that day!
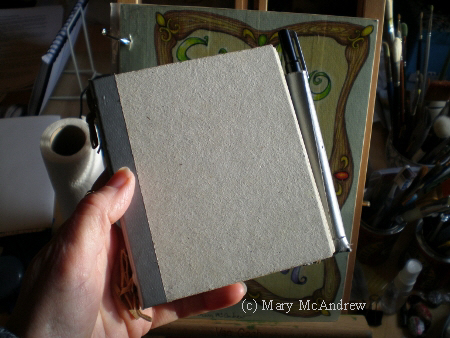
 This is one of the small sketchbooks I designed, it’s great for winter sketches because it’s small. There’s the sketchbook I made, designed complete with a pen holder made out of duct tape!
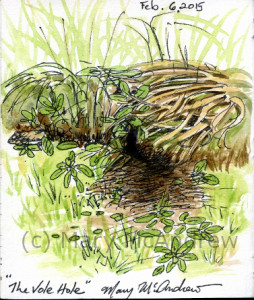 The Vole Hole, watercolor, 4.25″ x 5″. Another tiny one, done on the backside of the sketch of Edlingham Valley view. Who can resist a tiny hole belonging to a vole or mouse? I know my husband’s cat can’t but neither can I for different reasons. I just have this little childlike vision of cute mice straight from Beatrix Potter coming out of the holes. I like to practice drawing these kinds of homes for future stories I may illustrate.
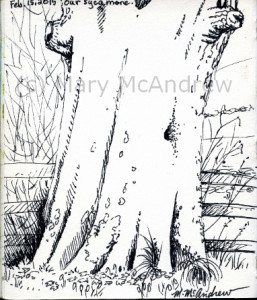 4.25″ x 5″ ink drawing of our ancient Sycamore. I did this sketch with the intention to study the wonderful colors that are on this tree. It’s an ancient Sycamore covered with lichens of many colors, mosses of green and the tree bark’s own reddish hue, just waiting (still) to be studied by my watercolors.
Well I think that’s all for this post, I still have lots of small spring sketches and watercolors to share soon though. Next time I’ll post some more photos too. I’ll be posting soon, stay tuned!
This walk was on April 13, 2012, all around on my land checking on how things were doing now that spring is well underway. (please click pictures to see larger)
lane with arched branches") "Lane with Arched Branches" watercolor and ink I did this watercolor study while standing in the lane, looking ahead through the natural arch formed by this one bush or small tree. Over the years as I would walk under it, I’d trim off branches hanging down right where you walk, so it formed a natural arch. The branches on top reach straight up like suckers do. I actually did most of it on one day then another time I was out I added the ink.
snail cr") The first snail I met this year! Now you can meet some of the critters I met on my walk. The first was a snail sliding along on this piece of dead grass floating in the water. I noticed this before on snails like this, his body color is blueish! Cool.
 The second snail I met was this flat shaped coiled one. Here’s a totally different kind, this one’s shell makes a coil but flat. Can you see the paler band of color at about 9 o’clock? Everything from there to the lip is new growth just from this year!
 I took him home and he decided to come out to explore Well, yes, I did tuck him into a little baggie I had with some of the water from where I found him! I stuck him in my pocket and brought him home to look at closer. I thought I’d have time to sketch him but when I realized I wouldn’t I released him right away.
under the oak (2)") Looking up to the spreading grandeur of this old oak! Now here we are in “Oak Lane”, so named because of the very old, very huge oak trees growing there. They were probably planted some 200 years ago by the original owners of this farm as a land boundary. I love looking up at them as they tower over me, and marvel at how many years they’ve been looking down at people before me even. There are so many critters living in, on and under them!
squirrel tail") Way up high this squirrel's tail was hanging out of it's hole. When you’re out walking, if you keep your eyes open and maybe more importantly, stop sometimes and just stand still to listen and look, you may be surprised at what you see. As I was admiring my oaks and listening to birds I caught sight of something way, way up high, moving. It was just a stirring but it caught my eye; turns out it was a Grey Squirrels tail left hanging outside his/her hole! How funny it was, just blowing around in the wind like a flag put out on a porch. I think it was sleeping!
Mourning Cloak Butterfly (21)") This is the first butterfly of the year for me, the Mourning Cloak Then all of a sudden in a flutter, a Mourning Cloak butterfly appeared and landed not far from me. It was sticking to the open lane where the sun was. Everytime I got too close it flew off but I was patient and followed it along, and the last shots I got were the best because I think, it was tired and didn’t want to fly as much. After that I left it alone, thank goodness for digital zoom!
I hope you enjoyed this little walk and my watercolor study. Stay tuned because I have some more posts in the works! And as always please share my blog with friends and visit my Shop at Zazzle where you’ll find TONS of my nature photos and artwork on all kinds of products.
(please click to see enlarged and clearer)
Pasture Lane 3-7-12 final") "Pasture Lane in March" watercolor and ink The land is starting to thaw at Long Lane Farm. The Robins have returned along with many other birds so I went out to look for signs of spring. It was very quiet except for occasional Chickadee’s following me or a Blue Jay calling, some Canadian Geese flying over. I made it just up the lane a little and decided to sit and do this sketch.
I carried a small camp stool over my shoulder so I sat on that and put my sketchbook on my lap along with my watercolor pan. I used two waterbrushes and a permanent ink pen to draw it first. I found it a bit difficult to paint the grasses right in front of me, that were all matted and crisscrossed on the ground, sooo much detail! You can see I didn’t get crazy into detail, mostly just looking for the darks and lights of the scene, showing the water around the rushes and the dry color of grasses in the lane. I didn’t fuss over it too long because my back hurt like a ‘son of a gun’! Darn back of mine, I think I may have been better to just stand like I usually do.
PS. A note to those who follow my blog, I’m so glad you keep coming back to read and see what I’m up to. I’ve not posted as much lately only because I am finally concentrating seriously on illustrating all the poems and stories I’ve written over the past years. I’ll try to share a bit as I can, but don’t want to let the cat out of the bag too soon! We’ll see what I end up with and I’ll keep you posted!
I made some cards with my sketch, check them out by clicking pics below:
Glossy Note Cards 
Glossy Post Cards Poster/Prints in many sizes and papers
(you can change the size smaller and the price will go down accordingly)
winter field sketch-oil signed 2") "Winter Field Sketch" This is a little (5 x 7″) oil painting I did “en plein air”, or translation… “while standing in the snowy field freezing my fingers off”! What I wanted to do was study the colors in oil and not get too caught up in the finished look of a painting. It was a good exercise in study of color for me, it would not have been as successful if I did it from a photograph.
 My oil field kit, closed. I rigged up a little field kit for oil painting, just for taking out on hikes. Here’s a picture of the kit closed, it’s a plastic case you can buy at an office supply department. I’ve only used it this once but hope to work with it more and ‘tweek’ it. The main objective was to keep it as light as possible.
 Here it is open to show you the metal pencil case and use of 'sticky tack'. This shows the kit open with two areas of gessoed canvas ready to use. Notice the four dots of ‘sticky tack’ on the left, they’ll hold the lid of the metal pencil case when I want to paint, using the lid for mixing. I used tape to make loops to hold brushes; just put tape sticky sides together to make it ‘not’ sticky in the middle.
 I created a loop of tape to slide my medium cup into. I used the tape in the same way here, keeping it sticky on the ends but not in the middle, I created a loop that my medium cup would slot onto. At the angle I would hold the kit, the cup would not come off! It was then held from behind with a dab of ‘sticky tack’.
 Here is my field kit in action! I held the homemade kit in one hand, using my arm for support, and painted with my right hand. It’s all in my reach and I brought no tubes of paint. Notice my fingers are holding one brush at the ready and the other ‘dirty’ or ‘in use’ brushes are kept on the left of the hinge, clean ones to the right in the loop.
 Of course Ginger was along for the adventure and waits patiently to continue with our walk! I put a squeeze of my colors in a metal pencil case and put some in a pill box from the pharmacy before I left the house. The pill box was an experiment and I wasn’t really satisfied with it, it gets too messy on the lids and doesn’t keep the paint really airtight. Since then I’ve moved to using contact lens cases that screw shut…we’ll see how the paint lasts in them as they’re all back in England and I won’t see them until spring!
 This shows you my view of the field as I worked. The above picture shows you the view I had as I worked, it also illustrates how dull the colors look on a photograph and how I perceived the colors with my eyes to be a bit more vivid. This is why working in the field is so important whether you are oil painting, using watercolors, pastels…etc.
When I came back home, I stuck the little study up on a wood post in my living room using ‘Loctite” sticky tack. I hung there for ages and I enjoyed looking at it whenever I walked by. It wasn’t until I found a great frame and laid it on top that it popped out and said “HEY…I’m a good little painting!” hahah…yes sometimes my paintings talk to me…don’t yours? It also told me to stop ignoring it and get it framed so it could have a proper place on the wall! Yes…yes, the voice of guilt, this painting actually was done last year (12/31/10) and since I traveled to England it got sort of forgotten!
Click to see photos enlarged:
 How it looks framed on the wall  "Winter Field Sketch" framed and in cool daylight Original framed painting $165 contact me
Go here to see all my Landscape Paintings in the Gallery.
I also made some nice products in my Zazzle Gift Shop with this, please click on the pictures to have a look!
Glossy Note Cards- 2 sizes
Glossy Post Cards
I know it’s already November and I’m way behind! I have more trouble getting online and having time to edit photos since I’ve been here in England. But I’m trying to go with the flow and keep up with posting my sketches and photos. I’m also using a tiny new laptop and my usual photo program isn’t on here, so I’m getting used to editing pictures with something new (sorry if they look small etc). I’ve also felt really down since my dad passed away and it’s hard to feel creative, as many of you probably know how that is.
But here’s a few cows to start off with! It’s what I see most of around where I’m staying so they’ve gotten my attention. I just love the velvety look of their fur in fall. The days have been very cold, damp and windy but I did these sketches standing along the field in the wind! Brrrr.
 Red Cattle in the Field, Oct 1 I wrote a poem as I watched them, just put a few words down then later I changed two words to make it better. I’ll retype it here:
“September ends…October is here,
The little Robin sings, Winter is near!
The red cattle in the field look so nice,
Fur like rust velvet, ready for Winter’s chill and ice.”
(c)Mary McAndrew 10-1-11
 Overthwarts on the Hill, watercolor The page above I did on October 2nd, it was windier, colder and wetter still than the day before! I wrote a note on the page about how hard it was to draw, of course I was wearing my fingerless mittens too and they are hard to paint in! There’s a farm called Overthwarts up on that hill as I looked from where I stood near Edlingham castle.
 Cows at rest and an Angle Shade moth, ink. The same day I walked a ways up the lane where it got even windier, I found some cows to sketch and sat down along the lane where I could see them through a break in the hedge. Getting down low really got me out of the worst of the wind.
Then another day an Angle Shade moth paid us a visit by coming inside, I guess it’s hibernation time! He didn’t want to leave. I put some sugar water in a little jar lid and he sucked it all up and grew very fat! Anything to help a little hungry wanderer. It hung around a few days just sitting there then disappeared, so I don’t know if he’s hiding out in the house or went back outside.
 The furry red cow eyed me warily Here’s one of the bovine beauties watching me, I tried to walk slowly and talk quietly to her but they are so skiddish, she turned away and made a retreat as I approached.
Well I hope you enjoyed my outdoor sketches, more to come, slowly but surely!
I had some fun creating note cards with cow (and sheep) photos I took in England, have a look in my shop!
 Sketch at dawn in watercolor pencils Today I stepped outside quite early, before the sun was up in fact. I took my sketch journal, waterbrush, watercolor pencils and ink pen and left the camera behind (but not Ginger of course). I sat on the edge of a very damp and cold picnic table that wobbles from age, and used watercolor pencils to quickly record what I could see.
This was easier than watercolors because I could just sketch across the paper quickly trying to guess at how it’ll look once I wet it. I laid down as much of the color as I could before adding water, once you wet it you can’t just scribble color on. Once it’s wet you can add color in two ways, using the tip of your brush to pick up color from the pencil tip, painting with it like watercolors or you can draw directly on the damp paper but the color will be intense and hard to blend or lift off. This is what I planned on to put the darker trees at the bottom, I wanted some of their branches to stay as drawing and fuzz out around it to look like foliage and mist.
The thing about plein air painting a sunrise is it changes so fast. Try to work as quickly as you can then either don’t look any more or peek for ideas to check colors and see cloud shapes etc. I try to avoid one problem that I run into, that’s adding yellow to the clouds then having blue sky wash over it or mix with it….and as you learned in elementary school…yellow and blue makes green! So…a bit of green tint sometimes appears in my sky! Try to blot up mistakes or intense color right away with paper towel and re-wet and blot as you need to.
I wrote the words before I did the drawing, just words of what I could hear, not a poem but kind of a way to get into the moment. If you don’t think you can write poetry or something clever, just write what you can hear. In case it’s hard to read, here’s my words on my painting above typed out:
“Sept. 19, 2011 – There is dawn. There are bird songs.
There are cars and trucks from morning traffic.
There are birds.
I look out over the fields, wet with dew.
Feel the cold dampness on my hands + face.
Dawn gets pinker.
The cloak of mist starts to lift off the field.
Blue Jay, Crow, Song Sparrow song.
Robin call + Yellow Throat makes it click call.
My day starts in peace.”
Well my day started in peace and ended with some stress I guess, my laptop died again and this time I think it’s permanent. I’m having burial services soon, in the meantime I got a Netbook…tiny little thing! We’ll see how we do with it. I had to get something portable as I’ll be leaving very soon for ENGLAND!!! YAYYY!! Please tune in to my blog page (you can subscribe to posts in the right column) and see what I find on my adventures. I’ll be studying nature and taking pictures and we’ll see what else. Eventually I’ll be doing some classes and if you want to come to England to do some sketching, I’ll be doing a tour or two this coming summer there. More on that later, if your interested in that idea email me so I get a feel for what people might like.
That’s all folks! Hope you enjoyed my post today. I have lots of new caterpillar discoveries to share soon, I just have to organize all the photos I shot to go with the paintings I did.
I headed out to the back fields today, before the day got too hot. As I picked up my straw hat and plopped it on my head Ginger got all excited, her eyes riveted to my every move. Her whole body tensed and ready to run out the door, as she knows this means we’re going out. Now…when I have my sketch bag in hand and pick up my camera and sling it over my shoulder she knows we’re in for it! The ‘Big Walk’ hahaha…well it means we’re leaving the yard and going out to the ‘wilds’ of the fields and lanes. Yes, if I was a dog I’d be acting just like her!
 Ginger waits expectantly! As I walked I was VERY mindful of watching out for the huge yellow garden spiders that I discovered in my overgrown field, I didn’t want to walk through one of their webs! I’ll show you pictures in another post! Every step I took about three grasshoppers or more would fly up and over the grass for a short bit then land again. As I studied them I laughed to see when they landed, many times they did a sort of “moonwalk” backwards down the stalk they were clinging to.
grasshopper 7 (3)") Red Legged Grasshopper I think If you stop to study them close, using the zoom lens on a camera is a great way, you’ll notice how many different varieties there are. I am guessing some of the many types may just be different ages of the same grasshopper, or males and females, all were really interesting.
fat yellow grasshopper (5)") Fat Yellow Grasshopper Most had some kind of interesting pattern and colors that I’d like to do some studies of someday. First I need to start identifying them better, my field guide to insects is woefully lacking in species of many insects, grasshoppers included.
 Nat. Wildlife Fed. Field Guide to Insects and Spiders of North America Though it’s not a bad all round guide to start with, I find now I need much more species to choose from.
Long Lane Farm in August") Long Lane Farm in August - watercolor Well as I got out into the field a ways, I paused and looked back and this is what I saw. The Purple Loosestrife was blooming, clouds billowing, wildflowers dotting the field. I did this small watercolor using one waterbrush and my pan of colors, while standing in some very hot sun. It was really hard to find any shade and it made me a little ‘snow blind’ looking at my page.
7-13-11 Eastern Tailed-Blue (9)") A tiny Eastern Tailed-Blue butterfly After that Ginger and I made for the lane for a bit more shade. I’ve been noticing this tiny butterfly now sometimes when I walk on the lane. It first caught my attention flitting around the grasses and I thought it was one of those tiny white moths I always see. (It’s only as big as the end of my thumb!) There was something about it though, it seemed to have a bluish look too. So I followed it with my eyes to see where it landed then zoomed in with my camera and there you go! Ahha! A butterfly. Just one of my little discoveries this summer.
7-13-11 Eastern Tailed-Blue (10)") He shows a peek of blue wing They don’t give up much, this tiny, tiny butterfly hardly ever opens it’s wings to show off it’s gorgeous blue!
P1230732") Hummingbird Moth feeding on Teasel I couldn’t resist slipping this picture in to share. I have a great big area behind my barn that’s overgrown now with Teasel. I found the Monarch and Viceroy butterflies, and to my delight Hummingbird moths, loved feeding on them. I would encourage everyone to grow some for them to feed on and for their beauty of form.
 Teasel drawn with permanent pen I love drawing Teasel and long into winter you can enjoy their elegant forms. This is a drawing I did years ago in the fall, (sorry I don’t have it scanned large enough to enlarge much) can you see how much fun you could have looking at it’s bristly but graceful form?
I hope you enjoyed our little walk on Long Lane Farm. I always see or find something new when I stop and look for awhile. I want to point out that I have been adding great links for identifying things on my “Nature Links” page, please have a look. I use these links often when I need to identify bugs or blooms. I’m adding links all the time so everyone can use it, please let me know if you have a favorite you want to share!
Below are a few note cards I created in my shop from my sketches or photos, I hope you enjoy them!
My watercolor sketch
Hummingbird Moth
Awww, who could resist that face?!
trees at Nancy's") Trees at Nancy's - Inktense 'Ink Black' watercolor pencil (Please click on the pictures to see them clearer, use the back button to return)
I had a chance to visit with my friend Nancy the other day and we sat on her back deck to do some sketching. We had a nice view; just behind her place is a small pond with trees on the other side. I was showing her how to do something simple by just using one watercolor pencil, the Inktense “Ink Black” by Derwent Pencils. I keep one in my kit always because sometimes it’s nice to just do a sketch with a waterbrush using this one pencil. The nice thing is you can go back over your black and white study with color after, the Inktense pencils will not lift off like watercolor can. It IS a VERY intense pencil, go very lightly at first and see what it does when you wet it. I started with the simple border as kind of a warm up, just draw a line around your page then use your waterbrush to wet it. To get it to look like mine, keep your brush ‘inside’ the line with the tip always touching and rubbing the line, letting the color run into the wetness left behind from the brush.
Sketch your scene lightly, trying to do most of it before you wet it. Once you wet the paper you’ll have a hard time adding more lines because they will be very dark and intense! If you need to just touch your waterbrush to the tip of the pencil to pick up more ink, then use your brush to add it to the sketch. Test how dark it is on a piece of scrap paper before you touch your sketch, this will help you avoid mistakes. I really like the look of this, sort of like an old antique picture.
S of Cullernose Point") Sketch of Cullernose Point from the south Here’s a sketch I did in England last year, along the coast of Northumberland, of Cullernose Point as viewed from the south. I had my sketch journal with me (OF COURSE!!) and because we wanted to keep walking, just sitting a bit and doing a sketch with no color worked well. I used my waterbrush and especially like how the clouds came out.
 Alnmouth, Northumberland -water soluble graphite Now I thought I’d add this one too just to show how nice it can be to do non color studies. This was done with water soluble graphite, not the colored type, just plain old graphite color! We were at Alnmouth, Northumberland England; a beautiful coastal spot! I did it in my tiny sketch journal which was so much fun to use! It was a wonderful experience to stand on the hill at the coast and capture the scene forever in my memory. Please read my post about it here to see the wonderful photos I took that day! I loved being there and can’t wait to go back for more! I love, love, love England!
I hope you enjoyed my little ‘non color’ sketches, as I said they’re a great way to capture a scene without the worry and time of adding color. And thanks to my friend Nancy for a nice visit! (ps. I photographed lots of dragonflies at her place and two of them were new for me!) I created a really nice print and greeting cards in my shop, see the links below! I love the dark grey background with it.
 Make your own card at Zazzle
When you see this print in my shop (below) don’t be scared by the price! It shows you the huggest size but can be ordered as a 16×11 for only $11.20 too!
 Here's my field on a dreary New Year's Day (Please click each picture to see it enlarged)
It is a cold and dreary day here in Western New York, I guess it is in many places around the world. But the drippy dreariness also shows me spring is coming; snow melting on soggy but still frozen ground, dripping of ice from the trees and an almost silent occasional gurgle of air from under the ice as I worked quietly.
 Oil sketch field kit, ready to be tested. I created this lightweight kit to take outside with me, just for oil painting sketches. I mostly want to focus on practicing mixing colors for landscapes from the real thing. I’m not concerned about finished paintings, though as the weather is warmer I may work longer on them.
It’s a plastic box that I bought at an office supply store. I used a metal pencil box for my paint and as a palette; it’s held on with blue sticky tack. I also have a pill box that has colors in it, though I want to buy a long one so it will fit better. I have canvas paper cut to standard sizes and tape it in and also created a place for brushes with loops of masking tape.
 My mineral spirits container slots over a strap I made out of masking tape. I had a tiny plastic bottle of mineral spirits with me but didn’t need to pull it out, I had a tiny bit in this metal medium cup. It’s got a screw on lid and I created a strap with masking tape that it could slip over to hold it in place. Then I stuck a blob of blue sticky tack behind it to keep it from slipping off. (Just love that sticky tack!)
 Here's how I held the kit and painted while standing. It was very lightweight as I worked. As all tests should do, it helped me find what was ‘not’ working great; I need to make a little holder for dirty brushes on the left and both need a holder with some kind of bottom, like a pouch. My brushes were sliding out the bottom too easily and may get dropped.
 A view of the painting and the subject. Here’s the whole thing in progress. Note the paper towel with red paint all over it!! Ok, I admit it, the very first thing, when I lifted the lid of the metal pan (with my very cumbersome mittens on) I inadvertently got Cadmium Red paint on my mitten thumb, WITHOUT KNOWING IT! It suddenly showed up in three to four places, probably on my face too and I didn’t know it! Ok, those who paint with oils know that sometimes this just happens, oil paint likes to migrate. Cad Red is one of the worse to get on stuff! You see traces of where I had to scrub off the second canvas paper there, sigh. Nobody’s perfect.
 Ginger is waiting patiently, telling me her tootsies are cold! Ginger loves to go out on walks, but gets bored when I stop to paint or sketch. Today was worse because her feet were cold! But a good sign, when I was ready to leave, she didn’t turn towards home, she wanted to go further.
 Cleaning my brushes, stand them up in the snow as you go. When I’m done, I set the kit on the snow and stuck my dirty brushes in the snow (bottom down) and just dipped the tip of each one in mineral spirits and pushed on the lid/palette to work much of the paint out. Wipe it really well on paper towel, it won’t be clean but well enough to travel home for cleaning. Most of my brushes I used were bristle brushes for scumbly strokes and one small, flat, soft but firm nylon brush for the thin line strokes.
 The field study for today. Here’s the quicky field sketch fresh from the icy field. I know my colors look brighter than the photo, but that’s the beauty of painting from life, the colors were more vivid and beautiful to my eyes, a photo will lose a lot of true color and atmosphere. If I want I can let this dry and work more on it or do it while it’s still wet. Ideally, touch up what you want right when you return and it’s fresh in your mind. I don’t want to fuss too much over these sketches unless I do one that I feel is worthy of fussing. My main goal is to just get out and get quick color studies and not complicate things too much.
Hope you enjoyed, I’ll be trying out my field kit more and will keep you ‘posted’ as they say! haha.
Happy New Year everyone! I’m looking forward to a year filled with tons of new paintings by me and look forward to getting back to England for more adventures! Please share my blog with those you think would enjoy it.
|
Welcome to my Blog! The most up to date information about my artwork, nature sketching adventures, or step by step demonstrations. Search using Categories or Tags, or use the search box in the left column.
Please sign up below to get notified when I post new articles.
|


lane with arched branches")
snail cr")


under the oak (2)")
squirrel tail")
Mourning Cloak Butterfly (21)")


grasshopper 7 (3)")
fat yellow grasshopper (5)")

Long Lane Farm in August")
7-13-11 Eastern Tailed-Blue (9)")
7-13-11 Eastern Tailed-Blue (10)")
P1230732")


trees at Nancy's")
S of Cullernose Point")