Yes I know, what a name! This bug is a type of “Shield Bug”, so named because when viewed from above it looks like a shield. I don’t have a definitive identification on it but closest I could come was a type of Stink Bug.
My sketch page with finished paintings of Stink Bug
This one I found was much smaller than others I’ve seen in the garden, you can see from the picture below. I put my subject into the “Crisco” container that I like to use for bug study and photographing. It crawled around constantly and was a real challenge to draw!
Stink Bug and sketch book
Below you can see an experiment I tried, I colored swatches of watercolor pencil on a heavy piece of watercolor paper. I used it with a waterbrush to paint the Stink Bug studies. I wanted to try it because it’d be great to take along right in my sketchbook into the field. It worked pretty good for small studies and I’m going to try it out some more. It helped to mix the colors on a small metal palette to the side to keep this color palette clean.
Watercolor pencil palette and waterbrush
Another tip, if you need to show some white highlights you can carefully scrape off layers of paint using a very sharp blade. This was just a small penknife I sometimes have in my field bag. Scrape sideways, gently and repeatedly to remove layers; sometimes scrape the opposite direction to remove it.
Scraping with a sharp blade
Here’s a bunch of pictures of the interesting little bug. If bugs aren’t your ‘thing’ I want you to just take notice of a few things. You can appreciate some things in insects that you may also appreciate in birds. What catches me about birds is how you identify them by checking their shape, patterns, colors and behavior. Well the same is true of insects; you can identify species by their special shape, patterns, colors and behavior!
Stink Bug 5
This guy has an interesting shape from every angle you look at him. Just check out those red antennae!
Stink Bug 4
And the spotted legs! Looks like he needs a shave! But isn’t it fascinating that it has such pattern?
Stink Bug 3
This angle is very interesting, his head seems to streamline right into his body, and the eyes are right along the edge.
Stink Bug 2
Stink Bug 1
Here we see his pointy shoulders, like he’s wearing football shoulder pads! And I love the pattern along the edges of his back. Can you see the fine veins patterns in that little section at the bottom of his back, that’s part of his wings folded up. His underside was a gorgeous light green that reminded me of marble, but it was hard for me to capture as he kept running around! After I took all these photos in the garden, he flew away, I think just to show off!
Hope you enjoyed my insect study, I’ve been on a real bug kick this summer! More coming!
PS. I have a Flickr page that I’m trying to add to when I can. Check it out here.
What did you think I’d be doing on Mother’s Day? It was gorgeous outside and I had the day to myself until later when my son comes over, so off I went for a walk with my sketch journal!
female bluebird I met along the way
Along the way I captured this shot of a female Bluebird, I’m so happy it came out. I didn’t use my long lens today, so the camera was actually easier to hand hold. (click to see as Note Card where you can see up close)
My watercolor crayons in a vinyl case so I can scatter them as I worked.
I was thrilled to find that the land on one side of the field was actually sort of dry. I mean I’ve been wading through water for weeks now, so any dry grass was pretty great. Before walking at all I decided to sit right down and have a go with my kit. I knew something would strike me. Above you can see something new I tried that worked great; I brought this empty vinyl case along and when I was ready just opened it and put it on the ground. I took my watercolor crayons and set the box right inside it, as I used colors I could just plop them in front and find them easier as I worked. This would be good to use for the watercolor pencils too, as they get lost easily in the grass.
Putting color down around a round plastic shape.
I wrote some notes at the top of my paper as I sat, not even caring about painting, just enjoying the great weather. Then I decided I’d try to put a landscape but leave a circle in the foreground to fill with something. I have a piece of plastic I cut from a plastic milk carton and just filled in green watercolor crayon around it.
Blocking on more green for grass, sky has been painted a bit.
As I decided where my horizon line would be I colored blue in the sky, leaving the clouds just blank paper. (lately I’ve been doing them with white wax to ‘block’ them out using a resist method, this time it’s just bare paper) I then brought the green up as far as I thought it should go, then wet my paper with the big brush to blend all and used a brown crayon to put trees in on the wet paper. I like how sharp the trees can look if you put them on wet paper; if you draw them dry first and then wet them, they can get fuzzy looking.
My set up on the grass, balancing my sketch journal on my knee.
Here’s my set up, as I sat on my piece of vinyl and kept everything in easy reach. I actually leaned on one elbow to do most of this sketch, and quite smartly tucked an empty sandwich bag under my elbow. By the time I was done, my elbow would have been soaked!
The real scene behind my sketchbook, the clouds have already floated by.
So here’s the sketch with the ‘real’ scene behind it, I don’t really like the greens of the watercolor crayons, but more practice will help. Sometimes I admit I could do a better job but when working in the field either the weather is too cold or my back hurts then I just want to hurry up. So I try to work fast, I can always touch up later if I want, or leave it as a study.
This is the page as I finished it in the field, dandelions and all.
This is my study finished in the field, I decided to put dandelions in the small circle as they were everywhere. First I lightly sketched in pencil then went over it with a brown Windsor Newton Permanent ink with a dip nib pen. Then I colored them in by touching the brush tip (a finer one) to the crayons then painting. I colored the letters the same way using a blue crayon. I really want to go back and tone down that green on that grass! Yikes!
Field sketch after touching it up back at home.
Well here’s the sketch after I got home and touched up the greens and added the yellow dandelions.
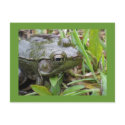
Leopard Frog
On our way after that sketch, I kept seeing Leopard Frogs. If I stood still I would start to pick them out of their hiding places.
Leopard Frog
I was really getting good at it! As you walk by they get scared into the water…then if you stop a few steps away, they would seem to appear everywhere. I imagined a funny cartoon of a photographer stopping to look for frogs, the way in front of her clear, but behind her all these little heads popped up in the water! haha, well it’s me of course!
mystery water bug
This was really cool, I noticed as I stood watching for frogs without moving, a little something moving in the water below me. I swore they were just catkins from the tree floating along the bottom, but it’s a standing pool of water and instinct told me otherwise. I bent over and kept watching them and remembered reading about larvae that formed cases by ‘gluing’ stuff around them. I got this great shot of it actually poking out of the case a bit! I am not sure yet what it is, have to look it up.
Long Lane green and lush.
Here’s Long Lane on the way back home. It’s green and lush in this very wet spring we’re having. It’s a bounty for the frogs but that means soon will come the mosquitoes too!
I hope you enjoyed this springtime walk with me and my sketching. I hope you go out and capture some nature the way I did, just stop and stand or sit still and you’ll be amazed at what you notice.
A post sharing my notes and photos from a cold, wet walk on Easter Sunday. I was still able to find interesting life, wait till you see the video clip with Tadpole eggs! Please click images to see them larger or be taken to see them as cards you can zoom in on, use the BACK button to return.
Easter Sunday 2011
Below is a picture of what it looked like when I was sitting on a pile of dead logs, my rubber boots deep in water, and trying not to drop anything! My hands were cold, as you could guess from my trusty wool flip back mittens. This is just a small, quick sketch done with watercolor crayons.
Watercolor crayons, brush and journal on my lap above the water.
Then I video taped the little tadpoles floating in the water here in front of the pond, have a look!
By the time I got to Oak Lane, where the wild Mayapples grow, I was tired and cold.
A sea of green umbrellas, like little people waiting in the woods!
I was excited to see the Mayapples though, they always surprise me as they don’t grow anywhere else on my land. They look like a sea of green umbrellas held by miniature people standing in the woods, maybe they’re fairies?
Mayapples softly unfolding.
Mayapple unopened yet, such a tender green with hints of reddish tints.
Below just a few small sketches done while standing and looking down at them. I had to give up soon though, my back was seizing up saying enough!
Mayapples + Green Frogs
I was excited to find a Green Frog in the pasture on my way back, he was moving slow because it was so cold. I was actually able to snatch him up after he dove under water! heehee…I felt like a little kid!
Meet my new friend, Mr. Green Frog
Always gentle with creatures I touch, I was careful how I held him, and with experienced deftness (;-) ) whipped out my tiny camera and got some close up shots of him.
Mr. Green Frog poses for his 3/4 profile shot!
Don’t worry, I didn’t entertain thoughts of kissing him! I already found my prince! But I do think Mr. Green Frog was trying to look handsome.
Green Frog in the grass
Then he was gently returned to the grass and as many frogs will do, just sat there while I continued to snap pictures and also do the small watercolor sketch. They believe themselves to be invisible while not moving. Here’s a tip from me, when photographing a frog, or any critter, take some shots right away in case they jump away. Then after you have a few, try moving your position a bit or as I sometimes do, move some grasses that might be in the way. With this green guy, I was actually able to gently remove grasses in front of his face, then from his body as he sat frozen, watching me. It was a cold day so maybe he was extra sluggish. Then he jumped away into the water and I took more shots.
I really do like frogs and feel a bit guilty for not doing a nice little painting for you to see, BUT I was really cold and wet by the time I met Mr. Green Frog and couldn’t wait to get home for a hot bath. I’d like to do some drawings from my photos though, when I do you’ll be first to know!
I hope you enjoyed coming on my walk with me, it was kind of lonely until I met the tadpoles and then the frog. I guess you’re always surrounded by friends if you stop to meet them!
Here’s some links to fun things in my shop with “Mr. Green Frog” on them:
I thought I’d add a series of posts that introduce my new watercolor crayons, a few old ones, and how to start using them in hopes that some of what I do may help someone else.
When I first bought watercolor (or water soluble) crayons I tried them and didn’t like them at all! I thought the colors garish and harsh. I thought “what a lot of money for these little things and I’m not going to use them!”. Well I’ve only recently pulled them back out and have been playing with them. I’ve learned from using watercolor pencils, go lightly at first until you know just what your colors will do when you wet them.
Please click on pictures to see them bigger.
Water soluble crayons in a tin
Here’s the set of colors I started with, Caran D’Ache Neo colors and one or two Derwent Watercolor crayons. I also show a “crayola wax crayon” and explained in another post (below) how I used it. I cut them in half (oh heavens yes I did!) to make them lighter to carry in my sketch bag and I could fit more; here I show them in an “Altoids” mint tin. The other halves go into a baggy for later or to carry in another kit.
I took them out into the field and did some small landscape studies using these few crayons. There are links at the end of my post you can click on to read about them. After doing them I was feeling more enthused about my crayons, I think it’s time to look for more colors!
New Tin of Watercolor Crayons, Staedtler "Karat Aquarell" Neocolor II
More colors in other brands…landscape colors hopefully. I thought I’d try these Staedtler “Karat Aquarell” neo color II, they were reasonably priced online. Because I’ve been desperate for sunshine this spring, it was gorgeous that evening so I sat on my front steps to do my color charts.
New Watercolor Crayons, wow look at all those colors!
Here’s the crayons! Woohoo….they look nice! I’m hopeful that some of those greens might be what I was looking for.
Getting ready to wet the colors and have some fun!
First I want to stress that before you do any paintings with ANY media, watercolors, color pencils, oils etc, you should ALWAYS do some color charts of all your colors. This will help you to get to know the colors as they really look on paper (or canvas) and get familiar with how to handle them.
In my sketch journal, I rubbed a small spot of color and wrote in permanent ink pen the colors name next to it. It helps to also put an initial for the name brand too or label it at the top as I did. Prepare one row and do the wash before you color the next set of spots, just so you don’t run out of room. Keep it neat because you can refer back to these charts again and again as you get to know your colors.
Color Charts of two brands of Watercolor Crayons
After you make your dry spots of color take a waterbrush or regular watercolor brush and water, wet the bristles and touch it to the color spot. Notice how as you ‘rub’ the color it releases and becomes like watercolor. If you rub a lot you can blend the spot right out for an even tone, but leave some intense color there, drag your brush as you rub back and forth, to one side to pull color away. Then lift your brush to stop, don’t rub too far out, keep ’em neat. Now your ready to put on any more spots you may need to and wet them; leave room for labeling them. After wetting a color rinse your brush and wipe or rub on a paper towel to make sure all color is cleaned off it.
As you can see, I did my new crayons on the left, my original crayons on the right so I can compare them.
Color Charts with my comparing colors close together in the centre.
Now to have some more fun, it’s time to compare colors from different sets so I can decide which ones are too similar to carry around with me. This is a ‘getting to know you’ exercise now and VERY important! The more you play with your colors the better your choices will be when you’re painting. Sometimes when I haven’t painted in a certain media in awhile, I’ll go through and do color charts just like this. So you can see the middle is a riot of colors!! I grouped the blues, then greens then browns and goldie colors, all good for landscapes. Label, label, label!!
( I really like how this page looks with all the color swatches, I decided to make note cards and t-shirts of it!! See the links at the end of this post 😉 )
More color play to further test some out.
Ok, then the page adjoining that one had to be used for more testing, wow, am I going to use all these pinks?
My Watercolor Crayons + Waterbrush
After all this playing I ended up with a pile of cut crayons (yes I cut my new crayons in half too! Yikes how awful!) So I searched through my favorite shelf of odds n ends, containers etc for my field kits, and found a plastic case from I think, a small first aid kit. I love that it’s plastic = lightweight! This is a picture from my previous blog post where I used the big flat water brush.
Here are the blog posts I’ve done so far using the crayons, in order of date posted:
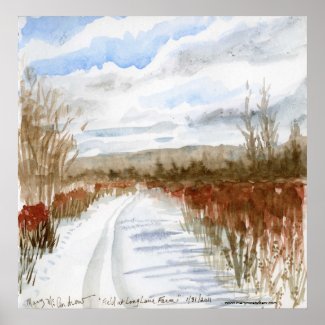
I know it seems out of place, this painting of snow when it’s Spring (at least it’s trying to be spring!) but I found I had never posted this and would hate to have it forgotten! So here’s a short post about a cold, snowy walk in January! If you click it you’ll see prints of it in many sizes.
"Field at Long Lane Farm" watercolor
I did this little 7 x 7″ painting in my journal while standing in the lane that goes out to the fields on my farm. I love the subtle colors of winter, the red tipped bushes and the cool blues in the snow. On a good sunny day you can have to most intensely blue colored skies and high contrast clouds. Not that you’ll ever hear your weather man call them that! “today there’s a chance of high contrast clouds with rain” hahaha.
Seed heads along the walk
Here are some notes I wrote as I paused to look at some dead seed heads.
Watercolor pan, brush and waterbottle
And this shows you what I used, not a waterbrush but a ‘proper’ watercolor brush, just used the one and a plastic bottle for water. In the winter you can’t use the waterbrushes that are so popular as the water tends to freeze as you paint on the paper.
Hope you enjoyed the late posting…I hope we can all say goodbye to winter weather soon!
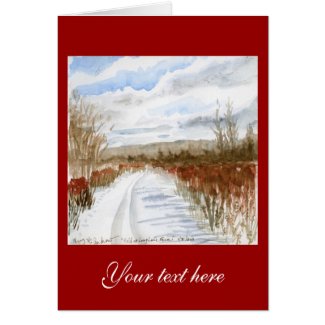
Here’s some prints and note cards of this little watercolor in my shop:
(if viewing this in an email subscription, please go to the website to see the video clip and pictures better)
Clouds Over Fox Lane
Above, this is the first view Ginger and I got when we started out on our walk; clouds, gorgeous clouds stretching as far as the eye could see! I love the way the old pasture fence looks here along “Fox Lane”.
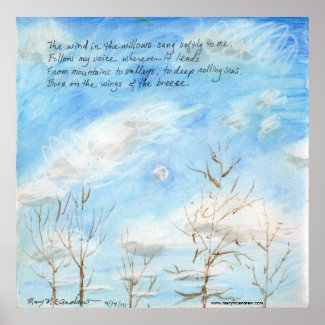
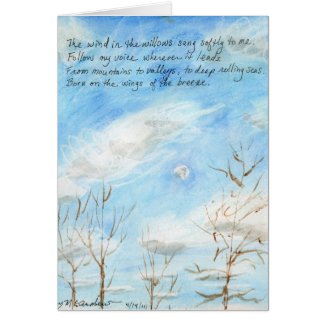
“Wind in the Willows”
I’ll show you right away what I ended up sketching after we walked all the way out on the property. (At the end of my post I have links to note cards and gifts using this image!) I had a page in my journal with the first verse of the song from “The Wind in the Willows”, the popular children’s tv show, written in permanent ink. I knew eventually I’d do some kind of painting over it of trees. I just love the song from this show, I posted a link below so you could have a listen too!
To explain a little how I did the sketch, as I stood in about 8″ of water on a particularly wet path, I held my sketch journal and balanced the little box of crayons on it. I have taken all my water soluble crayons and cut them in half so I could carry more in a smaller space and less weight! I put it on a peice of paper towel to protect a little watercolor I’ve got on that page, and I put a piece of paper towel (Viva) next to the box for wiping my brush on. I used one flat water brush, a favorite of mine when I want to do very quick washes and scrubbing. This particular brand releases water quite fast, at first I didn’t like that but now it’s also why I DO use it!
First thing I did was to scribble with white crayola wax crayon where I wanted to show white clouds. It doesn’t really show up until you color around it, but if you tip your paper a tiny bit you can see it. Then I colored very quickly with two different blue water soluble crayons all around; I found that I could shade right over the white wax and it didn’t really disturb it, cool! Then very quick scrubbing with the waterbrush to wet and move the color around. I grabbed the paper towel and sometimes blotted off the white cloud and it helped soften the look. Using the grey crayon ‘under’ each cloud really helped to pull them out and make them look real.
The trees were drawn on with a brown wc crayon from Derwent, using the hard edge to make branches. It works really great on damp paper, the lines are very vivid. I must say, it’s the scribbley look of the painting that I like so much! I could go back and soften the bottom of the moon, but it was a field sketch and I think I’ll just leave it as is. It was hard to get the look in such a tiny thing while hand holding my journal.
View I painted from while standing in water!
This is a photo from the spot I was standing, can you see the tiny moon in the middle?
A close up of the moon
Sometimes when you’re outside in the middle of the day, if you look for it you’ll see the moon amongst the clouds. I always think it’s a nice surprise.
Ginger all wet!
Yes, Miss Ginger is wet but doesn’t mind. This is the lane I stood in to do my sketch.
An old nest left from last year
I spotted some old nests as I walked, this one was out near “The North Pole”, the furthest part of my land. It’s amazing how many nests are at our eye level but we don’t see them when the bushes are in full leaf.
Clouds in Spring Over the Lane
I’ll leave you with one more pretty picture. I just love the colors in this, the blues contrasting with the golden colors of the dried grasses, the reds in the tips of the bushes and trees and the purpley colors under the clouds.
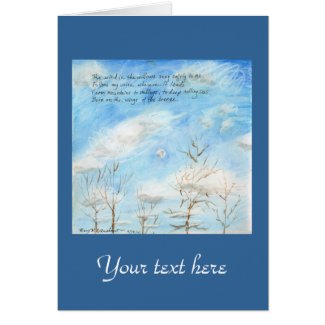
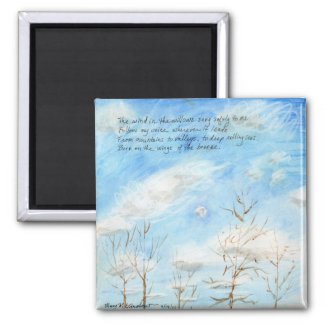
I hope you enjoyed our walk again out on “Long Lane Farm” at Springtime. Please enjoy the pictures links shown below, they go to prints, note cards, tee shirts and a magnet using my “Wind in the Willows” field sketch painting, in my shop. I can’t wait to order a tee shirt for myself!
Visit mySHOP to see many beautiful note cards with photos of the new Spring flowers, bees, landscapes etc!
(if you are viewing this from your email subscription, please visit my blog on the actual website to see the video and links properly)
Today I went for a walk with Ginger. We ventured forth out into the wet lanes and fields, the mud sucking at our feet, water swirling as we waded. Not all my land is wet mind you, but this time of year it certainly is in some areas. I start my post off today with my drawings of the little snail I met while out walking, because I knew you’d be curious to see him.
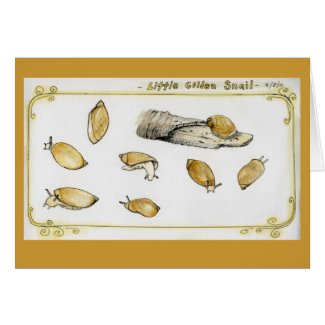
Little Golden Snail Sketches
I did these studies actually back at my studio while looking at him under a magnifying glass. I did some while in the field (you’ll see below) but it was so small it was hard to really get a good look at him while I sat on a log! So he came home for a visit. I first lightly sketched him with pencil then drew with a permanent ink pen and then watercolor on that. After I drew the swirly curly border I drew over it with one watercolor pencil then just dragged a wet waterbrush over all of it to soften it and make the color bleed out a bit.
Now back to our walk.
Secret Circle Lane
This is “Secret Circle Lane”, as wet as it always is in springtime; (click it for high res. view in my shop) how pretty reflecting the sky like that! Ginger and I crept quietly along through this water because I heard an interesting call from some kind of frog along with the zillions of peepers that were singing.
Here’s a short video clip I shot while standing in the water, just to let you hear the sound of the Peepers calling.
my boots
Ah yes, the trusty boots! Can’t go anywhere without these mud boots or “Wellies”. Well these boots weren’t made for “walkin” they were made for “sloshin”!! I did see some interesting little critters in the water before our feet disturbed it, some snails and a few water beetles.
me
Oh, and there’s me…had to show you my favorite hat of all time and my Dad’s hunting coat! The hat I bought in England at a farm supply shop, where they sell the expensive horsey equipment and clothes. Well it WAS expensive too, BUT well worth ever penny! It’s waterproof, lined for warmth, has a flap that drops down over your ears and makes it fit your head like a helmet and has an elastic cord that goes under your chin for high winds. When the wind blew hard on the high hills of Northumberland, my wonderful hat stayed put!! The other nifty thing is it has a little button on the brim you click and you get two settings of led lights! High power beams!! I’m telling you we’ve used it to find our way on paths past dusk and it’s great for visiting old castle ruins because you can point your beam into dark places that you wouldn’t have seen before. I should get paid money to promote this hat!
And the wonderful old Woolrich hunting coat my dad gave me so I love it. He used to put it on when going out hunting, I still remember seeing him in the kitchen with the pants on with bright red suspenders and laughing playing like he was Santa! It is covered with pockets and has a special pocket at the back for carrying your ‘game’ home in. I have been known to carry sketchbooks there and always keep a spare kitchen size garbage bag for sitting on wet ground.
Crocuses in Aspen Hall
I told you before that we planted flowers in “Aspen Hall”, here’s two little crocuses I wanted to sketch. Click to see a note card of it where you can zoom in and see it bigger.
golden snail
I love the close up pictures of this pretty little golden snail. I spotted him on the ground amongst the leaf litter, but in the sun he glistened like gold. I took my tiny Olympus camera on the macro setting and shot this picture through a close up part of my magnifying glass! It really works at getting a little closer. Click on the pictures to view note cards that you can view close up.
golde snail pointy end up!
Here’s another shot of him, I love the form of the shell twisting up like that.
Studying the snail closely for sketches
Now this picture is important because it shows you how tiny he was and when you need reading glasses to see things better, it doesn’t help. The other thing that made it difficult to draw him in the field was sitting on one little log made my back hurt terribly so I was not comfortable. I wrote my notes and did some little sketches anyways.
golden snail peeking at me
Another great shot, I love the patterns in the shell that the sunlight catches. And notice the subtle color that runs up through those eye stalks? I notice how well it matches the dead stick he was crawling on.
My Journal page
Here’s my actual journal page from my time sitting in “Aspen Hall”, go ahead and click it to read it.
Tiny Golden Snail with metallic gold watercolor paint added.
Now I had a little more fun with the snail studies I did by using some metallic watercolor paint on them. I took some pictures of the snail paintings tipped at an angle to catch the sun and really show the metallic watercolor paint I added on top. It was a lot of fun using it and really made it look like the snail did, it sparkled in the sun!
Golden Snails in watercolor with gold metallic watercolor over.
And one more shot showing the glitter in the full sun.
I hope you enjoyed our walk today and you didn’t even have to get your feet wet! 😉 Don’t forget to visit my SHOP by clicking the pictures above to see note cards of the little golden snail or the landscape photos in this post.
Here’s a note card using the watercolor studies:
Speaking of snails I’m honored to say there’s a wonderful blog written by two talented women one of which was inspired by my posts about the snail I found and did studies of while I was in England! Have a look here: “The Dao of Doing”
As my page describes, it was overcast, wet and dreary. I did the small landscape sketch while standing up, just a small little thing but it reminds me exactly of the time and place. At the bottom I wrote words I associated with where I was sat, this is a great way to begin creative writing. When I got back to the house I added the background colors behind the words and around the landscape to perk the page up. Without it it was quite plain looking! Then I outlined the leaf shapes under the crocuses to give it more ‘umph’.
Wet Walk in March (2011)
I was sitting on a small pile of dead trees that I stacked as I could during the winter, right in the middle of “Aspen Hall”, a favorite place on my land. It’s just a clump of Aspen trees that sticks out into my field and can be seen from the house. As you walk up the lane, lined with bushes and some trees, you come to a place where there are thick trees on both sides and it forms a sort of shady canopy, so we named it “Aspen Hall”. When my boys were just two and four (when we first moved here) we found it to be just the right distance to hike from the house and have a picnic. I then planted daffodils, crocuses and maybe some tulips some seventeen years ago! When I went out the other day I was excited to see shoots coming up! Today there were crocuses ready to open, I can’t wait to see what will be out next time I visit.
Mud Boots and Paint
This picture and those that follow I took with my cell phone! I guess I was glad I had it, sometimes it is great to get some pictures. Had to add this photo! The mud boots or “Wellies” are standard fare around here; if you want dry feet you practically live in your mud boots! I just reached down to use the colors but it wasn’t the most comfortable after awhile for my lower back, even though I was on a low seat.
My Watercolor Paints and Watersoluble Crayons
Here’s a closer look at my watercolors and crayons. I didn’t use the crayons but put them out just in case; they’re new to me so I want to play around with them more while out in the field. I also used just a tiny round watercolor brush with a small container of water I had, not my usual waterbrush.
Ginger's Big Nose
My little companion Ginger, she loves to walk with me and waits patiently (though she whimpers when she wants to keep going) as I stop often to sketch or paint. She’s getting older now though so it’s probably good for her to stop.
Water Droplets on Seed Heads
On my return to the house I noticed something glimmering like diamonds in a rather dreary landscape; it was water droplets hanging on the seed heads of the plants.
The World Upside Down in a Drop of Water
Did you know that water droplets hanging like this reflect the world upside down? It reminds me of the drawing I did of a crystal ball reflecting the woods around it (Ravensphere), everything is upside down. I think someone poetic could think of ways to use this imagery of the world being caught like this. (This picture is a bit dark but it shows the glimmering of the droplets quite well).
Well I hope you enjoyed coming on this walk with me today! There’s always something to discover outside your door and you don’t have to go that far. I hope you will go out today and see and hear what you can!
(Please sign your email in my “Subscribe” box on the right, to receive my posts)
Spring Fuzzy Buds on "Long Lane Farm"
Today is the “Equilux”, that is the day of the Equinox, where day is the same length as night. I heard that it’s also “World Storytelling Day“; now this interests me greatly as I love to tell stories and love to hear and read them. I’ll have to look into that further. For me today was like a story of Spring coming. The sun was out, though the air was still very cold, and the birds are all vying for attention, not from me but they were certainly getting it! I did some sketches and wrote notes and a poem while I was walking so I’ll re-type what I penned on my pages for you to read. So I tell a story today. (Please click pictures to see enlarged).
"Step Out Your Back Door" notes, poem and Hawthorn needle.
Journal: “March 20, 2011 Just had to pop outside. It’s sunny but cold; I am wearing a wooly cap + wool fingerless mittens. Though the sun shines + the birds are all singing, it’s COLD! Daffodils by the back door are getting ready for their entrance into Spring.”
Then I walked out into the pasture, totally flooded and squishy; so lucky I wore my ‘barn boots’ or Wellies as they call them in England. Here’s a little poem I wrote while standing and listening to the birds:
Journal:
“Step Outside Your Door Today”
“Step outside your door today, walk in your backyard.
Watch the Blackbirds sing and play, smiling is not hard.
The woodpecker laughs from his high perch,
As signs of Spring you do search.
Cardinals red and grasses of brown,
You smell the earth deep beneath the ground.
A stirring of creatures above and below,
Spring’s arrival defeats Winter’s foe!”
Mary McAndrew
Hawthorne needle
Then I walked on and around “Aspen Hall”, a favorite area of my land where the boys and I used to picnic, I found a branch from the Hawthorne tree on the ground. I plucked many of the long sharp spines off it, then poked one through my paper like a needle. This looks really cool if you click the picture to see it enlarged!
As I walked it was so cold I had to keep my hat and scarf on. When I found a sunny spot in the “Maze”, it actually felt better to sit down out of the breeze. I was able to pull my wooly hat off and stretch my legs out; I put a plastic kitchen garbage bag on the ground to keep the wet where it belonged! Just make sure you don’t put it on any pokey stubs of things, you’ll get a hole and be surprised later!
Black Crayola Crayon Sketch
Here’s a page in my sketch journal that I worked on, a view of the path I had just walked on. I started with a little border line around the edges to add a neat design element. Then sketched in black ‘Crayola’ wax crayon that I had sharpened with my knife. Using this crayon was SO MUCH FUN! I can’t wait to try it some more, I loved the feel of the crayon on the slightly rough paper, you could see the texture too. You can press harder for darker lines and very lightly to make it light of course.
Using the flat tipped waterbrush to wet the watercolor crayons
Then I tested my colors by making a tiny dot at the bottom of the next page and wet it. Make sure you test your colors before you scrawl all over a drawing, watercolor pencils and crayons can surprise you at how different they look wet! I very lightly, using the side of the point of each crayon, added color to the areas. I saw the bushes and trees in front of me as more of a mass of value with some standing out in the foreground; so I massed it in as brownish reds then added heavier marks for trees and branches. Experiment with adding lines onto your wet paper, they will be very distinct and bold; this is good for adding branches.
I’m using the flat waterbrush, I really like this brush for studies that need large washed areas and it’s great for making grass marks! PS. yes it was cold still, I did the sketch with the mittens on, the flipped back the finger cover to use my brush!
Sketch in the Maze done with watercolor crayons on black wax crayon
Here’s a picture of my crayons, (each is broken in half to make them fit and weigh less in my pack) I have them tucked into an “Altoids” tin with some paper towel. The ones in the lid on the left are what I used for this sketch. Another thing you can see is how in the foreground I used more lines from the crayons going back and forth to add texture. Then the flat waterbrush with tip sort of dry, it spreads apart and makes good grass type marks. Touch it to your crayon tip to get color and brush it on the paper. Click on the finished sketch below.
"Springtime Path in the Maze" watercolor crayon + wax crayon
Here’s the finished sketch done in wax and water soluble crayons. I rather like it! Oh and the three bigger trees on the left are the “Sister Trees”, they are a group of huge trees I’ve painted before.
You may like to read my notes on this page that I wrote as I did the little painting. They are here at full size so you don’t have to click it and I typed out the notes below the picture!
Notes from my walk with colors for sketch at bottom.
Journal: “I’ve found a sunny spot to sit in a clearing on one of the paths in the “Maze”, an overgrown field on my property that I cut paths and tracks all around. This is an area I cleared more into an open, private spot along one path. I put a clean plastic garbage bag upon the ground and that’s where I’m sat; legs stretched out and wooly hat off! Sun warming me nicely now! 🙂 I did the little sketch with Black Crayola crayon and it was wonderful to see the fine texture of the paper under my hand; pressing hard or light to get variety of lines. Then I lightly scumbled over it all with watercolor crayons by Caran d’ Ache. I never used these before as I thought the colors too garish- but if you go light the browns + the golden yellow were great over the black wax crayon! I love how the black crayon just stays. I used the big, flat waterbrush and it blended all nicely, then made perfect marks for texture on the ground in front.
Just sitting here quietly feels wonderful. I hear birds + distant sound of cars. The Chickadees are so curious they keep coming closer and closer. One just looked down on me from a small bush. Something else interesting, I can hear the ground making sound! There is a barely audible sound like “ticking” here and there all about me. I’m sure it’s the sound of air bubbles coming to the surface of this very wet ground…the earth breaths as the ice melts…the peepers awake.
12:10 pm 3/20/2011 Mary McAndrew”
Ginger on Long Lane, listening to the Peepers singing.
Now, go get your dog, your children or just yourself, grab that sketchbook and some crayons and get out there!! Good days don’t wait for anyone, go enjoy what’s around you no matter where you live. I’d love to hear from you if you’ve been out and noticed signs of Spring, leave me some comments.
I started putting lots of my sketches on “Flickr” if you want to stop by and see them, I may use it as a place to show all my sketch pages? We’ll see. Don’t forget to stop by my ‘SHOP’ to see the new Easter and Spring cards.
It is a cold and dreary day here in Western New York, I guess it is in many places around the world. But the drippy dreariness also shows me spring is coming; snow melting on soggy but still frozen ground, dripping of ice from the trees and an almost silent occasional gurgle of air from under the ice as I worked quietly.
Oil sketch field kit, ready to be tested.
I created this lightweight kit to take outside with me, just for oil painting sketches. I mostly want to focus on practicing mixing colors for landscapes from the real thing. I’m not concerned about finished paintings, though as the weather is warmer I may work longer on them.
It’s a plastic box that I bought at an office supply store. I used a metal pencil box for my paint and as a palette; it’s held on with blue sticky tack. I also have a pill box that has colors in it, though I want to buy a long one so it will fit better. I have canvas paper cut to standard sizes and tape it in and also created a place for brushes with loops of masking tape.
My mineral spirits container slots over a strap I made out of masking tape.
I had a tiny plastic bottle of mineral spirits with me but didn’t need to pull it out, I had a tiny bit in this metal medium cup. It’s got a screw on lid and I created a strap with masking tape that it could slip over to hold it in place. Then I stuck a blob of blue sticky tack behind it to keep it from slipping off. (Just love that sticky tack!)
Here's how I held the kit and painted while standing.
It was very lightweight as I worked. As all tests should do, it helped me find what was ‘not’ working great; I need to make a little holder for dirty brushes on the left and both need a holder with some kind of bottom, like a pouch. My brushes were sliding out the bottom too easily and may get dropped.
A view of the painting and the subject.
Here’s the whole thing in progress. Note the paper towel with red paint all over it!! Ok, I admit it, the very first thing, when I lifted the lid of the metal pan (with my very cumbersome mittens on) I inadvertently got Cadmium Red paint on my mitten thumb, WITHOUT KNOWING IT! It suddenly showed up in three to four places, probably on my face too and I didn’t know it! Ok, those who paint with oils know that sometimes this just happens, oil paint likes to migrate. Cad Red is one of the worse to get on stuff! You see traces of where I had to scrub off the second canvas paper there, sigh. Nobody’s perfect.
Ginger is waiting patiently, telling me her tootsies are cold!
Ginger loves to go out on walks, but gets bored when I stop to paint or sketch. Today was worse because her feet were cold! But a good sign, when I was ready to leave, she didn’t turn towards home, she wanted to go further.
Cleaning my brushes, stand them up in the snow as you go.
When I’m done, I set the kit on the snow and stuck my dirty brushes in the snow (bottom down) and just dipped the tip of each one in mineral spirits and pushed on the lid/palette to work much of the paint out. Wipe it really well on paper towel, it won’t be clean but well enough to travel home for cleaning. Most of my brushes I used were bristle brushes for scumbly strokes and one small, flat, soft but firm nylon brush for the thin line strokes.
The field study for today.
Here’s the quicky field sketch fresh from the icy field. I know my colors look brighter than the photo, but that’s the beauty of painting from life, the colors were more vivid and beautiful to my eyes, a photo will lose a lot of true color and atmosphere. If I want I can let this dry and work more on it or do it while it’s still wet. Ideally, touch up what you want right when you return and it’s fresh in your mind. I don’t want to fuss too much over these sketches unless I do one that I feel is worthy of fussing. My main goal is to just get out and get quick color studies and not complicate things too much.
Hope you enjoyed, I’ll be trying out my field kit more and will keep you ‘posted’ as they say! haha.
Happy New Year everyone! I’m looking forward to a year filled with tons of new paintings by me and look forward to getting back to England for more adventures! Please share my blog with those you think would enjoy it.
The most up to date information about my artwork, nature sketching adventures, or step by step demonstrations. Search using Categories or Tags, or use the search box in the left column.
Please sign up below to get notified when I post new articles.
stink bug")


 re")
 re")
 re")
sketchbook (6)")
sketchbook (8)")
sketchbook (10)")
Mother's Day 2011 ed2")
 re")

 re")
 re")
Easter Sunday 4-24-11 pg2 ed1")
 re")

 re")
 re")
Easter Sunday 4-24-11 pg3 1ed cr")
 re")
 re")
 re")


My WC Crayons + Waterbrush (7)")


Clouds Over Fox Lane")
Wind in the Willows")
View I painted from")

_resize")
_resize")
Clouds in Spring Over the Lane")
golden snails final ed")


")
")
")
")


")


