Support This Site

If you like what I do please support me on Ko-fi

White Ermine Moth

White Ermine Moth

This is the White Ermine Moth that came to visit the other night.

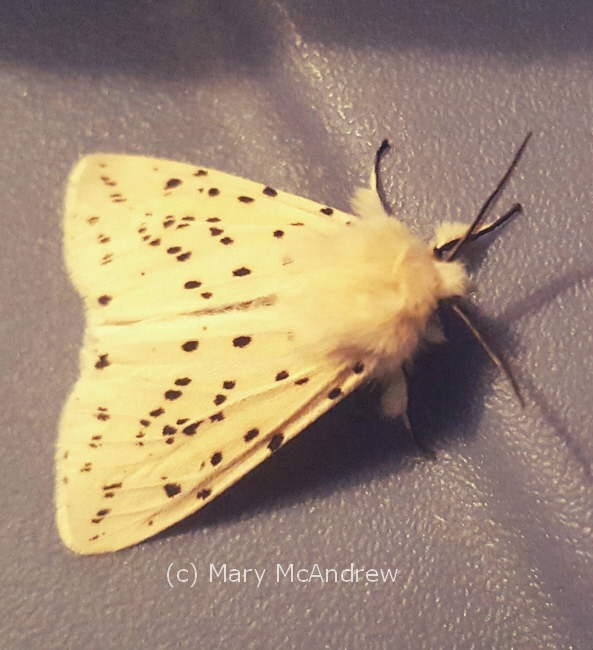
This is the White Ermine Moth (Spilosoma lubricepeda) that came to visit us here in Northumberland the other night. What is it about moths that gets my interest so much? There are so many kinds, they hold their wings in different ways and seem to ‘sneak’ into the house and surprise you. This moth has a wonderful ‘Ermine’ fur coat and furry legs. He has long slender antennae with delicate fringe and speckles on it’s wings that are different on every single moth!

(c)5-28-17 white furry moth (14)

Sketching the moth in my little field sketchbook.

I made a simple holding container for when I catch interesting bugs and want to study or draw them. This is just a plastic container from Wilko, I cut a rectangle in the lid and taped some mesh over to cover it. I had a better container before I moved to England made from a clear plastic container, but like so many things I had to leave it behind, so this one will do for now.

Ink studies of White Ermine Moth

Ink studies of White Ermine Moth

First I sketched the moth in pencil, then used permanent ink and erased the lines. I know it would look nice if I did an ink wash around the moth so it will really show how white it is, but this is just a brief study. I feel I have no time for lengthy studies lately! I think when I have some time I’ll go back and put a watercolor wash around the three studies to make them stand out white.

The underside of the White Ermine Moth

The underside of the White Ermine Moth

This shows the underside of the moth, his little furry black ‘face’ and neat rows of ‘buttons’ down his front! It’s things like that that inspire me to think of drawing little characters! One of these days I’ll make a better container, a jar is also very good to use.

The way he holds his front legs and the ‘fur’ on them and his body reminds me of the beautiful moth I discovered back in NY. Here’s the post I did about it: http://marymcandrew.com/beautiful-wood-nymph-moth-june-2011/ I hope you take a look, it really was a ‘beautiful’ moth!

Click this link to see some really great photos of other White Ermine Moths: https://www.ukmoths.org.uk/species/spilosoma-lubricipeda/  It was this website that helped me to get a positive ID on my moth, but I would have had much trouble doing it if I didn’t already know that it was an Ermine Moth. 

A Weevil Came to Visit

This will be short and sweet. Just a quick post to share some sketches I did of a little dark Weevil that came by today. He didn’t stop by for tea but I may do a character of him someday so you never know!

(click any pictures to see larger)

Enlarged sketches of the Weevil

Enlarged sketches of the Weevil

Above shows the small sketch page I did. It had a spot of color on it from when I was going to paint something, but this is just a study so it didn’t bother me. You can see in the upper right corner, I always draw two lines showing the bugs actual length. I hope the pictures aren’t too blurry, I only have my cell phone camera right now. I cropped and enlarged them so they may not be as nice as they could be! (getting a new camera is on my list!)

Weevil in my 'bug' container to study.

Weevil in my ‘bug’ container to study.

Above shows the little container I’ve used for years as a temporary holder for bugs while I study them. None of them have ever held still, it’s so hard to draw them while they constantly walk about. I tried to draw the sketches much bigger than actual size to show more detail.

A great natural light picture when I released him.

A great natural light picture when I released him.

This is when I released him outside on the fence. You can see the tiny dots of tan on his back.

Another nice shot of his texture and color.

Another nice shot of his texture and color.

They must have a special substance on their feet because he was able to walk on all the slipper walls of this shiny plastic container.

And another shot

And another shot, you can see his eyes.

Look at those antennae! They were bent like an arm would bend at the elbow, and he poked them up and down to ‘feel’ or ‘smell’ (?) his way along.

I like how this picture shows how he can bend his body a bit, or neck if he has one!

I like how this picture shows how he can bend his body a bit, or neck if he has one!

Look at the interesting shape of his legs, and I like how he has his neck bent a bit.

One last picture of him in the container.

One last picture of him in the container.

One last picture of him in the container, I like showing all the different angles. I find the legs so interesting and difficult to draw unless it’s from a photo. He walked constantly while I sketched him and reminded me of one of those wind up toys! I noticed how they moved opposite legs, just like any multi-legged creature would for balance.

“Lightning Bug Under Grass” watercolor

"Lightning Bug Under Grass" watercolor + ink

(click to see enlarged, hit ‘back’ arrow to return)

I know it’s not the time of year for Lightning Bugs (or Fireflies) to be out but thought I’d share this small illustration I finished recently. I’ve been working on studies of small, native plants (NY) to go with illustrations in the children’s books I’m working on and decided to put this Lightning Bug in here. It’s more realistic than the books will be but I really like how it looks like an ‘old time’ illustration. Many people have never seen this bug in the day, known for it’s magical blinking lights at night, but if you get to know it you may spot it in long grasses or hedges.

Though I painted this entirely in the studio all the studies had to be done in the field. Lately when I’ve been able to get out for sketching, I’ve taken my garden kneeling pad and a big garbage bag to sit on the wet ground to work. It really is amazing how many different small plants there are growing right under your feet!

Next post will be about the small plant studies I’ve done out in the wet lanes of spring. Click on the images below to see my prints, note cards and other items with this painting (you can add text to any of them!):

Lightning Bug or Beetle Under Grass with Mushroom zazzle_print
Posters / Prints in size you choose
Lightning Bug or Beetle Under Grass with Mushroom zazzle_card
Glossy Note Cards in two sizes
Lightning Bug or Beetle Under Grass with Mushroom zazzle_sticker
Stickers in many shapes and sizes (change text or remove if you like)
I love reading your comments as it really keeps me enthused! It’s been hard to get time to paint lately because I’m getting ready to downsize my house so I’ll be ready to move. Years of stuff is all I can say! I will keep posting as I have time so please bear with me, there is more to come!

Coffee Stain Moth and Arthur Rackham

Watercolor moth painted on coffee stained paper

This moth is a little watercolor painting I did on coffee stained paper (click it to see it larger and clearer). Using instant coffee to stain your paper is something I taught in my Creative Journaling class. It’s great to use lightly on your paper to make it look antique or like parchment. Here I just played with it like watercolor and brushed it around, then splattered water drops into it. Let it dry totally then you can draw or paint on top of it as I did. I have a few small sheets that I did at the same sitting, so I can grab one when I’m in the mood and use it. I lightly sketched with pencil first then just used burnt umber, burnt sienna, black and a touch of white for highlight. This was from a “Yellow Underwing” moth I photographed last year.

I have always loved the illustrations of Arthur Rackham and it’s the works he did using mostly brown colors that inspired me to work with brown tones alone. Click on any of the illustrations to see cards or gifts I created in my shop! There’s more items coming in the category Vintage Illustrations.

Flippant Fairies Floating Freely

Just look at how gorgeous this painting is!! Sigh…I love his work. (Sorry I don’t have a bigger copy to view) The background is just subtle tone, there’s a hint of tree tops below and then the sparrows come into view as they nonchalantly go about their business of preening. The branch is laid out as a perfect design element reaching across the paper and reaching up to lead your eye but not take you totally away from the subject of the fairies. Yes, those fairies, painted lighter than the rest to really make them stand out, aren’t they wonderful? Not having pointy ears, pointy eyes, pointy hair, sexy clothes and striped socks. Good God some of the awful modern day interpretations of what a fairy is is shocking! Just plain tacky and awful!

Oh but this is one of my favorites!

This is one of my favourites! SIGH….that’s how I feel when I look at work by another artist I revere. I love her dress, the attention to it’s detail but it doesn’t take over the attention of the piece, do you notice how the lower part blends into the tone of the ground and the skirt is the same as the background? It’s all married together, floating but on the same ground, do you know what I mean? Just like the tree roots coming from nowhere out of the paper and growing up into this tree that is alive. I love how he combined just enough elements that say man and tree at the same time, the fabric hanging adds a touch of color that picks up in her cheeks and it’s form adds a floating liveliness to the painting; movement. Not to mention the tenderness of the way they clasp hands….sigh.

Subtle tones means less distraction

In “The Man in the Wilderness” above, I love the way he draws his trees to be just like people, look at the ‘arms’ of the one in the background reaching up to the sky. For a child (or adult) reading the story this illustration would be something to pause over, study and discover. They’d see the obvious girl and elf and think about what they are doing but then they’d look at the trees and realize with delight they have faces and arms! Here again I like how he’s used such simple color to make this illustration, just a simple bit of red and gold on the elf to show the main subject. I can’t wait to use the card in my shop (click picture to see) as an invitation or birthday card, “Can we meet for tea?” “May your day be full of discovery”. Oh, how about a funny one for your friend…”I know you’re kind of different….but I like you all the same!” haha

The Queen floats in as if on air

This illustration shows use of line at it’s best, do you notice how in some places it’s thicker and heavy then it gets thin and light? This is very important in drawing, good drawing. This one is definitely more of a drawing than a painting, hardly any range of values used, quite flat. It’s all about the lines and what lines!, all swirling and curling, sweeping like there is a magical breeze blowing just her skirts and delicate lace veil. To give some depth and interest I like how he put the pale leaves and branches at the top then used a light similar design on her skirt in just the front.

I have wanted to do drawings and paintings starting with a freely painted base of brown or parchment colored paper for ages. The moth is my first one I guess, though I’ve done paintings before that are monochrome browns, (Autumn watercolor, Etain oil, Twilight oil) they were never started on a freely tinted paper. By that I mean a piece of paper where you just play with the color and use water drops and salt to add interest and you end up with something that in itself looks good. I’ve played with coffee staining before (as you can see on this post) but never got around to painting on them. So I’m hoping to do some more starting with small studies like this moth. Hope you enjoyed my discussion on using browns and the great Arthur Rackham! (more sighs) Oh, and I found an excellent, though old, article written about a show of his works in London in 2002 here on the “Telegraph”.

Below are a few items I designed with the Moth painting on it, please click the picture to see them in my shop. Enjoy and let me know if you’d like it on another item!

Yellow Underwing Moth card
Try these stickers out, they’re glossy and I love ’em!
Yellow Underwing Moth Sticker sticker

Below, Sterling Silver necklace!

Yellow Underwing Moth necklace

Light Green Stink Bug

(Light Green) Stink Bug watercolor

(click the picture to see it in my shop where you can see ZOOM view by holding your curser over it)

This is a painting of (another) Stink Bug, though I’m not sure what the exact species is, a friend in England suggested maybe it was a ‘baby’ with this coloring. I really enjoyed painting this, the colors, the leaf and then the detail on the bug itself….love those dots on the legs! It’s a page in my journal so I added a little fun border with my brush and watercolors.

Almost there!

Here’s my set up; I found that using a large bobby pin to hold my photo in place worked out really well. I keep a little piece of paper nearby to test dabs of color. You can see at this stage I’ve got a lot done, but don’t have the deeper shadows or finer details in yet.

Close up of my progress

Here’s a closer look, though the color is not right (because of my camera shot) you can see how pale the whole thing looks. Adding more shadow under the bug and rich color to the leaf really helped it. I also took a damp brush and rubbed the edge of the leaf, above the bug, to make it softer. Something else I did, though it’s not in my photo, I added just a bit of cast shadow from his feet. This really made it look more 3 dimensional and realistic!

Well I’ve had a lot of fun making some attractive products with this painting in my shop, please click any below and have a look!

 Science teachers would love this! You can put whatever words you want on it.
I love this tee-shirt! I ordered one for myself on the ‘value tee’, it was printed huge on the whole front! WOW, so much fun to wear! I know some Science teachers who’d love this! You can put whatever words you want on it.
Glossy stickers, you can change the words if you like.
A great card when you need to ‘gently’ remind someone of something!
Hope you enjoyed my being “buggy”…love to hear from you, leave me some comments, shop in my store, but definitely have a great day!

Crocus Geometer Moth

Crocus Geometer Moth full page from my sketchbook journal

In the morning when I let Ginger (my dog) out the back door for her morning wee, I always survey the screen porch to see if any visitors of the mothy type, have overstayed their visit. I used to leave the screen door open so I could be lazy and Ginger would just run right out, but stopped when too many flies were coming in! But I did get all kinds of moths in there! Well even with the door shut, some do sneak in and that’s how I found this little guy. Well sad to tell you it wasn’t alive, but laying on the floor in perfect condition. So I gently, gently picked it up and put it in my “Crisco” container for study.

Above is a full sketchpage from my journal, I did a life size study in the lower left corner and an enlarged size in the middle. I had fun with the border by just using my waterbrush with a matching color and added little ‘butterfly’ heads.

My set up when I sketched the moth

You can see in my picture that I lay the moth on the lid of the “Crisco” container and that way I was able to move it around as I worked. My watercolor pan is under it and the sketchbook is on my little table top easel box. (you can see my last page from the lady bug post!)

Drawing a study at the same size first

Now here I’m showing how nice it was to sketch the same size study by having the moth on the plastic lid. Using my pencil I did comparative measurements to compare the width to the height of the moth. Do you see those lines on the page? I put them just as a teaching tool, to show you that I found the measurement from inside wing to outside tip was the same measurement as the bottom of the wing to the top, his head I think it was. I always use comparative measurements when drawing!

Such a gorgeous colored subject!

Isn’t this a beautiful moth? His antennae were really elegant and graceful, very hard for me to paint with watercolor!  The more I studied him under a magnifying glass the more I saw and appreciated it’s beauty.

This is how my larger sketch looked at first.

(Above) Now I’ll show you the steps I took to do the large painting of this Crocus Geometer Moth, mostly how I drew it. Do you see how boring and technical it looks? I know, but if you don’t start with a clear drawing done in PROPER PROPORTION it will never look right! Sorry, I”m not shouting, but it is REALLY important! If you do anything, learn how to draw well!

So I used my pencil to compare the width of the wings tip to tip to the measurement of the moth top to bottom. I put light lines on the paper then drew an arc as close to the shape of the ‘real’ moth subject as I could. Then I decided where the wings ended in the centre, keeping in mind that they overlap.

The second stage is lightly sketching the placement of shapes, wings, body, head.

Above you see a lot more drawn here; I drew an arc lightly for the bottom wings too, then decided where the two wings met and overlapped then drew them. I found the wing tips were half way between the head (top) and bottom wing edge, can you see how there’s a little ‘t’ at the tips?; that’s centre from top to bottom.

It’s really fun when you get into a drawing and start to find things that are the same measurement so you can check other parts of your drawing by comparing them! That’s why it’s called Comparative Measurements! (This is something I teach my students first!)

Then I clean up the lines and decide how the outline will look.

Look back and forth at the subject and drawing, look for areas that might be out of line and fix it now. After you feel your measurements are right, you clean up the light lines and decide on the lines you leave. Keep your final line clean and neat. Use your kneaded rubber eraser now to dab repeatedly at the line to lighten it as much as you can, just enough so you can still see it but you can do watercolor over it and not have it show.

Laying in some washes with watercolor and adding some details.

Here I put the first washes of color on and then started to add where the dark markings are and light wing ‘ruffles’.

Larger study of the moth finished.

And here it is finished! I just kept adding the tiny spots and built up the larger dark markings. Sometimes it dries and just doesn’t look as colorful because watercolor can look lighter and duller after it dries. So I go back and add some light washes when needed to perk it up, I added bright yellow and more browns on this one. (ps. I did have trouble with the antennae! I need to practice how to do such tiny detail with watercolor!)

I’ve created some really pretty note cards and other things in my shop using this page from my journal, please have a look! Please forward my shop (or this post) to your friends to help me spread the word.

I love this tee shirt!

Lady Bug, Lady Bug, fly away home!

I’m showing you the page from my journal first, then I’ll tell you a little story about a ‘bug discovery’ I had.  You’ll see on the right my studies from the lady beetle I found, bottom left is studies of lady bug ‘faces’ so you can see at a glance how this is a handy way to identify them. It’s not really their face but the pronotum which is the part just behind the head on beetles. Then I have a quote by Paul Cezanne and had some fun adding a old style border.  (Please click on pictures for a BIG clear image!)

Multi-Colored Asian Lady Beetle studies

You can read my note that the one leaf I actually traced to get the exact size on my paper. That’s  a great thing to do when you’re making ‘scientific’ type notes and it saves time for studying other things about your subject.

Ok…now to get on with my bug story. Now this is really exciting, well for someone who’s interest in bugs has really peeked this summer it is!

Multicolored Asian Lady Beetle pupa

When I went out to get the mail I find myself looking down at the weeds in my front ditch near the driveway. I’m getting more used to spotting insects and today was no different.

Multicolored Asian Lady Beetle pupa 2

 I thought it was some kind of small bug but I didn’t have my (reading) glasses on so I didn’t really see what I was looking at as clearly. 😉

Multicolored Asian Lady Beetle pupa 3

Well after taking pictures of it I gently set it down by some weeds in my yard, but when I looked at the enlarged pictures on my computer I realized what it was! I double checked in my Field Guide and yup, it’s a Lady Bug pupa. It’s a pupa just like butterflies come out of!

Multicolored Asian Lady Beetle pupa 4

It was when I saw this picture that I realized it was hatching right now! Yikes!

Newly hatched Lady bug

So I ran back out into the yard and found where I had put it, brought it inside and put it in my plastic “Crisco” container you’ve seen me use before.  He/she slept in this overnight (yes in my living room!) and the next morning there it was, all fresh and yellow, a brand new Lady Beetle! How cool is that?

Newly hatched with wings still very tender

Can you see the clear ‘spots’ on it’s yellow wing covers? I had a suspicion that these spots would turn into black spots we all are familiar with. And I think just like butterflies do when first emerged, I think it was letting it’s wings ‘develop’ and firm up…they looked quite tender at this point.

Newly hatched lady beetle

It looks like a little lemon seed, I love it!

Multicolored Asian Lady Beetle with it's spots developed

Well what did I tell you? The very same Lady Bug now with it’s spots all developed. I released it as soon as possible onto the same weeds I found the pupa on. What a wonderful experience it was to see this Lady bug go through these changes!

My eyes are getting better at noticing little things on the weeds and plants around my yard and land. I find that I’m seeing many more bugs,  interesting eggs and pupas. If you take your kids out on a bug hunt, tell them to pretend that they have “Eagle Eyes” or “Superman Vision” and they need to stand still,  zoom in on leaves and watch for little things. It’s a wonderful hobby to get kids interested in, especially if you loan them a small camera like I use, and get them photographing them.

This little beetle is definitely waiting patiently on my list of things to be painted! Below are some note cards I created using the  “Multi Colored Asian Lady Beetle” pictures.

Multicolored Asian Lady Beetle card
Multicolored Asian Lady Beetle by MaryMcandrew
Shop for a different greeting card template online at zazzle
Multicolored Asian Lady Beetle card
Multicolored Asian Lady Beetle by MaryMcandrew
Shop for a card with zazzle.com

Two July Beetles

Two new beetle studies to share, the Milkweed Borer Beetle and the Rhubarb Curculio. Sometimes I print out 4×6″ photos of my bugs and then as I have time I can sit and do studies in my sketch journals. I’ve been working on lots of bug studies as you’ve noticed lately, but plan to work on a series of small insect paintings soon.

Milkweed Borer Beetle

I love the Milkweed Beetle because of it’s black and red coloring and nice black curved antennae. With the black legs it looks rather coordinated in a fashion sense of the word! I’ve always been partial to red and black clothes or designs!

Milkweed Borer Beetle and Rhubarb Curculio

Then just below I decided to add a little study of the Rhubarb Curculio Beetle.  I photographed it in my garden in early spring, it wasn’t ‘on’ my Rhubarb but I bet it was soon to be! I liked the rusty, powdery appearance of it and it’s unusual ‘snout’, typical of a weevil type insect.

My set up while painting

I tried to take some pictures, with my tiny camera, of some of the stages while I painted the Milkweed Beetle. I like to try and show the steps a bit because there are so many ways to approach how to do a painting.

(side note- you see on the page a bunch of dots of color, I was playing around with color mixing with my watercolor crayons and it had nothing to do with these bug paintings)

Laying green 'spots' on top of first light green layer

I missed taking a picture of the first stage but here (above) you can see that I put a very light green wash all over the leaf around the beetle first. I did this before I painted any of the bug, I used a bigger brush and just washed it on quickly but still tried to stay neat around the bug outline.

Then I started to paint the beetle; I used a water brush to wet the paper only where I was going to paint. The water brush was very handy to use instead of dipping my brush in water and wiping. I tested the red out on a piece of scrap paper then added a little at a time. The dampened paper was a nice way to keep the shading soft. Start with the overall color or the ‘background’ color first, then the darker values of red will be layered over it after it dries. I was careful not to paint red to the edges because it would ruin the 3d effect and also he had a powdery look that I wanted to imitate.

To make the leaf veined pattern, I thought I’d try just adding these little green ‘spots’ in a sort of organized pattern. By organized I mean that I would put them next to my pencil lines that indicated where a light vein would be, just arranging them along it was enough to indicate a vein.

Green 'spots' layer is finished

I’ve finished the green spots layer and you can see now how the bugs legs don’t look as dark? That’s relative to the new value of color around it and now will need to be darkened some more. That’s usually the way as you work on a detailed watercolor, it’s many layers to push things darker and bring out detail.

My set up today on an easel to give my neck relief!

Here’s a picture just showing you my set up as I worked at this stage. Before I had it flat on the table but that starts to hurt your neck after awhile, so best to prop it up somehow, this is a basic wooden paint box that you use on the table and the lid serves as an easel.  I just stick the photo to it with “Blue Tack” or “Sticky Tack” and then I put my field palette of watercolors on a small box in front of it (so it’s raised up closer).  This table easel a great little box because I keep ALL of my color pencils in it, separated by colors with rubberbands. I used to always use color pencil on my watercolors to add details at the end, but find I haven’t done that in ages!

Milkweed Borer Beetle finished and edited

I took a wet brush and gently wet the spots and rubbed very lightly to blend them a bit, then I washed some blue faintly over areas of the leaf to tone down the yellow green a bit. The picture above is of the Milkweed Borer Beetle all finished and cleaned up (the edges) on the computer so I could use it in my shop on note cards.  (if you click on it, it will take you to see Note Cards in my shop).  Now I wanted to comment here that if I was making this as a finished painting to frame and sell I would have worked on it more. I would have washed over more of the pattern here to ‘push it back’ and not make it so spotty looking, though I don’t mind it much. And the area right in front of his face I would have tidied up a bit more but that’s it for now, I consider him a good study for a better painting someday!

Here’s some more items with this painting on it:

Thanks for stopping by, leave me a comment if you like, I LOVE reading them and replying! And I hope I encouraged you to stop and look a little closer at the bugs in your garden, you may be surprised at how interesting they are! If I could encourage one more thing, it would be to get you to leave some areas of your yard go wild with local weeds and wildflowers. I have some huge Bull Thistles growing now and have discovered many interesting bugs living on them all summer. It’s like a highrise building in a city, some live at the bottom, some at the top and they climb up and down the main stem all day long! The other day I saw a Ruby Throated Hummingbird stop at the huge pink bloom of the thistle and soon the Goldfinches will be using the down from it for nesting and in fall they will eat the seeds.

There are many other ‘weeds’ growing around my yard besides the thistle, more because I have trouble keeping it neat with my neck and back giving me trouble. BUT I have also noticed new bugs almost every single time I walk around the perimeter of my yard and STOP to look. If you stop, stand still and just watch awhile, you’ll see so much. Here’s a little rhyming quote from me:

“When you stop, study and sketch, a fine image you will catch.  Study even longer, your drawing will be stronger!” Mary McAndrew

OK, go have some fun now looking for bugs! (and please get your children to look with you!)

“Stink Bug…What a Name!”

Yes I know, what a name! This bug is a type of “Shield Bug”, so named because when viewed from above it looks like a shield. I don’t have a definitive identification on it but closest I could come was a type of Stink Bug.

My sketch page with finished paintings of Stink Bug

This one I found was much smaller than others I’ve seen in the garden, you can see from the picture below.  I put my subject into the “Crisco” container that I like to use for bug study and photographing. It crawled around constantly and was a real challenge to draw!

Stink Bug and sketch book

Below you can see an experiment I tried, I colored swatches of watercolor pencil on a heavy piece of watercolor paper. I used it with a waterbrush to paint the Stink Bug studies. I wanted to try it because it’d be great to take along right in my sketchbook into the field. It worked pretty good for small studies and I’m going to try it out some more.  It helped to mix the colors on a small metal palette to the side to keep this color palette clean.

Watercolor pencil palette and waterbrush

Another tip, if you need to show some white highlights you can carefully scrape off layers of paint using a very sharp blade. This was just a small penknife I sometimes have in my field bag. Scrape sideways, gently and repeatedly to remove layers; sometimes scrape the opposite direction to remove it.

Scraping with a sharp blade

Here’s a bunch of pictures of the interesting little bug. If bugs aren’t your ‘thing’ I want you to just take notice of a few things.  You can appreciate some things in insects that you may also appreciate in birds. What catches me about birds is how you identify them by checking their shape, patterns, colors and behavior. Well the same is true of insects; you can identify species by their special shape, patterns, colors and behavior!

Stink Bug 5

This guy has an interesting shape from every angle you look at him. Just check out those red antennae!

Stink Bug 4

And the spotted legs! Looks like he needs a shave! But isn’t it fascinating that it has such pattern?

Stink Bug 3

This angle is very interesting, his head seems to streamline right into his body, and the eyes are right along the edge.

Stink Bug 2

Stink Bug 1

Here we see his pointy shoulders, like he’s wearing football shoulder pads! And I love the pattern along the edges of his back. Can you see the fine veins patterns in that little section at the bottom of his back, that’s part of his wings folded up. His underside was a gorgeous light green that reminded me of marble, but it was hard for me to capture as he kept running around! After I took all these photos in the garden, he flew away, I think just to show off!

Hope you enjoyed my insect study, I’ve been on a real bug kick this summer! More coming!

PS. I have a Flickr page that I’m trying to add to when I can. Check it out here.

Beautiful Wood-nymph Moth / June 2011

(Click on any picture to see larger, picture links at the end of the post go to my shop, enjoy!)

The "Beautiful Wood-nymph" moth...my newest discovery!

As your family and friends get to know how much you love to study new bugs and things, they will start to point things out to you that they find. This is great because it’s more ‘eyes’ watching for things than just your two. Well my son Paul, home from college, said there was an interesting moth on the back screen. I didn’t pay much attention until he again said, “Mom, you really should look, it’s really different looking!”

My two page spread of studies from life of the moth.

Glad I listened and glad I looked! It was a small moth who must have made it’s way onto my porch looking for the lights. Above you can see how I used two pages of my sketch book journal to do studies. I’ll share with you the steps I usually take when I find a new bug to study.

View from above taken with my tiny Olympus camera.

Before anyone gets their portrait painted, I get as many photos as I can to file for references, maybe for a future painting or at least to properly identify it.  I usually have some plastic containers around that I use, this one was perfect, it’s from a “Crisco Sticks” shortening package; the kind you buy with three sticks in a pack and they’re easy for measuring. One of the plastic containers has a lid and the whole thing is nice clear plastic!

View underneath the moth, many times reveals a surprise color!

I also have some fine mesh that I can put over the top with a rubber band, I never want to kill the creature (unless it’s a house pest, I may not be so nice then!) I love using my tiny Olympus camera to take the close up photos, it works great on the macro setting. This shot is through the bottom of the container. Another tip, I go outside into the natural light if I can to take pictures, the color is always so much better; this was taken in bright sunlight.

This is my set up showing how I positioned the moth under a magnifying glass.

This photo shows you my set up  for drawing. Now that I have lots of pictures to save, I put him under an old magnifying glass that stands up and start sketching. Do you see there is no lid? The moth was staying put, maybe because of the light, so I kept the lid off to work. I start with a light pencil sketch and then use permanent ink (you can see my pen in the background, this was an Itoya Finepoint System .2)

I did a 3/4 view to show another angle.

This is a close up of one of the sketches, I try to do different angles to show various aspects of the bug. I thought the furry legs were fascinating! (and made it look ‘cute’ actually!) I colored him in after drawing with the ink, but sometimes I do it in the opposite order. I laid the washy blue background in after I colored all the moths, I wanted it to be lose and just ‘pretty’.

View from above of the Beautiful Wood-nymph.

What an appropriately named moth…”Beautiful” really is in it’s name!

Beautiful Wood-nymph in the 'wild' on a leaf.

Now here’s the cool part of my story! I went for a ramble the very next day, hoping to find some interesting butterflies to photograph. I was into the first pasture and saw a tiny fluttering in a low plant, I watched for where it seemed to end up then just studied the leaves and grasses, looking for a butterfly. See below:

Hiding down low in the grasses, can you believe I found him?!

Ok, I’ll brag a little here, I think I have good eyes for spotting things, because I found him! Hiding amongst all those grasses and leaves. Can you see how well he can blend in, but then, not totally.

Another shot showing how well they hide on the leaves!

Then he flew around again and re-landed; this shot shows him pointed downward, always keeping his legs stretched out in front.

The Beautiful Wood-nymph imitating bird dropping, that's his job!

When they do that, it makes them look like bird droppings and that’s their defense!! I’ve seen pics in books about such things, but never saw one myself.  Though he imitates such a yuchy thing, the moth itself is really pretty! I enjoyed studying how the wing pokes up through with a curling flourish and the fuzzy legs that remind me of a Poodle dog. The wings had a sheen in the sunlight that looked like white satin.

The big thing all of this made me realize, was that I’ve been living here for about 17 years and I never noticed one of these before! Well, much of that time I was busy raising my boys, taking care of animals and whatever else. I didn’t go out walking in my fields all the time as I do now. What I’m trying to say is there is SO MUCH around us that isn’t seen, unless we start looking closer to see it. And then, like this moth, once you see it and study it, it’s more likely you’ll see it again. Try not to miss anything, try to capture it all and the best way is in a sketch journal!

(No moth was harmed in the making of this blog entry, the names were not changed because he’s not innocent, he’s guilty of being “Beautiful” heehee)

The following pictures go to glossy Note Cards I created using my painting and photographs of the moth. Please have a look and share the links with nature loving friends you think may enjoy them!

**

**
**
**
**
This one has customizable text!
**
And here’s the last one!
Let me know if there’s anything you want created or customized in my shop, I’m glad to do it for you!