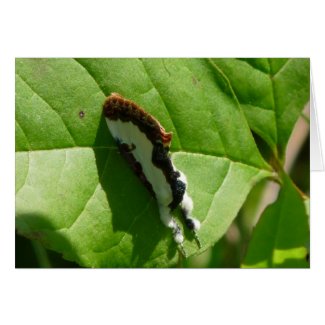
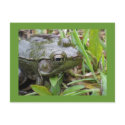
Yes I know, what a name! This bug is a type of “Shield Bug”, so named because when viewed from above it looks like a shield. I don’t have a definitive identification on it but closest I could come was a type of Stink Bug.
My sketch page with finished paintings of Stink Bug
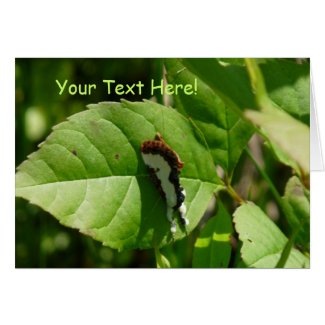
This one I found was much smaller than others I’ve seen in the garden, you can see from the picture below. I put my subject into the “Crisco” container that I like to use for bug study and photographing. It crawled around constantly and was a real challenge to draw!
Stink Bug and sketch book
Below you can see an experiment I tried, I colored swatches of watercolor pencil on a heavy piece of watercolor paper. I used it with a waterbrush to paint the Stink Bug studies. I wanted to try it because it’d be great to take along right in my sketchbook into the field. It worked pretty good for small studies and I’m going to try it out some more. It helped to mix the colors on a small metal palette to the side to keep this color palette clean.
Watercolor pencil palette and waterbrush
Another tip, if you need to show some white highlights you can carefully scrape off layers of paint using a very sharp blade. This was just a small penknife I sometimes have in my field bag. Scrape sideways, gently and repeatedly to remove layers; sometimes scrape the opposite direction to remove it.
Scraping with a sharp blade
Here’s a bunch of pictures of the interesting little bug. If bugs aren’t your ‘thing’ I want you to just take notice of a few things. You can appreciate some things in insects that you may also appreciate in birds. What catches me about birds is how you identify them by checking their shape, patterns, colors and behavior. Well the same is true of insects; you can identify species by their special shape, patterns, colors and behavior!
Stink Bug 5
This guy has an interesting shape from every angle you look at him. Just check out those red antennae!
Stink Bug 4
And the spotted legs! Looks like he needs a shave! But isn’t it fascinating that it has such pattern?
Stink Bug 3
This angle is very interesting, his head seems to streamline right into his body, and the eyes are right along the edge.
Stink Bug 2
Stink Bug 1
Here we see his pointy shoulders, like he’s wearing football shoulder pads! And I love the pattern along the edges of his back. Can you see the fine veins patterns in that little section at the bottom of his back, that’s part of his wings folded up. His underside was a gorgeous light green that reminded me of marble, but it was hard for me to capture as he kept running around! After I took all these photos in the garden, he flew away, I think just to show off!
Hope you enjoyed my insect study, I’ve been on a real bug kick this summer! More coming!
PS. I have a Flickr page that I’m trying to add to when I can. Check it out here.
I thought I’d include a post about my photography equipment, that is my cameras, and then later I can expand a bit by giving tips about how I use them. Mostly how I use them in the field for reference photos but maybe some of my tips may help someone out and that’s a good thing! When I do a post that includes something useful about photography, I’ll link it to the category on the right under “Lessons + how to’s > Photography”.
I consider photography to be a hobby, though I sell lots of note cards and gifts with my photos on them (see my Photography page here), I still like to take pictures just because I love doing it. I love traipsing through a field following behind a flitting butterfly, or capturing a bird up on a branch (not blurry while hand holding my camera) or wading around in water studying frog eggs and frogs, all while smacking at mosquitoes, black flies etc and sometimes balancing my sketch book! I LOVE IT!
I have learned to put picture files into different folders on my computer under Reference photos. Wow my collection of reference photos has grown and I could use it for painting for quite some time! I say it’s best to study from life, but take pictures too if you can, to study later, they are loaded with information.
Here’s a few pictures of my simple cameras I use right now when I go in the field to sketch or just shoot pics for references and study. I have a long lens and tripod I’ll get pictures of later to include.
my Panasonic Lumix DMC-FZ28
I just love this camera! It’s lightweight but takes great shots. I put a different strap on it using one from some other bag that’s nice and long. I wear it across my body, not hanging from my neck; this way it stays relatively out of the way and doesn’t strain my neck. I put special little rings on the clips from a binocular strap I got, it allows more movement of the strap without stress on the clip. Do you see how I put clear tape on the clip too, that’s to keep the clip from slipping off the tiny rings.
My Lumix is pretty lightweight and not too bulky
You can see it fits in my hand and sometimes I hold it up to take pictures of myself working, a little awkward but it works. It has automatic settings and manual, I use both. Most of the time I use the “Landscape” mode because it has super zoom capacity (that’s as far as my tech talk goes!) on that setting. From there I select manual only when having difficulty getting the auto focus to ‘see’ what I want it to focus on. That’s a lot tougher to use! More about that another time.
My tiny Olympus FE-220 7.1 megapixal
This little camera deserves a gold star! I’ve had it years and years, use it all year round and never fails me! My favorite thing to use this camera for is close-ups. It has a Macro and Super Macro, I always use the Super Macro. There is no zooming on this setting you just get as close as it allows you and snap. It’s just great for bugs and for peeking under mushrooms where a larger camera can’t go (or you just can’t get your head under with it!) I’ll show you why I have the super long lanyard on the handle later.
The backside of the tiny Olympus.
This is the backside, small, easy, compact. I put some of that special ‘stuff’ on the viewing area, ahm…bought it in an office supply store, I’ll have to look up what it’s called. I put it on all my cameras.
Then there's always the cell phone camera in a pinch!
And then there’s always your cell phone in a pinch. They take better pictures than ever, but it’s hard to see what you’re shooting when outside, but sometimes it’s fun to take a picture and upload it to facebook immediately so your friends can see what kind of trouble your getting up to! (or just wish they could be there with you walking in the fields!).
I also have a Cannon 20D that is just a beautiful camera and takes marvelous pictures, but I don’t use it anymore. I have given up the extra weight so I can carry my art kit, I have to be careful how much weight I carry because I get trouble with my neck and back if I don’t.
(Click on any picture to see larger, picture links at the end of the post go to my shop, enjoy!)
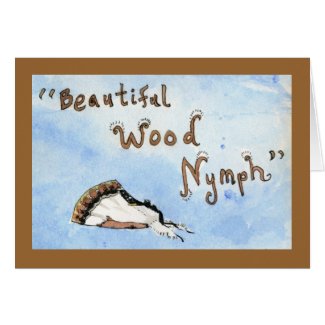
The "Beautiful Wood-nymph" moth...my newest discovery!
As your family and friends get to know how much you love to study new bugs and things, they will start to point things out to you that they find. This is great because it’s more ‘eyes’ watching for things than just your two. Well my son Paul, home from college, said there was an interesting moth on the back screen. I didn’t pay much attention until he again said, “Mom, you really should look, it’s really different looking!”
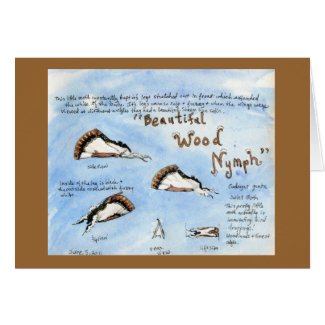
My two page spread of studies from life of the moth.
Glad I listened and glad I looked! It was a small moth who must have made it’s way onto my porch looking for the lights. Above you can see how I used two pages of my sketch book journal to do studies. I’ll share with you the steps I usually take when I find a new bug to study.
View from above taken with my tiny Olympus camera.
Before anyone gets their portrait painted, I get as many photos as I can to file for references, maybe for a future painting or at least to properly identify it. I usually have some plastic containers around that I use, this one was perfect, it’s from a “Crisco Sticks” shortening package; the kind you buy with three sticks in a pack and they’re easy for measuring. One of the plastic containers has a lid and the whole thing is nice clear plastic!
View underneath the moth, many times reveals a surprise color!
I also have some fine mesh that I can put over the top with a rubber band, I never want to kill the creature (unless it’s a house pest, I may not be so nice then!) I love using my tiny Olympus camera to take the close up photos, it works great on the macro setting. This shot is through the bottom of the container. Another tip, I go outside into the natural light if I can to take pictures, the color is always so much better; this was taken in bright sunlight.
This is my set up showing how I positioned the moth under a magnifying glass.
This photo shows you my set up for drawing. Now that I have lots of pictures to save, I put him under an old magnifying glass that stands up and start sketching. Do you see there is no lid? The moth was staying put, maybe because of the light, so I kept the lid off to work. I start with a light pencil sketch and then use permanent ink (you can see my pen in the background, this was an Itoya Finepoint System .2)
I did a 3/4 view to show another angle.
This is a close up of one of the sketches, I try to do different angles to show various aspects of the bug. I thought the furry legs were fascinating! (and made it look ‘cute’ actually!) I colored him in after drawing with the ink, but sometimes I do it in the opposite order. I laid the washy blue background in after I colored all the moths, I wanted it to be lose and just ‘pretty’.
View from above of the Beautiful Wood-nymph.
What an appropriately named moth…”Beautiful” really is in it’s name!
Beautiful Wood-nymph in the 'wild' on a leaf.
Now here’s the cool part of my story! I went for a ramble the very next day, hoping to find some interesting butterflies to photograph. I was into the first pasture and saw a tiny fluttering in a low plant, I watched for where it seemed to end up then just studied the leaves and grasses, looking for a butterfly. See below:
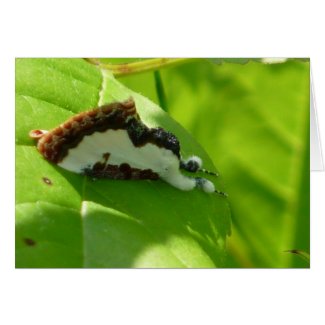
Hiding down low in the grasses, can you believe I found him?!
Ok, I’ll brag a little here, I think I have good eyes for spotting things, because I found him! Hiding amongst all those grasses and leaves. Can you see how well he can blend in, but then, not totally.
Another shot showing how well they hide on the leaves!
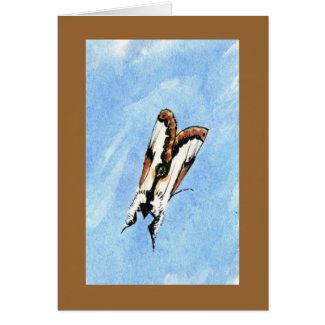
Then he flew around again and re-landed; this shot shows him pointed downward, always keeping his legs stretched out in front.
The Beautiful Wood-nymph imitating bird dropping, that's his job!
When they do that, it makes them look like bird droppings and that’s their defense!! I’ve seen pics in books about such things, but never saw one myself. Though he imitates such a yuchy thing, the moth itself is really pretty! I enjoyed studying how the wing pokes up through with a curling flourish and the fuzzy legs that remind me of a Poodle dog. The wings had a sheen in the sunlight that looked like white satin.
The big thing all of this made me realize, was that I’ve been living here for about 17 years and I never noticed one of these before! Well, much of that time I was busy raising my boys, taking care of animals and whatever else. I didn’t go out walking in my fields all the time as I do now. What I’m trying to say is there is SO MUCH around us that isn’t seen, unless we start looking closer to see it. And then, like this moth, once you see it and study it, it’s more likely you’ll see it again. Try not to miss anything, try to capture it all and the best way is in a sketch journal!
(No moth was harmed in the making of this blog entry, the names were not changed because he’s not innocent, he’s guilty of being “Beautiful” heehee)
The following pictures go to glossy Note Cards I created using my painting and photographs of the moth. Please have a look and share the links with nature loving friends you think may enjoy them!
(I wrote this at the very end of May and wanted to share it with you before it gets too late!)
I took a walk out through the fields today to “Aspen Hall”, just for a bit of exercise and to enjoy the sun. Along the way I discovered some beautiful butterflies, though it’s tiny, the “Pearl Crescent” was so pretty when you look at it on zoom!
A beautiful little butterfly called the Pearl Crescent
When we got to Aspen Hall, I did a very quick sketch using my watercolors and waterbrush. I say quick because the mosquitoes were finding us fast! The picture below shows how I held my palette as I worked.
This is how I held my palette while I stood and painted.
You can see the last post I did on Carpenter Bees there to the left. I also always make a little pen holder with clear tape on my sketch book.
This is the water brush I used to do the whole painting, a big flat.
Here’s a picture showing the big flat waterbrush I used to do the entire painting. The flat was great for making the marks on the trees and I used the corner when I wanted to make small marks. (If you click this pic you’ll see a really cool note card I created where you can put your own text on the palette!)
Painting and notes done while standing in "Aspen Hall", watercolor.
This is the page I created with my notes and watercolor sketch. Click it to read my notes, the black flies were terrible, biting me and being pests! It was hard to paint, but I’m happy with the little watercolor sketch. Standing still is great for seeing and hearing birds, they were all around me.
Ginger gives me a toothy smile and says, "Hurry up already!"
And there’s Ginger, my faithful Aussie! She’s just looking at me saying, “Are you done yet?” 🙂
A footprint in the mud from ?
Here’s a cool footprint I spotted in the mud in “The Maze”, another area on my land. I have to look it up, but I’m thinking Opossum? Skunk?
Another Leopard Frog friend!
Could I take a walk on Long Lane Farm and NOT see a frog? I don’t think so! This is one of the most popular kinds here, the Leopard Frog. Isn’t he handsome? (oh it could be a female…can a frog be pretty?) I just love the spring greens, olive greens and bronze of their skin; in the sun it really is metallic!
A female Baltimore Oriole looking for food in the bushes.
A great capture, photos of a female Baltimore Oriole searching for seeds on this wild bush in my field.
Another shot of her as she searched for food.
It’s interesting to observe ‘garden’ birds further afield than your backyard. Seeing her feeding on native bushes, bugs, seeds….whatever she was eating she was very busy doing it.
A collection of leaves I picked while sitting in one spot.
After painting I sat for a few moments in Aspen Hall, I looked around me at all the green plants. It didn’t look like anything interesting to paint or draw, but, if I had students with me I’d challenge them to find as many different leaf shapes as they could to draw. I picked one of each just within my own reach and look how many I found! It would be nice to do as a lesson, ignoring color and talking about shape, and some botanical terminology.
I hope you enjoyed this (short) walk today! Wait till you see the next post, a new moth discovery for me!
BTW here’s a new page I created called “My Photography Equipment” to show what cameras I use when I go out walking and exploring, I love ’em!
I thought it’d be fun to share with you my newest journal I just created, well at least the cover, while I work on the next post waiting in the wings. I don’t usually bother much with decorating the covers because I care more about what’s on the inside and use them in the field. But I have noticed as I make more journals, they are getting more attractive, colorful and fun to look at. I can’t speak for other artists who journal (sketch journal), but it becomes a very important part of you, so why shouldn’t you make it something you like to look at?
Swirls and bubbles of green and gold
I made it from colored mat or mount board (for matting/mounting drawings and paintings). It’s a lovely shade of green and I made the spine a different green. I wasn’t sure what I was going to do with it, but then thought it’d be fun to play with color pencils.
So as I watched a movie on Youtube, I drew some swirls,
that turned into curls…
and some dots that looked like spots…
then some scrolls filled with green and gold….
And I used a new landscape format for this book, for me to fill and you to look.
My journal open, landscape format
I think this is the first time I created a journal that’s a ‘landscape’ format, it’s spine is on the short side. It’ll be interesting to see how it fills out!
Sketch journal front cover
When I was done I covered the whole surface with wide, clear packing tape you can buy at any office supply store or department. I found the Scotch brand actually was nicer to work with, heavier and stickier than the store name brand.
Sketch journal back cover
I lay the tape on overlapping edges, and then burnish it by rubbing with my fingernail or the bone folder tool I have, you could use a spoon too I guess. (ps. the color looks different here because I shot it in different light with a different camera.) I can’t wait to finish my present sketch journal so I can start this one!
This design was so cool on front and back, that uploaded it to my Zazzle shop and created some neat things with it, even a skateboard!! I’d be so pleased if you had a look, tell me what you think.
Click on any of the following pictures, there’s more there than what I posted here:
I’m going to get one of these for grocery shopping!
I love this little heart sticker, you can choose different shapes with this design, I thought the heart looked nice. It’d be great as an envelope seal.
Sometimes it’s good to take a break from always studying how to draw a subject and draw something free hand like this. It’s a different kind of activity for the artistic brain and I think very healthy! It can be very freeing to work on. If I was an “Art Doctor” I’d recommend adding this to your diet, some abstract designs for good digestion!! 😉
What did you think I’d be doing on Mother’s Day? It was gorgeous outside and I had the day to myself until later when my son comes over, so off I went for a walk with my sketch journal!
female bluebird I met along the way
Along the way I captured this shot of a female Bluebird, I’m so happy it came out. I didn’t use my long lens today, so the camera was actually easier to hand hold. (click to see as Note Card where you can see up close)
My watercolor crayons in a vinyl case so I can scatter them as I worked.
I was thrilled to find that the land on one side of the field was actually sort of dry. I mean I’ve been wading through water for weeks now, so any dry grass was pretty great. Before walking at all I decided to sit right down and have a go with my kit. I knew something would strike me. Above you can see something new I tried that worked great; I brought this empty vinyl case along and when I was ready just opened it and put it on the ground. I took my watercolor crayons and set the box right inside it, as I used colors I could just plop them in front and find them easier as I worked. This would be good to use for the watercolor pencils too, as they get lost easily in the grass.
Putting color down around a round plastic shape.
I wrote some notes at the top of my paper as I sat, not even caring about painting, just enjoying the great weather. Then I decided I’d try to put a landscape but leave a circle in the foreground to fill with something. I have a piece of plastic I cut from a plastic milk carton and just filled in green watercolor crayon around it.
Blocking on more green for grass, sky has been painted a bit.
As I decided where my horizon line would be I colored blue in the sky, leaving the clouds just blank paper. (lately I’ve been doing them with white wax to ‘block’ them out using a resist method, this time it’s just bare paper) I then brought the green up as far as I thought it should go, then wet my paper with the big brush to blend all and used a brown crayon to put trees in on the wet paper. I like how sharp the trees can look if you put them on wet paper; if you draw them dry first and then wet them, they can get fuzzy looking.
My set up on the grass, balancing my sketch journal on my knee.
Here’s my set up, as I sat on my piece of vinyl and kept everything in easy reach. I actually leaned on one elbow to do most of this sketch, and quite smartly tucked an empty sandwich bag under my elbow. By the time I was done, my elbow would have been soaked!
The real scene behind my sketchbook, the clouds have already floated by.
So here’s the sketch with the ‘real’ scene behind it, I don’t really like the greens of the watercolor crayons, but more practice will help. Sometimes I admit I could do a better job but when working in the field either the weather is too cold or my back hurts then I just want to hurry up. So I try to work fast, I can always touch up later if I want, or leave it as a study.
This is the page as I finished it in the field, dandelions and all.
This is my study finished in the field, I decided to put dandelions in the small circle as they were everywhere. First I lightly sketched in pencil then went over it with a brown Windsor Newton Permanent ink with a dip nib pen. Then I colored them in by touching the brush tip (a finer one) to the crayons then painting. I colored the letters the same way using a blue crayon. I really want to go back and tone down that green on that grass! Yikes!
Field sketch after touching it up back at home.
Well here’s the sketch after I got home and touched up the greens and added the yellow dandelions.
Leopard Frog
On our way after that sketch, I kept seeing Leopard Frogs. If I stood still I would start to pick them out of their hiding places.
Leopard Frog
I was really getting good at it! As you walk by they get scared into the water…then if you stop a few steps away, they would seem to appear everywhere. I imagined a funny cartoon of a photographer stopping to look for frogs, the way in front of her clear, but behind her all these little heads popped up in the water! haha, well it’s me of course!
mystery water bug
This was really cool, I noticed as I stood watching for frogs without moving, a little something moving in the water below me. I swore they were just catkins from the tree floating along the bottom, but it’s a standing pool of water and instinct told me otherwise. I bent over and kept watching them and remembered reading about larvae that formed cases by ‘gluing’ stuff around them. I got this great shot of it actually poking out of the case a bit! I am not sure yet what it is, have to look it up.
Long Lane green and lush.
Here’s Long Lane on the way back home. It’s green and lush in this very wet spring we’re having. It’s a bounty for the frogs but that means soon will come the mosquitoes too!
I hope you enjoyed this springtime walk with me and my sketching. I hope you go out and capture some nature the way I did, just stop and stand or sit still and you’ll be amazed at what you notice.
A post sharing my notes and photos from a cold, wet walk on Easter Sunday. I was still able to find interesting life, wait till you see the video clip with Tadpole eggs! Please click images to see them larger or be taken to see them as cards you can zoom in on, use the BACK button to return.
Easter Sunday 2011
Below is a picture of what it looked like when I was sitting on a pile of dead logs, my rubber boots deep in water, and trying not to drop anything! My hands were cold, as you could guess from my trusty wool flip back mittens. This is just a small, quick sketch done with watercolor crayons.
Watercolor crayons, brush and journal on my lap above the water.
Then I video taped the little tadpoles floating in the water here in front of the pond, have a look!
By the time I got to Oak Lane, where the wild Mayapples grow, I was tired and cold.
A sea of green umbrellas, like little people waiting in the woods!
I was excited to see the Mayapples though, they always surprise me as they don’t grow anywhere else on my land. They look like a sea of green umbrellas held by miniature people standing in the woods, maybe they’re fairies?
Mayapples softly unfolding.
Mayapple unopened yet, such a tender green with hints of reddish tints.
Below just a few small sketches done while standing and looking down at them. I had to give up soon though, my back was seizing up saying enough!
Mayapples + Green Frogs
I was excited to find a Green Frog in the pasture on my way back, he was moving slow because it was so cold. I was actually able to snatch him up after he dove under water! heehee…I felt like a little kid!
Meet my new friend, Mr. Green Frog
Always gentle with creatures I touch, I was careful how I held him, and with experienced deftness (;-) ) whipped out my tiny camera and got some close up shots of him.
Mr. Green Frog poses for his 3/4 profile shot!
Don’t worry, I didn’t entertain thoughts of kissing him! I already found my prince! But I do think Mr. Green Frog was trying to look handsome.
Green Frog in the grass
Then he was gently returned to the grass and as many frogs will do, just sat there while I continued to snap pictures and also do the small watercolor sketch. They believe themselves to be invisible while not moving. Here’s a tip from me, when photographing a frog, or any critter, take some shots right away in case they jump away. Then after you have a few, try moving your position a bit or as I sometimes do, move some grasses that might be in the way. With this green guy, I was actually able to gently remove grasses in front of his face, then from his body as he sat frozen, watching me. It was a cold day so maybe he was extra sluggish. Then he jumped away into the water and I took more shots.
I really do like frogs and feel a bit guilty for not doing a nice little painting for you to see, BUT I was really cold and wet by the time I met Mr. Green Frog and couldn’t wait to get home for a hot bath. I’d like to do some drawings from my photos though, when I do you’ll be first to know!
I hope you enjoyed coming on my walk with me, it was kind of lonely until I met the tadpoles and then the frog. I guess you’re always surrounded by friends if you stop to meet them!
Here’s some links to fun things in my shop with “Mr. Green Frog” on them:
I thought I’d add a series of posts that introduce my new watercolor crayons, a few old ones, and how to start using them in hopes that some of what I do may help someone else.
When I first bought watercolor (or water soluble) crayons I tried them and didn’t like them at all! I thought the colors garish and harsh. I thought “what a lot of money for these little things and I’m not going to use them!”. Well I’ve only recently pulled them back out and have been playing with them. I’ve learned from using watercolor pencils, go lightly at first until you know just what your colors will do when you wet them.
Please click on pictures to see them bigger.
Water soluble crayons in a tin
Here’s the set of colors I started with, Caran D’Ache Neo colors and one or two Derwent Watercolor crayons. I also show a “crayola wax crayon” and explained in another post (below) how I used it. I cut them in half (oh heavens yes I did!) to make them lighter to carry in my sketch bag and I could fit more; here I show them in an “Altoids” mint tin. The other halves go into a baggy for later or to carry in another kit.
I took them out into the field and did some small landscape studies using these few crayons. There are links at the end of my post you can click on to read about them. After doing them I was feeling more enthused about my crayons, I think it’s time to look for more colors!
New Tin of Watercolor Crayons, Staedtler "Karat Aquarell" Neocolor II
More colors in other brands…landscape colors hopefully. I thought I’d try these Staedtler “Karat Aquarell” neo color II, they were reasonably priced online. Because I’ve been desperate for sunshine this spring, it was gorgeous that evening so I sat on my front steps to do my color charts.
New Watercolor Crayons, wow look at all those colors!
Here’s the crayons! Woohoo….they look nice! I’m hopeful that some of those greens might be what I was looking for.
Getting ready to wet the colors and have some fun!
First I want to stress that before you do any paintings with ANY media, watercolors, color pencils, oils etc, you should ALWAYS do some color charts of all your colors. This will help you to get to know the colors as they really look on paper (or canvas) and get familiar with how to handle them.
In my sketch journal, I rubbed a small spot of color and wrote in permanent ink pen the colors name next to it. It helps to also put an initial for the name brand too or label it at the top as I did. Prepare one row and do the wash before you color the next set of spots, just so you don’t run out of room. Keep it neat because you can refer back to these charts again and again as you get to know your colors.
Color Charts of two brands of Watercolor Crayons
After you make your dry spots of color take a waterbrush or regular watercolor brush and water, wet the bristles and touch it to the color spot. Notice how as you ‘rub’ the color it releases and becomes like watercolor. If you rub a lot you can blend the spot right out for an even tone, but leave some intense color there, drag your brush as you rub back and forth, to one side to pull color away. Then lift your brush to stop, don’t rub too far out, keep ’em neat. Now your ready to put on any more spots you may need to and wet them; leave room for labeling them. After wetting a color rinse your brush and wipe or rub on a paper towel to make sure all color is cleaned off it.
As you can see, I did my new crayons on the left, my original crayons on the right so I can compare them.
Color Charts with my comparing colors close together in the centre.
Now to have some more fun, it’s time to compare colors from different sets so I can decide which ones are too similar to carry around with me. This is a ‘getting to know you’ exercise now and VERY important! The more you play with your colors the better your choices will be when you’re painting. Sometimes when I haven’t painted in a certain media in awhile, I’ll go through and do color charts just like this. So you can see the middle is a riot of colors!! I grouped the blues, then greens then browns and goldie colors, all good for landscapes. Label, label, label!!
( I really like how this page looks with all the color swatches, I decided to make note cards and t-shirts of it!! See the links at the end of this post 😉 )
More color play to further test some out.
Ok, then the page adjoining that one had to be used for more testing, wow, am I going to use all these pinks?
My Watercolor Crayons + Waterbrush
After all this playing I ended up with a pile of cut crayons (yes I cut my new crayons in half too! Yikes how awful!) So I searched through my favorite shelf of odds n ends, containers etc for my field kits, and found a plastic case from I think, a small first aid kit. I love that it’s plastic = lightweight! This is a picture from my previous blog post where I used the big flat water brush.
Here are the blog posts I’ve done so far using the crayons, in order of date posted:
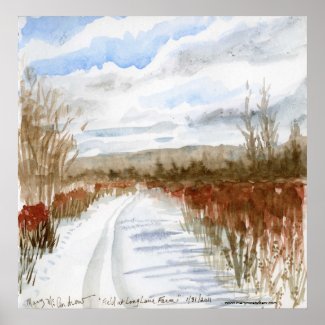
I know it seems out of place, this painting of snow when it’s Spring (at least it’s trying to be spring!) but I found I had never posted this and would hate to have it forgotten! So here’s a short post about a cold, snowy walk in January! If you click it you’ll see prints of it in many sizes.
"Field at Long Lane Farm" watercolor
I did this little 7 x 7″ painting in my journal while standing in the lane that goes out to the fields on my farm. I love the subtle colors of winter, the red tipped bushes and the cool blues in the snow. On a good sunny day you can have to most intensely blue colored skies and high contrast clouds. Not that you’ll ever hear your weather man call them that! “today there’s a chance of high contrast clouds with rain” hahaha.
Seed heads along the walk
Here are some notes I wrote as I paused to look at some dead seed heads.
Watercolor pan, brush and waterbottle
And this shows you what I used, not a waterbrush but a ‘proper’ watercolor brush, just used the one and a plastic bottle for water. In the winter you can’t use the waterbrushes that are so popular as the water tends to freeze as you paint on the paper.
Hope you enjoyed the late posting…I hope we can all say goodbye to winter weather soon!
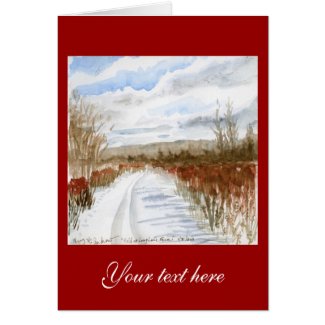
Here’s some prints and note cards of this little watercolor in my shop:
(if viewing this in an email subscription, please go to the website to see the video clip and pictures better)
Clouds Over Fox Lane
Above, this is the first view Ginger and I got when we started out on our walk; clouds, gorgeous clouds stretching as far as the eye could see! I love the way the old pasture fence looks here along “Fox Lane”.
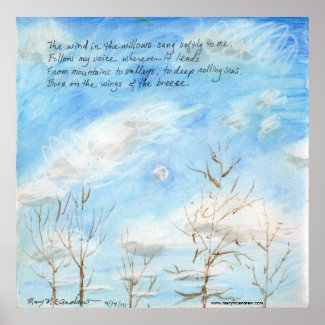
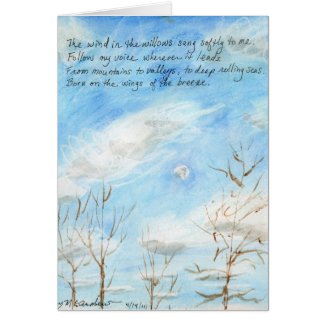
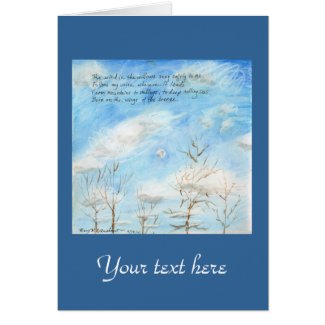
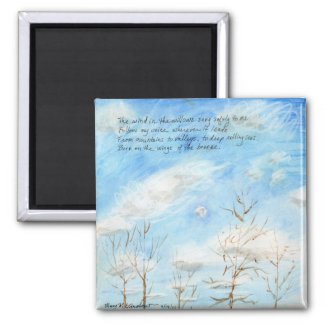
“Wind in the Willows”
I’ll show you right away what I ended up sketching after we walked all the way out on the property. (At the end of my post I have links to note cards and gifts using this image!) I had a page in my journal with the first verse of the song from “The Wind in the Willows”, the popular children’s tv show, written in permanent ink. I knew eventually I’d do some kind of painting over it of trees. I just love the song from this show, I posted a link below so you could have a listen too!
To explain a little how I did the sketch, as I stood in about 8″ of water on a particularly wet path, I held my sketch journal and balanced the little box of crayons on it. I have taken all my water soluble crayons and cut them in half so I could carry more in a smaller space and less weight! I put it on a peice of paper towel to protect a little watercolor I’ve got on that page, and I put a piece of paper towel (Viva) next to the box for wiping my brush on. I used one flat water brush, a favorite of mine when I want to do very quick washes and scrubbing. This particular brand releases water quite fast, at first I didn’t like that but now it’s also why I DO use it!
First thing I did was to scribble with white crayola wax crayon where I wanted to show white clouds. It doesn’t really show up until you color around it, but if you tip your paper a tiny bit you can see it. Then I colored very quickly with two different blue water soluble crayons all around; I found that I could shade right over the white wax and it didn’t really disturb it, cool! Then very quick scrubbing with the waterbrush to wet and move the color around. I grabbed the paper towel and sometimes blotted off the white cloud and it helped soften the look. Using the grey crayon ‘under’ each cloud really helped to pull them out and make them look real.
The trees were drawn on with a brown wc crayon from Derwent, using the hard edge to make branches. It works really great on damp paper, the lines are very vivid. I must say, it’s the scribbley look of the painting that I like so much! I could go back and soften the bottom of the moon, but it was a field sketch and I think I’ll just leave it as is. It was hard to get the look in such a tiny thing while hand holding my journal.
View I painted from while standing in water!
This is a photo from the spot I was standing, can you see the tiny moon in the middle?
A close up of the moon
Sometimes when you’re outside in the middle of the day, if you look for it you’ll see the moon amongst the clouds. I always think it’s a nice surprise.
Ginger all wet!
Yes, Miss Ginger is wet but doesn’t mind. This is the lane I stood in to do my sketch.
An old nest left from last year
I spotted some old nests as I walked, this one was out near “The North Pole”, the furthest part of my land. It’s amazing how many nests are at our eye level but we don’t see them when the bushes are in full leaf.
Clouds in Spring Over the Lane
I’ll leave you with one more pretty picture. I just love the colors in this, the blues contrasting with the golden colors of the dried grasses, the reds in the tips of the bushes and trees and the purpley colors under the clouds.
I hope you enjoyed our walk again out on “Long Lane Farm” at Springtime. Please enjoy the pictures links shown below, they go to prints, note cards, tee shirts and a magnet using my “Wind in the Willows” field sketch painting, in my shop. I can’t wait to order a tee shirt for myself!
Visit mySHOP to see many beautiful note cards with photos of the new Spring flowers, bees, landscapes etc!
The most up to date information about my artwork, nature sketching adventures, or step by step demonstrations. Search using Categories or Tags, or use the search box in the left column.
Please sign up below to get notified when I post new articles.
stink bug")


re")
re")
re")
re")
 re")
Beautiful Wood-nymph cr4")
Beautiful Wood-nymph")
Beautiful Wood-nymph for sketch 2")
Beautiful Wood-nymph for sketch cr")
set up")
Beautiful Wood-nymph cr4-1")
Beautiful Wood-nymph cr5 cr")
Beautiful Wood-nymph (21)")
Beautiful Wood-nymph (28)")
Beautiful Wood-nymph (14)")
Beautiful Wood-nymph (5)")
 Pearl Crescent")
 journal + palette")
 WC Palette 2")
Aspen Hall wc")
 re")

Leopard Frog 1_5-25-11")
 cr re")


 re")
 re")
 re")
sketchbook (6)")
sketchbook (8)")
sketchbook (10)")
Mother's Day 2011 ed2")
 re")

 re")
 re")
Easter Sunday 4-24-11 pg2 ed1")
 re")

 re")
 re")
Easter Sunday 4-24-11 pg3 1ed cr")
 re")
 re")
 re")


My WC Crayons + Waterbrush (7)")


Clouds Over Fox Lane")
Wind in the Willows")
View I painted from")

_resize")
_resize")
Clouds in Spring Over the Lane")