|
|
Here’s a post I wrote from July, never too late to enjoy a bit of sun I guess!?
July 16, 2015
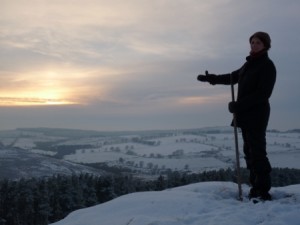
Did I tell you how much I LOVE living here in Northumberland? I did? Well I won’t get tired of saying it or doing my sketches out in the field.
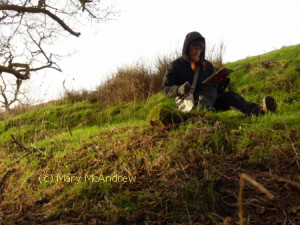
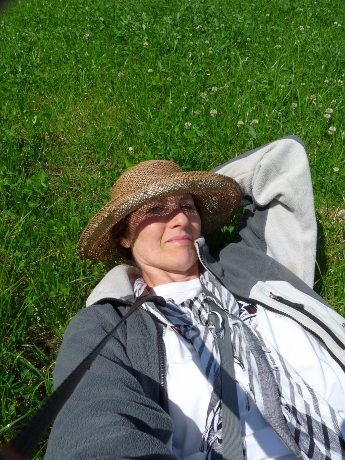
 Taking a rest, enjoying the day, in my barn boots of course! I went up in the field near Edlingham Castle, I had it all to myself, no sheep or cows about. It was just that kind of day that I sat on the ground to think, listen to the birds and enjoy just living. Then I just lay back and put my straw hat over my eyes and let time slip by, and it was ok.
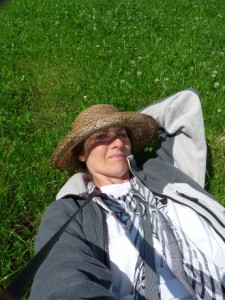 Trying to take a selfie with a 35mm isn’t easy! Laying down amongst the clovers, it made me feel like a kid again. Isn’t that funny? I should go lay in the grass more often! Maybe we could start a national “Lay in the Grass Day”! haha.
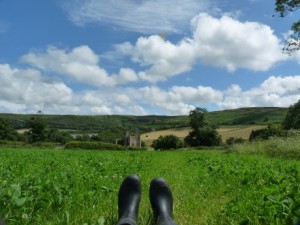
Below is a picture of what it looked like, my view from the grasses, the clouds were so beautiful.
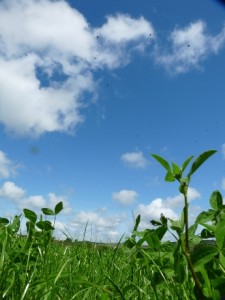 My view from the grass, my mouse eye view. And below, this is what I saw near me, a Ringlet butterfly, a very common sight in the fields here in summer. I’m really enjoying learning the new butterflies and bugs here in the UK.
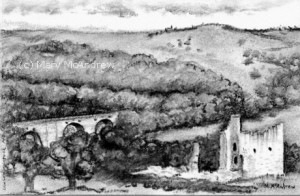
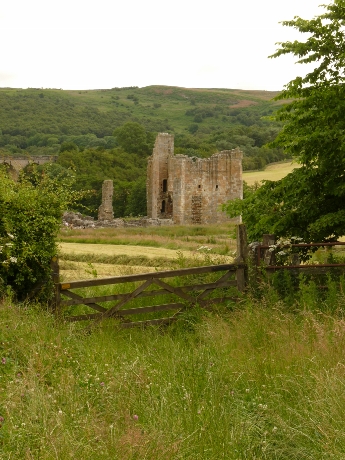
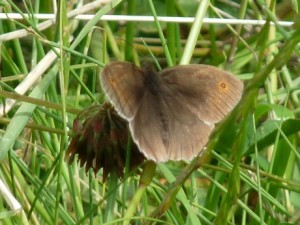 A Ringlet butterfly on a clover head. Well I didn’t just lay around all day, after a little while I went down the field, found a spot to stand and did a small painting. Below is a picture of Edlingham Castle, this was what I drew. You can see by the photo, the lighting never stays the same when you’re painting outside. My painting ended with nice blue skies and sunshine!
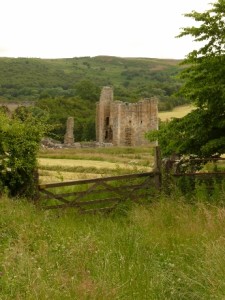 Edlingham Castle view from field. Below is the ink drawing I did first. Sometimes I do an ink drawing then paint with my watercolors, especially if I don’t think I’ll have time to paint it. The other way is to do a light pencil sketch and then paint, drawing with ink a little for details on the pencil before or after painting.
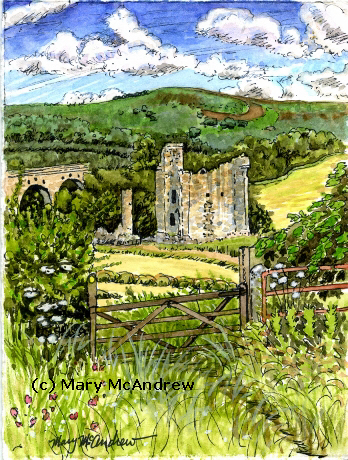
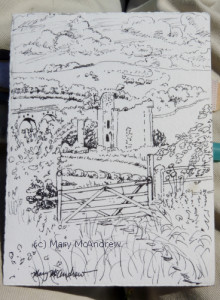 Ink drawing of Edlingham castle, over the gate. Below is my finished watercolor painting, only 4.5″ x 6″. You can see how bright the colors are, the day really was so bright, unlike the photo! The ink drawing makes it look more like an illustration than a painting to me. Kind of like all details are picked out at once, but that’s ok.
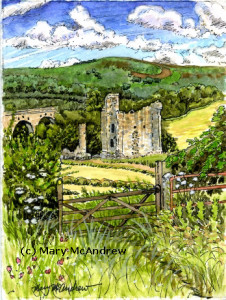 Edlingham Castle, Northumberland. Watercolor and Ink 4.5″ x 6″ I hope you enjoyed a little look back into summer! If you don’t want to miss any of my posts, just put your email in the box at the top right column. It’ll send you an email notice and you just respond then you’ll get my posts right in your inbox. Remember though, it’s best to click to come here and read the post, it lays out better on the page (and you can leave comments here).
I wrote this post way back in July, when it was sunny and warm, now here we are at the end of October! I still have new drawings and paintings to share, it’s just been more hectic than I expected! I’m still settling into this new life, trying to learn how to drive standard (badly!), finding a new accountant, and not being able to find some of my supplies because many things are still packed and stacked in plastic bins! But what has been most excellent is our walks near our home and a few trips to the Lake District. The greatest joy Gary and I share is our love of walking in the countryside. I’m overwhelmed with subject matter, it’s just finding time to sit and work.
So, on to my July post! Please click on the pictures to see them enlarged and clearer, enjoy!
(July 2015) I’m very lucky to have an ancient castle near where I live. I can go visit the site and walk around it, or view it from the fields.
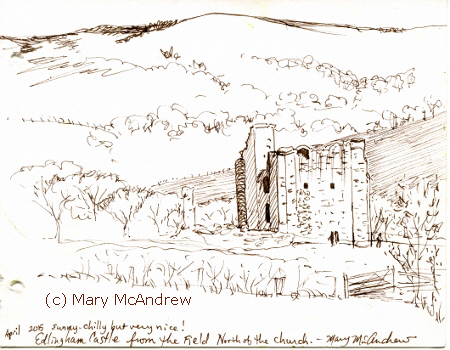
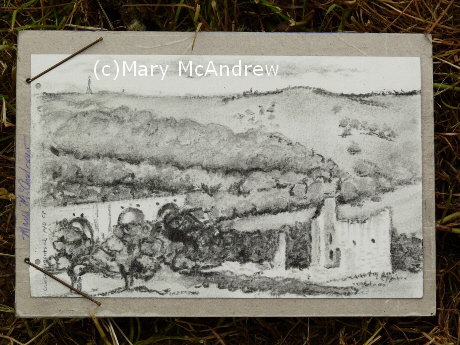
 Brown ink drawing of Edlingham Castle done in the field in April 2015. I did this drawing in brown ink (Faber Castell Pitt pen) while standing in the field where only local villagers usually go, way back in April. It’s great to switch your mediums once in awhile when out painting. I think it’s great ‘brain training’ as you have to approach it in different ways, seeing shapes, values, lines, textures and measurements; and thinking what you will use to capture that.
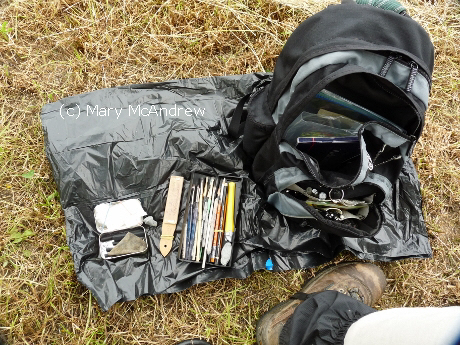
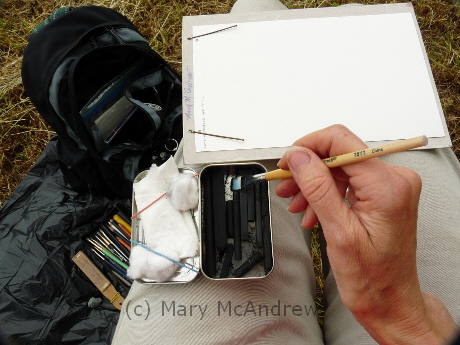
As I am settling into my new studio space here in England, I am still re-organizing my ‘stuff’ and wanting to play with materials I’ve had packed for ages. One of those is charcoal, I haven’t really used it in a long time so lately I’ve been rediscovering it. Below I’ll show you how I did another small drawing of the castle en Plein Air or sitting in a field with my art kit.
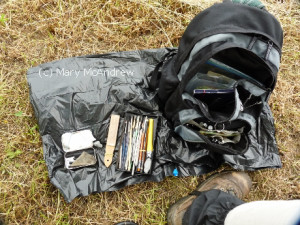 Sometimes I set my stuff out on the ground, this is charcoal drawing supplies. This shows my small backpack, a big lawn + leaf type garbage bag, Altoids tin with loose charcoal sticks and one plastic box with charcoal pencils, tortillions, brushes, sandpaper and eraser. I almost always stand when I work but today I had a small folding camp stool to sit on. The garbage bag is great for when you want to throw your backpack or kit on the ground and it’s all damp OR use it for sitting on.
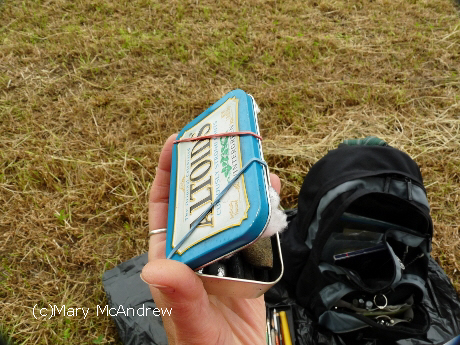
 Here’s part of my field kit for charcoals, good ‘ol Altoids tin. And the ever popular ‘Altoids tin’, once used by me for watercolors but now I put my charcoal sticks in here. The rubber bands on the lid are holding a piece of paper towel and some cotton balls in place.
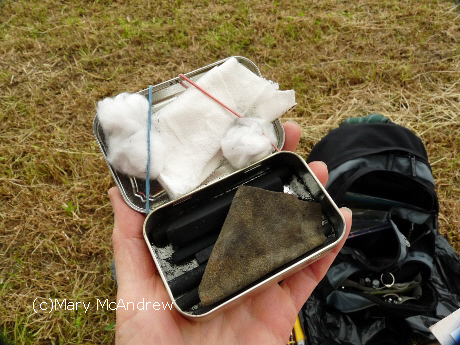
 Here it is open and ready to use; I put the messy hard and soft sticks in here. The base holds an assortment of soft vine and compressed charcoal sticks also a piece of chamois for blending and shading.
 You can use the ‘messy’ charcoal powder in the tin to draw with a brush. When I sharpen points on sandpaper I let the powder fall into this tin and then it’s great to pick up with brushes for shading. A great way to start your sketch with soft blocked in areas of value, using soft or stiff brushes.
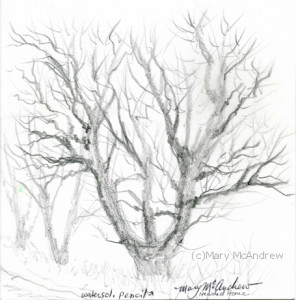
 Work in progress, my support is just the cardboard back of a sketchpad. Above here it is almost finished, just a few touch ups and strengthening of darks and details to do.
 Charcoal drawing of Edlingham Castle, July 2, 2015. And it’s finished! I hope you enjoyed seeing some of my kit and how I worked. I’ll try to post more of those sketches I’ve done! Leave me comments below, I love to hear from you all.
And my other facebook page: Mary McAndrew Painting and Illustration
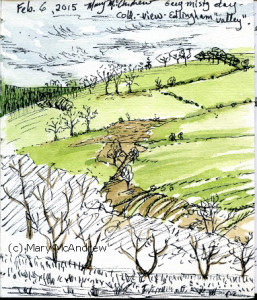
As I was looking through my small sketches and watercolors from this spring and early summer, I found I have many that are of distant views of the hills. Scenes that are all around me here in Northumberland England, just drive anywhere and you will always see some far off huge hills in the distance that all the locals can tell you the name of. Yes, all have names, very old names! It’s fun to learn the silhouettes and names of them.
Our favorite thing to do is walk up any of the high hills and see into the distance; can you believe we can see all the way to Scotland!? You don’t have to climb a high hill to appreciate the views though, even walking on the upper lane out of our village gives you views across Whittingham Vale or up to Corby Crags.
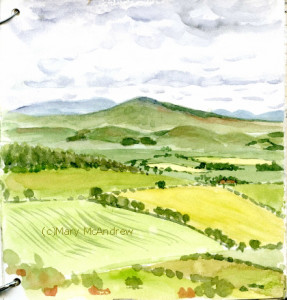 View of the Cheviots and Glanton area in the Whittingham Vale. The tiny watercolor sketch above is from one of my morning walks along the upper lane of our village. The blue hill in the distance on the left is actually two hills in the Cheviots, one being “The Cheviot” itself. The hill in the center I’m pretty sure is Low Pyke in Glanton, the next village that you can see across the valley. It makes you realize that all the way back to bronze age man, people must have named the hills and used them for direction.
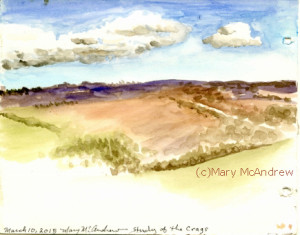 Study of Corby Crags in watercolor, March 10, 2015. This little study above is of Corby Crags, as seen from my side yard in spring. It’s just a quick watercolor sketch to practice clouds and colors, but I remember standing there doing it on a sunny day in March, when winter was breaking.
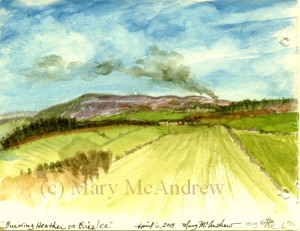 “Burning Heather on Brizlee”, watercolor field study, April 6, 2015 This one was done while walking along our upper back lane, I saw smoke from a fire in the distance and stopped to record it. I leaned on a big field gate as I looked past the buildings in the foreground to the long hill in the distance. My husband told me they were burning heather on the moors up on Brizlee, this is to promote new growth of heather shoots for the grouse and partridges (all for the hunting season). This hill I realized later when I looked on a map is all the way in Alnwick, the next village about 6 miles away!
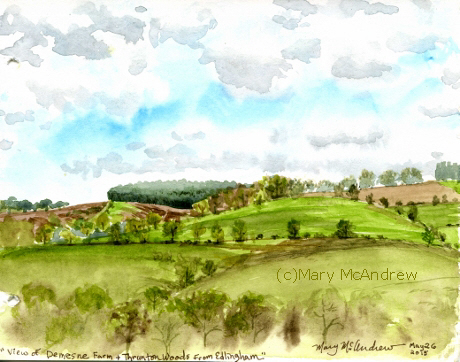
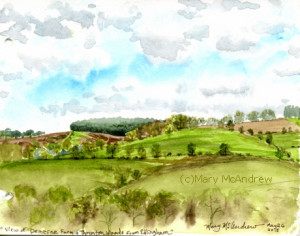 “View of Demesne Farm and Thrunton Woods”, watercolor, May 26, 2015. One of my favorite things here is to watch the clouds cast shadows and patches of sun creep across the face of the land. Where the sun goes the greens and golds of the land come alive, it’s so dramatic! The little 5 1/2″ x 7″ watercolor above I did while sitting on the side bank of the road out of our village looking towards Thrunton Woods and Demesne Farm. It’s one of my morning walks that is relatively short but always windy when you get to the top. I don’t think I’ll ever get tired of this view!
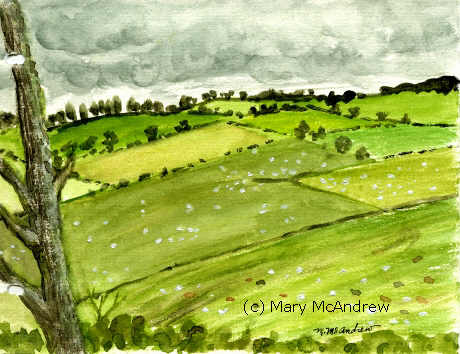
 “View From Edlingham Lane” watercolor, July 21, 2015. This 4 1/2″x 6″ study was done on the same lane but just a week ago. I was near the top of the lane where you really get hit with all the wind sweeping across this valley. It was a misty day and my hands got cold and stiff, yeah even in July! As I painted this it started to rain (see the approaching clouds?) so I quickly put my kit away…then it stopped….so unpack the kit again! The weather here is just like that, dress in layers because when the sun comes out you’ll get so hot and start peeling off jackets, but as soon as the clouds come it’s cold and there could be a surprise sprinkle in that cloud. I usually bring more than the average walker because I end up sitting or standing still a lot and it gets cold when you don’t move around.
Next post I’ll share more photos of my surroundings, but still so many sketches to share too! Besides sketching I’ve been busy testing watercolor paper so I can dig in and concentrate on my illustrations, I also got a new watercolor field box that I’ve been using and love. I’ve been recording (with photos and sketches) the local flora and fauna (would you expect anything less from me?) So far I have positively identified 51 birds, 46 different wildflowers, 10 butterflies, 3 moths and any number of unidentified insects, moths, plants etc. It’s exciting to be in a new country with all these new things! I’ll share more of this coming up, stay tuned!
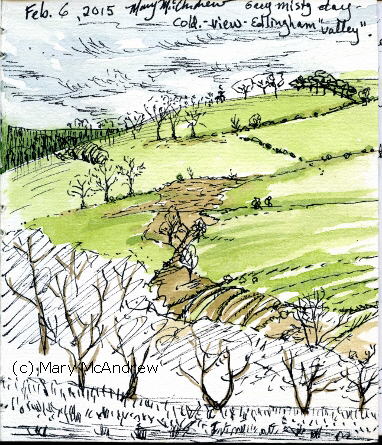
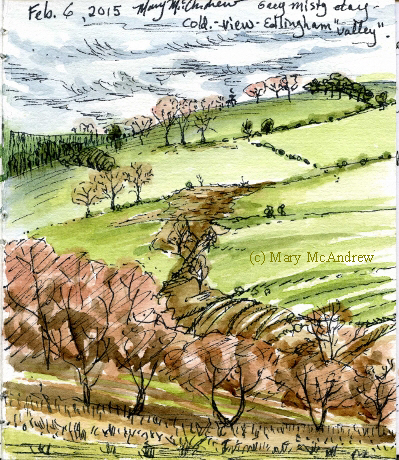
Ok, so I know it’s summertime so why am I talking about spring? Well I still have sketches and paintings to share that are from late winter and spring before I share my recent work. You’ll notice my winter and spring sketches were all quite small and not as much watercolor going on. As the weather warms up, and thus my fingers, I start to do more. Lately I’ve been doing some charcoal drawings too, but lets not get ahead of ourselves…spring first!
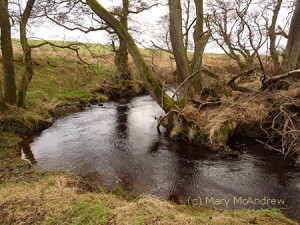
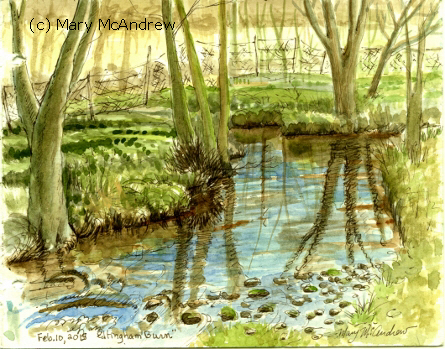
 Watercolor of Edlingham Burn, February 10th in Edlingham village, Northumberland. Above, here’s a small watercolor I did while sitting by the burn or stream that runs through Edlingham. The painting is just small, about 5×6″ or so, but good practice to paint the green trees and blue and brown water. Well actually the water is quite clean and clear, it just reflects all that’s above it! I really enjoyed the sun that day though it was still cold, so I finished the painting at home.
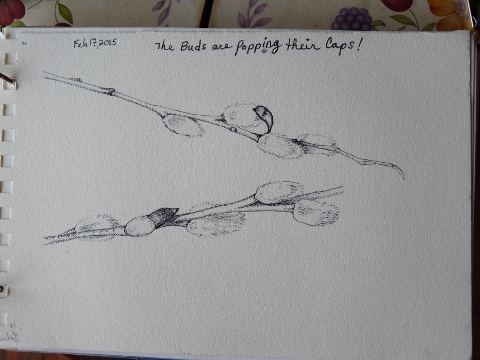
 Fuzzy Buds drawing in ink February 17, 2015 I just love when native bushes bloom with soft fuzzy buds in springtime. They have little shiny, leathery looking caps that their fuzzy little heads push up as they swell to bloom. I brought some twigs in to draw; if you put them in water they look great and last awhile as you draw them.
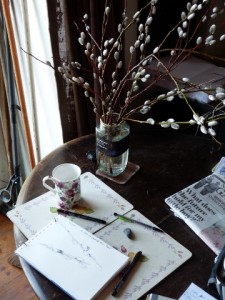 My set up for drawing. I set up the jar of buds by the patio windows, getting some natural light to work by. I like sitting here with my porridge in the morning to read and watch the birds outside.
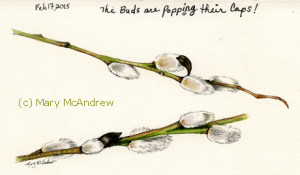 Painted with watercolor from live branches I brought inside. February 17, 2015 I really enjoy trying to paint the soft look of the buds and also showing that they are white. You can’t (well I can’t) help but stroke them and think of how it feels like the ear of my bunny I had years ago!
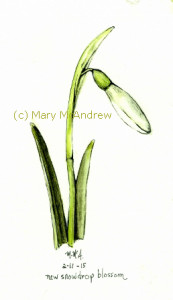 One of many snowdrops, done in ink and watercolor. February 11, 2015 Spring here in England, wouldn’t be spring without the Snowdrops! They were everywhere and lasted so long, a real promise of more spring flowers to come. I had planned to paint a Snowdrop open, but ran out of time. I took a lot of pictures though so maybe in the future?
 Unfinished sketch of a bit of Edlingham Valley. Here’s another from February; do you notice how small this is? It’s from one of my tiny 4.25″ x 5″ sketchbooks I like to use in the winter. (see pic below). It’s great for tucking in your pocket when you just might want to draw something interesting, and I draw while standing up so it’s easy to hold too.
 Finished watercolor 4.25″ x 5″, view in Edlingham, Northumberland. Later I finished the color on the trees and grasses. As the page says, it was cold that day!
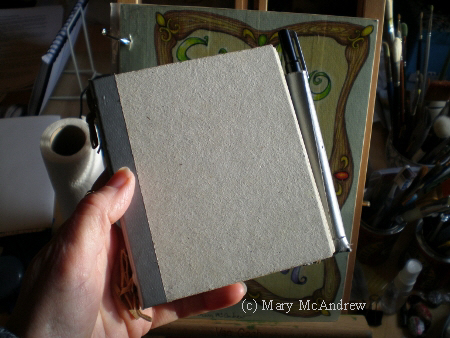
 This is one of the small sketchbooks I designed, it’s great for winter sketches because it’s small. There’s the sketchbook I made, designed complete with a pen holder made out of duct tape!
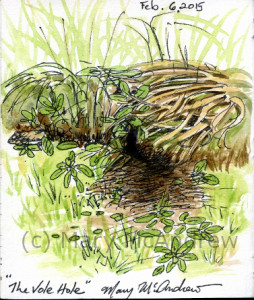 The Vole Hole, watercolor, 4.25″ x 5″. Another tiny one, done on the backside of the sketch of Edlingham Valley view. Who can resist a tiny hole belonging to a vole or mouse? I know my husband’s cat can’t but neither can I for different reasons. I just have this little childlike vision of cute mice straight from Beatrix Potter coming out of the holes. I like to practice drawing these kinds of homes for future stories I may illustrate.
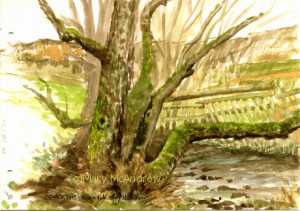
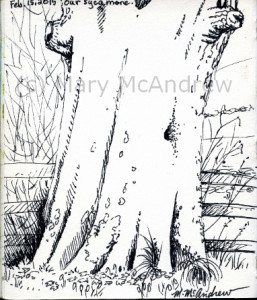 4.25″ x 5″ ink drawing of our ancient Sycamore. I did this sketch with the intention to study the wonderful colors that are on this tree. It’s an ancient Sycamore covered with lichens of many colors, mosses of green and the tree bark’s own reddish hue, just waiting (still) to be studied by my watercolors.
Well I think that’s all for this post, I still have lots of small spring sketches and watercolors to share soon though. Next time I’ll post some more photos too. I’ll be posting soon, stay tuned!
Winter has passed by and I’m still settling into my new life in England. I did some sketches as I could, being tired from unpacking, cleaning or just being overwhelmed in general. But happily I can see my sketching has increased as the months slip by and I will share all that in further posts to catch up.
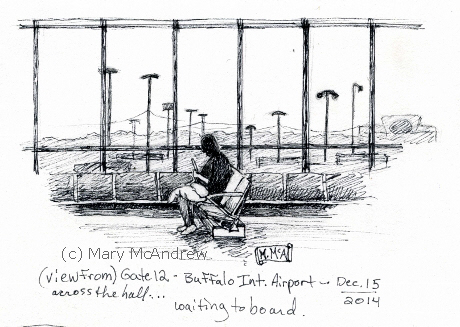
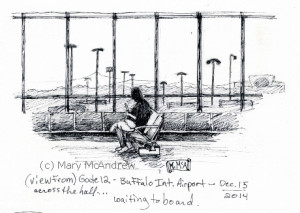 Waiting at Gate 12, Buffalo International Airport…the big day way back in December! Today I’m posting sketches I did way back in December and January. The one above I did while waiting in the Buffalo International Airport, Gate 12, for my flight to the UK. I like the way it came out, a person sitting ‘almost’ in silhouette in front of the huge windows. It definitely helped to pass the time and calm my nervous excitement.
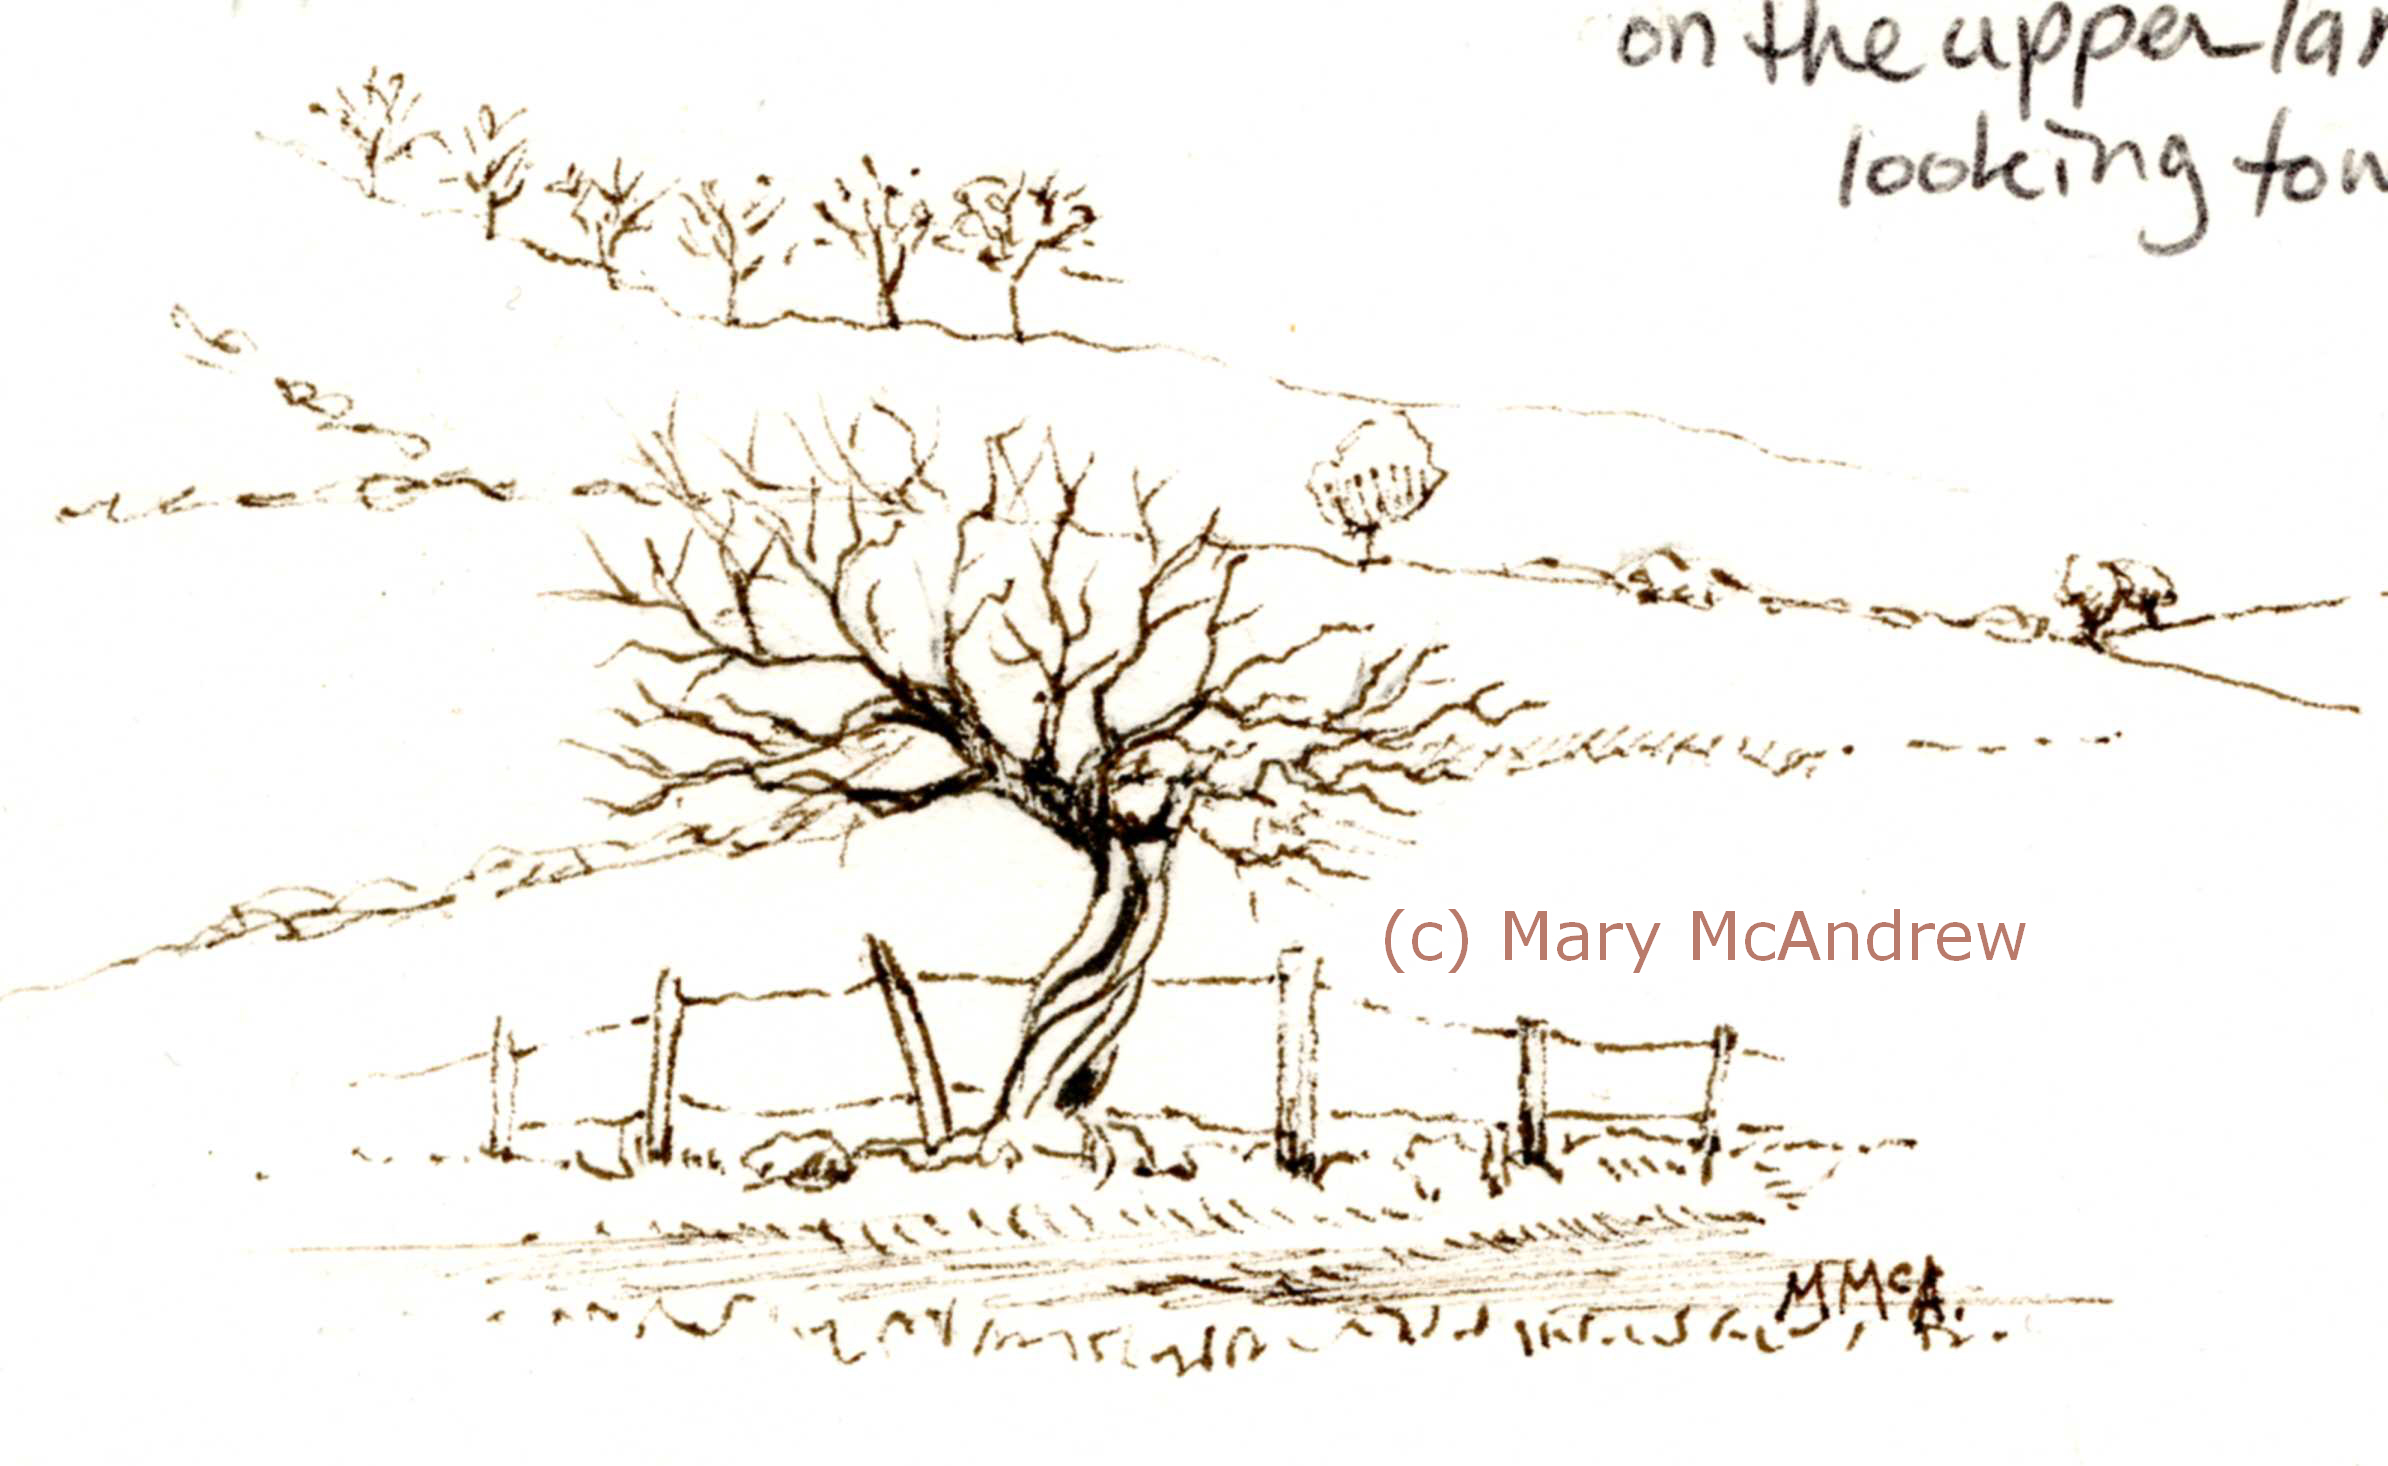
 Ink sketch of a very old Hawthorn in a farmers hedgerow. After I settled in I started walking in the mornings, mostly on my favorite lane above the village. Just like at ‘home’ in New York, sketching in winter I mostly use very small pocket sketchbooks. It’s just too cold to stand around freezing my fingers off, so I just do smaller quicker sketches; the most important thing is just to keep sketching.
The drawing above is actually tiny, done at the top of the page, but I like how it came out. It’s done with a brown Faber-Castell ink pen; I love using these pens. It’s a twisted little hawthorn along a sheep field, very exposed to the winds at the top of a ridge. I like it’s character because it reminds me of a bonsai tree. Some of the little trees you see hedges made of are actually very old trees that are trimmed all the time.
 “Tree on Upper Lane”, a rough sketch on a very cold day, using water soluble pencils that I haven’t wet yet! This sketch was done very quickly because it was so darn cold! I love walking on this one lane that goes out of our village because it’s lined with ancient trees and gorgeous views of distant hills and fields. I did it using water soluble pencil but wanted to scan it before I wet it. When you wet them they can get very dark and intense…it still waits for me to wet it with my brushes and mess around.
This is one of the small sketchbooks I designed. This is one of the small sketchbooks I designed, it’s great for winter sketches because it’s small. I made a pen holder out of duct tape and attached it to the back cover. I have another one that’s even smaller that I used at home a lot too, just loved sticking it in my barn coat pocket when I went walking.
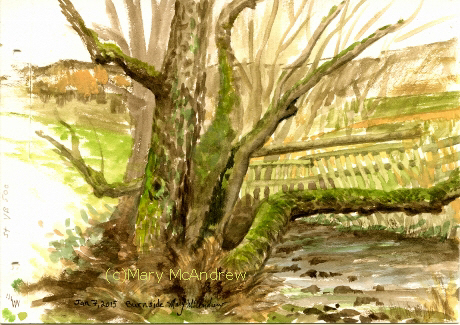
 Small watercolor done while sitting along the bank of Edlingham Burn, on a very cold day in January. January 7, 2015 – I walked down to Edlingham Burn (small river) and found a mossy rock to sit upon with this lovely view. Well maybe it’s hard to imagine from such a small sketch, but it was a view of the burn and moss covered trees everywhere, just lovely!
 Me in the freezing cold, painting Edlingham Burn. I was very cold painting this, I did it with mittens on mind you, no easy task! I sat on a bit of rock, cold and damp, but it felt so good to be out and finally messing with my watercolors, that I didn’t notice (until I got up, all stiff!) I used one medium sized waterbrush to do this.
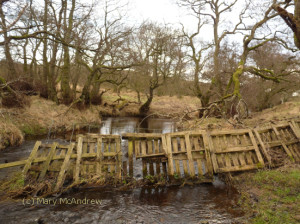 The livestock fence across the burn. Farmers use old pallets across small streams or ‘burns’ here, to keep sheep and cattle in sectioned off fields. I put it in the background of my watercolor sketch you can see above.
 A walk along the burn in January. This is Edlingham Burn, I walked along it looking for a spot to paint. Where the rest of the land was pretty bleak and bare, the river was/is fascinating to me. With all it’s mossy trees, ivy climbing everywhere, dry grasses draping over dark banks touching the cold water and the sound of splashing water, wonderful.
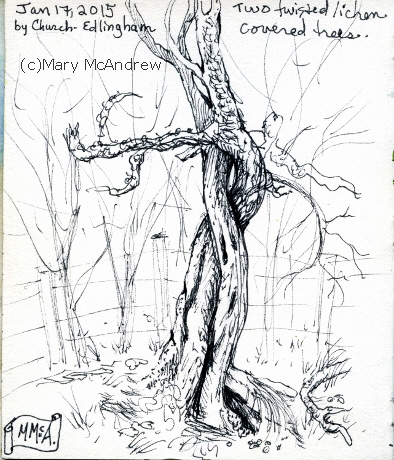
 From my small sketchbook, I love the way these two trees were twisting together. These two trees I found behind the old church, in the farmers field. I really like how this sketch came out. They twisted together, almost in an embrace, part lichen covered, part moss. Standing in a cold, bare hedge, naked of leaves or flowers, just waiting till spring! Maybe someday I’ll do a larger color study.
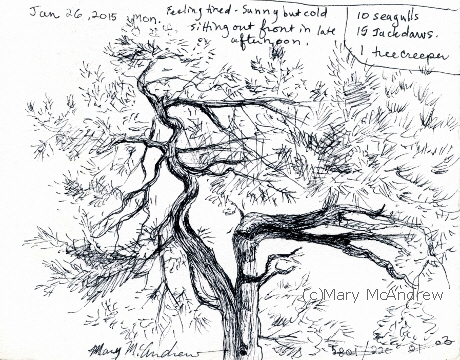
 Pine tree across the road from us, I noted the birds I saw while sketching it. January 26th – I did this sketch on a day where I was tired and not feeling particularly inspired. That’s an especially good time to stick to your small sketchbook, just do something small until you ‘do’ feel inspired. It helped me to focus and relax; practice is always a good thing. I noted the birds I saw while doing it, Seagulls, Jackdaws and a Tree Creeper.
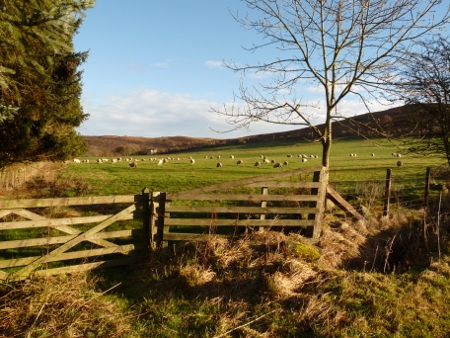
 A pretty view of sheep over a country fence. I thought I’d leave you with two more photos, from Jan. 6th on my morning walk. I love watching the sheep in the fields all around me, there are so many kinds here!
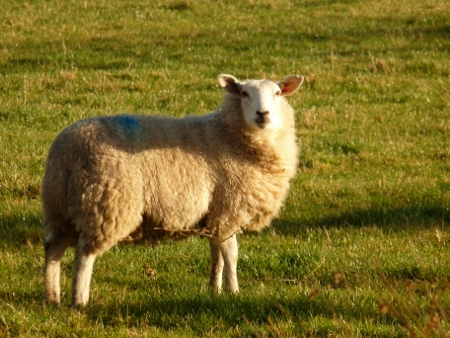
 A sheep wondering what I’m doing in her field. This little ewe was watching me, they run away if you get too close, so having a zoom is needed! They are all carrying lambs at this time and I can’t wait to see them in spring!
Check back for more updates, yes there are more sketches, paintings and photos to catch up with from this spring and I can’t wait to share them with you! Sign up in the right column with your email, if you want to be notified when I do new posts. Please leave me comments if you like!
(Please click pictures to see enlarged)
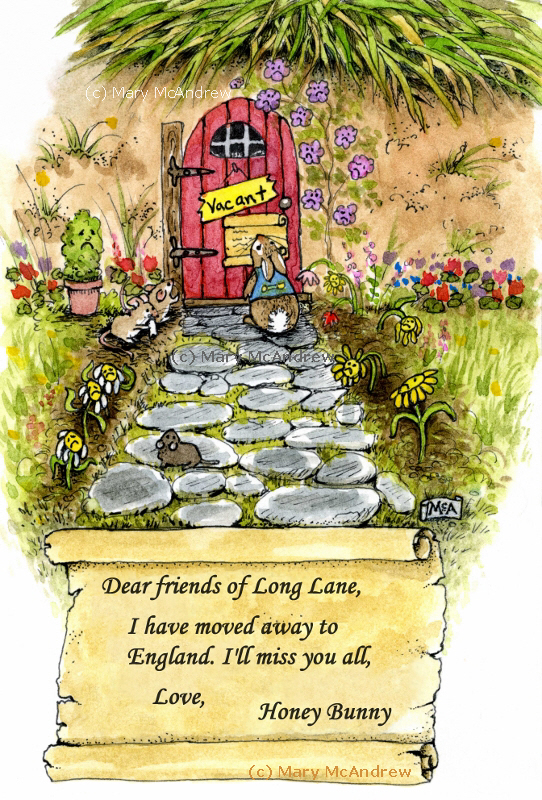
 Honey Bunny left a message for her friends at Long Lane. Honey Bunny made her decision, she’s moved away from Long Lane to England. But her little friends and she have promised to write to each other. She wants to know what happens back home and they want to hear about her adventures!
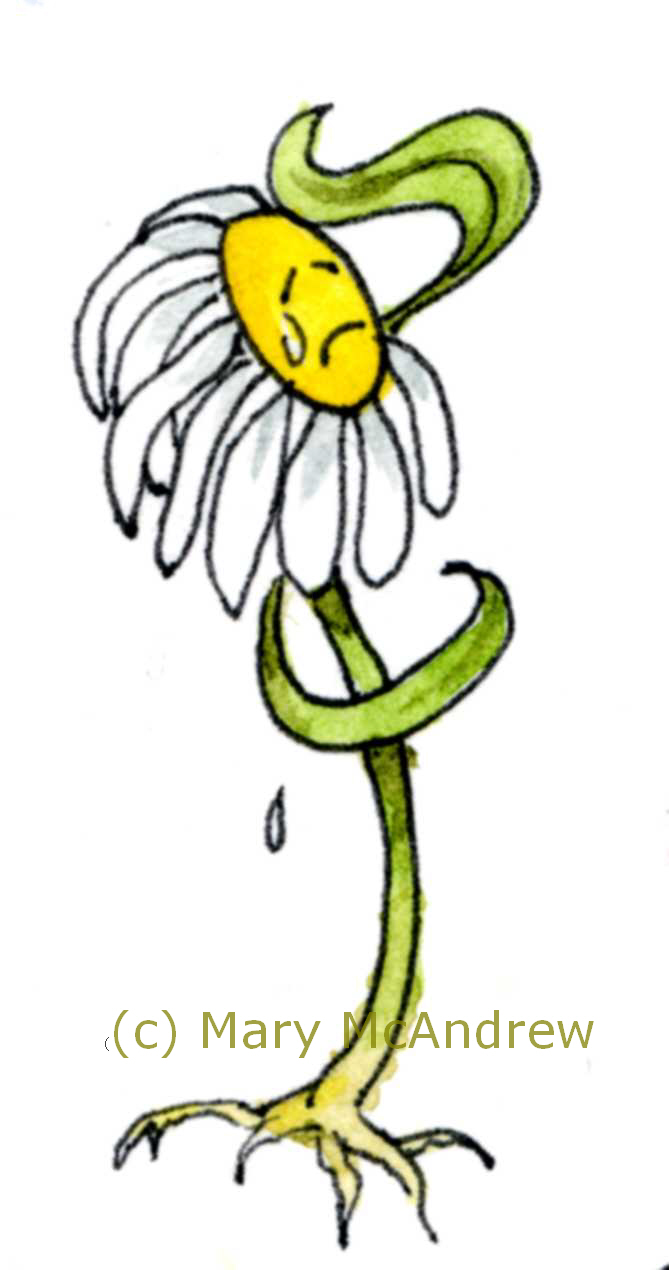
 The little flowers of her garden are sad. Her leaving has made the little flowers of her garden very sad. Honey Bunny always cared for the little living things at Long Lane and they all will miss her.
 Her little mice neighbors were sorry to see her leave. Her mice neighbors had lived near her at Long Lane for such a long time, they were very sorry to see her leave.
 Even the little insects were sad. When friends leave it can be very sad and lonely feeling but it can also mean something new and exciting is happening.
Life keeps expanding if you let it grow.

Well life has been expanding for me, as I am now sitting at my laptop in a cottage, in Northumberland England. Expansion doesn’t happen all at once, I guess if it did it would hurt! What I mean is I think it’s going to take me some time to settle in and feel like this is home. Before when I came, it was for long visits and it was all new and exciting. I’m not saying it isn’t new and exciting now, just that it does feel different. We don’t have that countdown of ‘days until I leave’ now and that’s such a relief!
But I do keep referring to the place I left, back in Clarence Center, New York, as home! I’ll give myself some slack with that; I still refer to the place I grew up, Endicott NY, as HOME. “Going home to Endicott”…I referred to it like this all the years my boys were growing up, so much that even they used to say…”when can we go home to Endicott and see Grandma and Grandpa?”
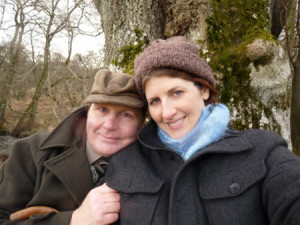
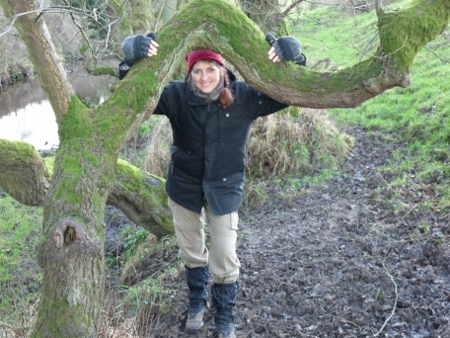
 Walking down the lane in a small village. But as they say “home is where the heart is”, and my heart is here with Gary, my soon to be husband. We share a love of nature and walking the hills, listening to good children’s stories and old tales and just being silly and laughing a lot. When I have a new idea for a story or character, and share it with him, it usually expands effortlessly, as he just ‘gets it’.
 Gary and I on a walk by a burn or creek. So as I explore my new gorgeous surroundings, I promise to share lots of photos here. The drawing, painting and felting are a bit on the back burner because we’re still working on arranging things to make room for my soon to arrive shipment. “Groan”….I have a lot of boxes and plastic bins coming!! (Remember all those boxes I kept packing?) But I DO miss my ‘stuff’ and can’t wait for it to arrive!
Well here’s a selection of photos from some of the walks I’ve taken. I’ve done a few little sketches but will share them later.
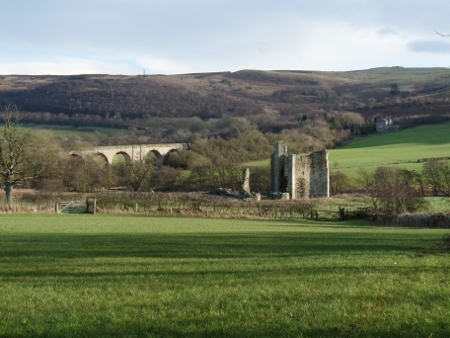
 Edlingham Castle and viaduct, right next to an 11th c church. The viaduct was built in the Victorian age and was part of a railway line; I’d like to do some sketches of it someday. The views are spread out here, that is you can see really far especially if you get up a hill, and I’ve noticed people just walk to things they can see.
 “My Northumberland!” from on top of the Crags looking down on the village. Like above, we walked up to the top of the Crags and you have an excellent view for miles and miles!
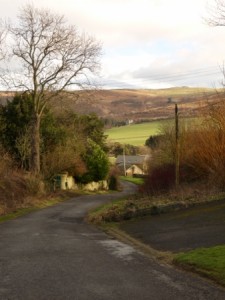
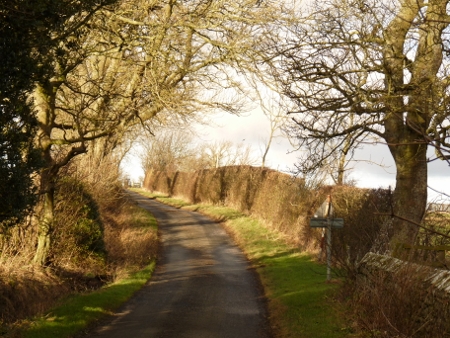
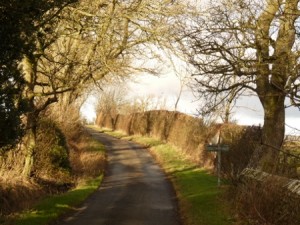 This is the upper or back lane to the village. This is the upper or back lane to the village and it’s one of my favorite (favourite 😉 ) places to walk…do you blame me?
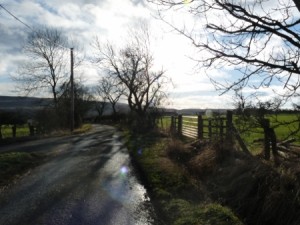 Another view on the upper lane, coming back. This is usually how the upper lane looks as I come back, with the sun low in the winter sky.
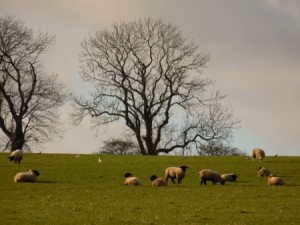 There are sheep everywhere! Most of the fields and hills have sheep on them. I can guess at three breeds- Norfolk, Scottish Black Face and Texel. They’re all nice but the Scottish Black Faced ones are especially bonnie!
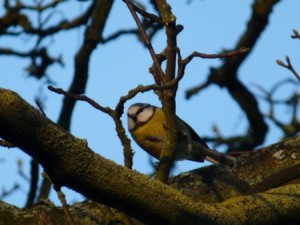 A tiny beautiful bird, the Blue Tit. There are all new birds here for me to learn too. I’m frustrated when I hear them sing or twitter and I have no idea ‘who’ it is! I’m getting good at identifying them on sight though.
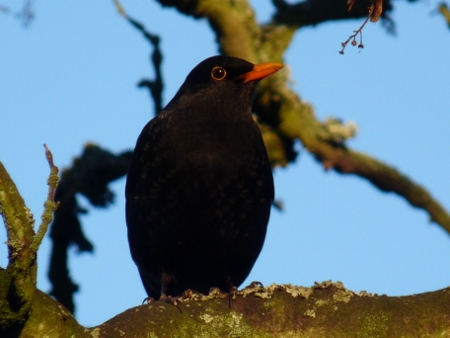
 A male Blackbird, in the thrush family and closely related to the American Robin. This beautiful bird is a male Blackbird…the same that were baked in a pie and that the Beatles sang about ‘singing in the dead of night’. They are thrushes just like ‘our’ American Robin; so things it does reminds me of it, and yes they’re known for their song!
 Walking down by the burn, wearing my gators! It’s spring. It’s muddy. When I go out walking and I put on my leg gators first, I’m always glad I did. The gators wrap around your lower leg and ankle and zip up. They stay put because of a strap that goes under your boot and a hook at your laces. I bought them years ago when I came here and just love them!
A walk along the burn in January. Can you see how beautiful this is? I love the tangle of roots, the moss covered trees and the branches that scraggle in all directions. I just hope I can start to capture it all when I start painting.
The livestock fence across the burn. Farmers use old pallets strung together across the burns or streams, to keep livestock in the proper pasture. I really like the way this one looks, like it’s blended in with it’s natural surroundings.
Well I’ll leave you here, time to go get busy. I’ll post more pictures as I go and hopefully some sketches. Please leave comments below as I love to hear from you all!
(Some of the images go to my shop where you can hover and see enlarged details)
Snowy Lane") Snowy Lane in black wax crayon colored with watercolor Even though I did this sketch back in December, while I was in Northumberland England, I guess it’s appropriate now seeing as there’s been a return of snow there! This was their first snow of the winter and it fell quite heavy for a time, coating everything with that heavy kind of silent snow. I had a cold but peaceful walk up the lane and stopped at this view with the trees I always like looking at. I did the sketch while standing to the side of the road using a black wax crayola crayon. The snow was falling on my paper as I drew and it made it hard to draw, not to mention drawing while wearing my fingerless mittens. It was later that I added some touches of watercolor.
P1260784") A lovely gate along the way I love the way this ivy covered gate looks and would love to do a painting of it. Problem is it’s someone’s front gate and with the house being just inside, they may think I’m being rude standing there staring at it.
P1260837 cr3") The snowy lane so quiet under snow This is one of my favorite views as the lane curves into the distance. You can see this is the view I stood and sketched in my drawing.
P1260835") Another view along the high lane The trees stand sentinel as they’ve done for hundred’s of years. Many of the trees you see along a lane are just overgrown from old hedges that weren’t kept trimmed down.
P1260816") The black faced sheep were quiet in the cold. I love how the trees look in the back of the field and how peaceful the sheep were, just trying to conserve energy I guess. These ewes are probably getting fat with lambs in them now…can’t wait to see the little ones in spring!
P1260805") The thick snowy hedge along the lane. P1260801") There are beautiful colors all around you even in winter! I like seeing the leaves in winter; these were interesting with the red spots. Sorry the picture isn’t brighter but the day was so grey!
P1260839") Just waiting to be put in a drawing! This is an old farm shed I always look at along the lane, it’s so old it’s actually fallen off it’s foundation and the sides are collapsed. I don’t usually want to paint old barns as some people do, but this with the trees, shrubs and grass with their colors in this shot, really attract me. I can see it as an ink sketch perhaps or chalk.
I hope you enjoyed coming on this little snowy walk with me. More sketches and photos from England coming soon.
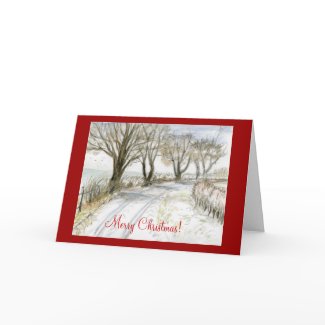
Click the picture below to see a glossy note card I created in my shop for Christmas! I even wrote a verse for the inside!
Glossy Note Card with customizable text
Today I saw a Goldcrest for the first time ever, but not the way I’d like to have seen it. This beautiful and tiny little bird flew right into the patio window while I was sat just on the other side of it. I’m pretty certain this is the same bird at home we call the Golden Crowned Kinglet.
goldcrest L") Tiny Goldcrest Studies in watercolor Poor little thing! I picked it up carefully with a paper towel and decided I’d do studies before putting it to rest in the field. I selected a nicely curled dry leaf to lay him on, it just seemed right for such a natural little creature. I sketched it out then added more detail then the layers of watercolor. I was fascinated by the tiny, hard black beak and little whiskers around it. The yellow crest was so beautiful, surrounded by black borders as if to hold the color in.
goldcrest R") Goldcrest studies in ink and watercolor The top drawing was done with permanent brown ink then I added just a touch of color. It’s amazing how long the claws are on such a small foot!
I hope to see a live one when I return to England, then I can do a painting from life! Much better I’d say!
Now I’ll freely admit, I’m WAY behind on my blog posting! I was doing so well at sketching all the time in my journal this summer and getting out for walks in my fields then sharing it with you, but life has been so busy this winter. I’ve been in Northumberland England the past few months and though I didn’t get as many paintings and sketches done as I would have liked, I do still have sketches and photos to share here. So I’ll try to post them even though they’re a little ‘old’!
This one is about a short walk to the ‘local’ castle, church and a spider in my front yard.
") Stone steps into the churchyard, access for people but not for sheep! Just down the road there’s a Church, St. John the Baptist, built in the 11c, and sometimes I go have a walk around the churchyard. My boyfriend doesn’t know why I think this is interesting but I’m just amazed at how old the gravestones are. I read the names and dates and think of the real people who lived long ago in this village.
 (450x338)") Gate latch at the church I love looking at old gates and this one is especially cool, the metal clasp lifts up so you can swing the gate open. Think of all the people over hundreds of years that have walked this path, maybe not the same gate but it’s been around awhile!
Oct 9 gravestone 1") Meet Me There carving on gravestone This is a popular carving theme on stones, the finger pointing upwards; I just love drawing banners too so I had to sketch it. It’s permanent ink pen, the date on this stone was 1900.
") Gate to the castle This picture was taken just next to the church, the gate on the left goes down a grassy lane to the castle in the distance, the one on the right goes into the farmers field, we won’t go that way! You can see an old viaduct in the distance, that used to be for a small railway that ran through this little town, I wish it was still here. The hills you see in the distance I climbed up with Gary, right to the top and oh what a view! Then we walked all the way back down and came over that viaduct and back to where I shot this picture. That was a looong walk for me!
 (450x338)") Edlingham Castle There’s the castle, not far now. This is Edlingham Castle built in the 12th c. On either side of the grassy path there are usually sheep or cows, remember the red cows I sketched not long ago? Here’s a link to Wikipedia about Edlingham Castle.
 (450x338)") Edlingham castle ruins You can walk all around this castle ruins for free, I like trying to imagine the original layout of it. You can see the viaduct in the background and the crags on the hill above that.
") Spider in the garden So I knew you’d be wondering, what about that spider you mentioned? Well when I got back from my stroll I discovered a spider in the front yard clinging to an old leaf and stem. Now I had to squat down and lean in really close to take this picture, I hope you appreciate how close I got to this spider to take it’s picture! I think spiders are really interesting but I still get scared of them and don’t want to touch them! shudder….
Oct 9 spider poem") Spider sketch and poem It had a web woven attached to it. I did a tiny sketch while crouched down to look at it, and I wrote the poem in bed one night after. I thought his web was like window panes in the air. Here’s the poem:
“Spider in the Garden”
Spider in the garden
What do you see?
A world through a web
Where we are all free.
Through your silver floss
Little windows in the air,
You watch us ignoring you
As if we didn’t care.
Mary McAndrew
October, 11, 2011
") Blackbird eating berries I’ll leave you with one more picture, a Blackbird (female) eating berries in the tree.
I know it’s already November and I’m way behind! I have more trouble getting online and having time to edit photos since I’ve been here in England. But I’m trying to go with the flow and keep up with posting my sketches and photos. I’m also using a tiny new laptop and my usual photo program isn’t on here, so I’m getting used to editing pictures with something new (sorry if they look small etc). I’ve also felt really down since my dad passed away and it’s hard to feel creative, as many of you probably know how that is.
But here’s a few cows to start off with! It’s what I see most of around where I’m staying so they’ve gotten my attention. I just love the velvety look of their fur in fall. The days have been very cold, damp and windy but I did these sketches standing along the field in the wind! Brrrr.
 Red Cattle in the Field, Oct 1 I wrote a poem as I watched them, just put a few words down then later I changed two words to make it better. I’ll retype it here:
“September ends…October is here,
The little Robin sings, Winter is near!
The red cattle in the field look so nice,
Fur like rust velvet, ready for Winter’s chill and ice.”
(c)Mary McAndrew 10-1-11
 Overthwarts on the Hill, watercolor The page above I did on October 2nd, it was windier, colder and wetter still than the day before! I wrote a note on the page about how hard it was to draw, of course I was wearing my fingerless mittens too and they are hard to paint in! There’s a farm called Overthwarts up on that hill as I looked from where I stood near Edlingham castle.
 Cows at rest and an Angle Shade moth, ink. The same day I walked a ways up the lane where it got even windier, I found some cows to sketch and sat down along the lane where I could see them through a break in the hedge. Getting down low really got me out of the worst of the wind.
Then another day an Angle Shade moth paid us a visit by coming inside, I guess it’s hibernation time! He didn’t want to leave. I put some sugar water in a little jar lid and he sucked it all up and grew very fat! Anything to help a little hungry wanderer. It hung around a few days just sitting there then disappeared, so I don’t know if he’s hiding out in the house or went back outside.
 The furry red cow eyed me warily Here’s one of the bovine beauties watching me, I tried to walk slowly and talk quietly to her but they are so skiddish, she turned away and made a retreat as I approached.
Well I hope you enjoyed my outdoor sketches, more to come, slowly but surely!
I had some fun creating note cards with cow (and sheep) photos I took in England, have a look in my shop!
|
Welcome to my Blog! The most up to date information about my artwork, nature sketching adventures, or step by step demonstrations. Search using Categories or Tags, or use the search box in the left column.
Please sign up below to get notified when I post new articles.
|


P1260816")
P1260805")
P1260801")
P1260839")
goldcrest L")
goldcrest R")
")
Oct 9 gravestone 1")
")
Oct 9 spider poem")
")


