Support This Site

If you like what I do please support me on Ko-fi

Mossy Fairy House in Ink

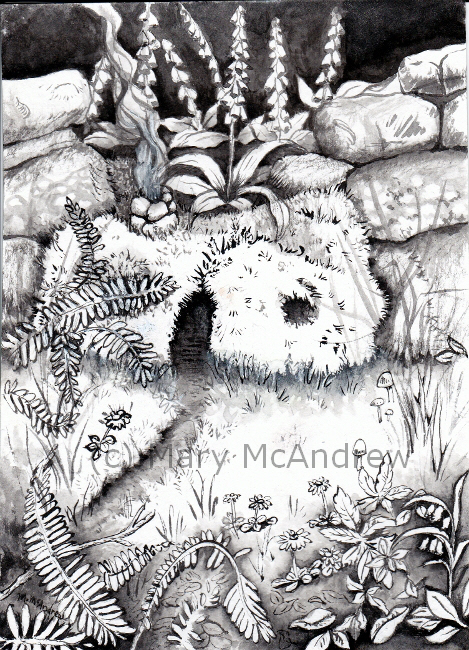
Hello everyone! As I said in my previous post about the toad in ink, I wanted to try and do some ink drawings in the month of October for what’s called “Inktober”. It’s a challenge that artists do to try and create ink artworks maybe everyday, but I knew I would never be able to do that!

So I did get this little drawing of the “Mossy Fairy House” done using inks and I did a bunch of fun cat cartoons. I’ll share them next time I think, there’s not many but it was a lot of fun! This Fairy House was a good practice for me as I did it entirely with brushes, no ink pen. I’ll show you from start to finish the stages it went through, it’s more interesting and educational in my opinion.

This shows the very beginning next to the reference photo.

I sketched my drawing out on a 5×7″ piece of bristol board that I taped to a piece of clear plexiglas. I like using this a lot in the studio, I use it like this and it’s easy to lay on top of reference materials or you can put a lamp behind when you need to trace from your sketch. I also put a piece in front of current illustrations that are leaning behind my easel on the table, don’t want any paint splashes on them now do we?

Anyways, the reference photo is one I shot years ago while hiking in the woods near our village, there is NO shortage of luscious moss growing here in England! It was growing on some rocks that had fallen down ages ago and to me, well it just looked like a Fairy house! What would you think if you saw it?

Starting to brush ink in, deciding how to make it look more ‘house’ like.

Then I started to brush ink in, trying to decide where to go with this, because the whole thing has got to come from my imagination. I added two ‘windows’ but never felt right about them. You can see I sketched rocks behind and added a chimney.

More ink as I pick out the rocks of the wall and put some smoke from the chimney.

More ink goes on as I pick out the rocks of the wall and put some smoke from the chimney. I also add one Digitalis or Foxglove flower behind. This grows commonly here and I love it, so do the bees!

I add more flowers and the path to the Fairy House.

Now I’m adding more flowers behind to fill it out (or fill it in however you want to look at it!), and I start to make a path lightly in grey wash. I also flick in some simple grass to start to set a scene, thinking all the time, “what will I put in the foreground?”. I would like to make it a nice illustration and add a fairy but nothing was hitting me.

I next do a bit on the stones on my mossy fairy house.

Then I start to add washes to the stones of the wall. This was fun because I got to look back through my reference photos of stone walls, which inevitably takes me MUCH longer than it should because I end up thinking about all the different walks it took to get all those photos! Actually more than that, it’s seeing so many photos of things I’d love to paint and this distracts me like crazy! Haha…oh well back to little mossy fairy house!


Now I’ve set up in front of my laptop so I could look for reference photos I’ve saved.

This photo shows I’ve moved off the easel, I’m done with that little reference photo and am looking up reference photos on my laptop to get inspired for the greenery in front. You can see how I’ve put my ink out, this is a little jar of Speedball Acrylic Ink, next to it is a small jar of water and they are sitting in a plastic paint mixing tray. The ink is permanent so I know I was taking a chance on permanently staining the tray, but it’s ok, I’ll use it for ink now. My brushes are resting on a tiny paintbrush stand I got years ago with a set of chinese brushes and ink. I have a small scrap of paper between the art and the ink, this is for testing marks etc. It kind of looks like I made a Jack O’Lantern face doesn’t it?

Now I add more ferns and flowers to the fairy house.

Ok, so the way the windows looked like two stark dots was bugging me, enter my husband. I like asking him his opinion as he has a sharp eye and doesn’t hold back on opinions! (though sometimes not what I want to hear!). He right away pointed out he didn’t like the windows, they looked too symmetrical, yes, that’s it, they had to be changed! It was nearly impossible to rub out or lift the black ink so I resort to illustrative techniques….out comes the white gel pen! I drew in pencil first how I wanted the fern to go and as you can see I added more in the foreground too. I drew on each leaf with the white pen to make it show, perhaps gouache would have worked well but it’s so tiny I opted for the pen.

Here’s a close up showing my waterbrush used to create a wash of ink around things.

You can see I have my waterbrush out now, this is great for making the soft shadows around the plants. I shot a video clip with my cell phone showing a bit of this. Next time I’ll try and set it up on a holder – tripod or something. I first paint the outline of the plant, then you can either let it dry and go back to it or try to quickly brush along the edge to draw the ink out. I usually like to get the drawing done first so I can think about where I want the ink wash shadows to go all together.

I was able to upload the clip to my YouTube channel, click here if you want to check it out! If anyone knows of some free program that compresses your videos please let me know in the comments, I have an awful time uploading videos.

Now we’re back on the easel, working on those plants!

Now we’re back at the easel and I’m working on adding more ferns, flowers and details in the foreground.

Almost finished!

Well we’re almost finished now, I lift a light patch inside the doorway, I really wanted to add something but felt the pressure of wanting to be done too. I’ve left a ‘free’ area on the grass in front of the Fairy House in case I come back to it later with a little fairy or creature. Something that bothered me about the drawing too is how I added so much dark under the house and it looked disconnected from the ground too much, do you know what I mean? So I tied it down a bit by adding grass blades with the help of the white pen and drawing grass with my ink.

And it’s finished!

Here’s the final drawing finished. It came out nicely I think, mostly I’m pleased with doing something that looks a bit different for my style. Adding the black background and darkness in the foreground I find to be exciting looking and graphic. I’m not happy about the smoke from the chimney and could have gone back with a wash of white gouache, but I really was trying to push myself to just use ink. Someday maybe a fairy will find it’s way in here, but that will probably be if I do another version of it. I was ready to say it’s done and get onto the next thing! I’ll share that next, some fun little cat cartoon drawings inspired by illustrator Edward Gorey!

I hope you enjoyed seeing the steps to this little ink drawing, please leave me a comment or any questions below. Cheers!